In the world of baked goods, few treats evoke the same warmth and nostalgia as chewy molasses cookies. These delightful cookies are a perfect blend of spices and sweetness, making them a favorite during the holiday season and beyond. The rich flavor of unsulfured molasses combined with soft, buttery dough offers a comforting bite that transports you back to simpler times. In this article, we will explore the art of creating these delectable cookies from scratch, providing you with a comprehensive guide to ingredients, techniques, and variations, along with the history behind this beloved recipe.
The Allure of Molasses Cookies
Exploring the Historical Significance of Molasses Cookies
The history of molasses cookies is deeply intertwined with the ingredient from which they derive their name. Molasses, a thick syrup produced during the sugar extraction process, has been a staple in baking since the colonial era. When Europeans settled in North America, they brought with them recipes and culinary traditions that featured this sweetener. The first molasses cookies likely emerged as a means to utilize this abundant and rich ingredient, transforming simple dough into a flavorful treat.
As time went on, the molasses cookie evolved, with variations emerging across different cultures and regions. In the United States, these cookies became particularly popular in the New England states, where the cold winters made their comforting, spiced flavor especially appealing. The use of ginger, cinnamon, and other spices in molasses cookie recipes reflects the early American penchant for bold flavors—an approach that resonates with many home bakers today.
Culturally, molasses cookies have held significance in various communities. They often appear in holiday celebrations, family gatherings, and as a cherished part of childhood memories. The act of baking molasses cookies, whether for a festive occasion or simply to enjoy with a cup of tea, serves as a reminder of home and tradition. This deep-rooted connection to family and festivity makes molasses cookies more than just a dessert; they are a symbol of warmth and togetherness.
Understanding the Ingredient Choices
The success of chewy molasses cookies lies in the careful selection and balance of ingredients. Each component plays a crucial role in achieving the perfect flavor and texture.
– Unsulfured Molasses: The star ingredient of this recipe, unsulfured molasses, is known for its rich, deep flavor. It adds sweetness while imparting a distinct taste that sets these cookies apart. Opting for unsulfured over sulfured molasses is essential, as the latter often carries a more bitter flavor due to the preservation process. The complexity of unsulfured molasses complements the spices in the cookie, creating a well-rounded taste.
– Granulated Sugar: While molasses provides a unique flavor, granulated sugar is essential for balancing sweetness and texture. It contributes to the cookies’ chewy consistency while enhancing the overall flavor profile. The combination of both sugars—granulated and molasses—results in a cookie that is both sweet and satisfying.
– Unsalted Butter: Using unsalted butter is vital for controlling the saltiness of the dough. Butter adds moisture and richness, resulting in a tender cookie. The unsalted variety allows for better control over flavor, as you can adjust the salt content as needed in the recipe.
– Dry Ingredients: The flour, baking soda, and spices are equally important. All-purpose flour serves as the base for the dough, providing structure. Baking soda acts as a leavening agent, helping the cookies rise slightly and contribute to their chewy texture. The blend of spices—typically ginger, cinnamon, and cloves—creates the signature flavor of molasses cookies, providing warmth and depth that keeps you coming back for more.
With a solid understanding of these ingredients, we can move on to the exciting part: creating these delightful cookies!
Step-by-Step Guide to Making Chewy Molasses Cookies
Preparing Your Kitchen for Baking
Before diving into the baking process, it’s essential to prepare your kitchen for a seamless baking experience. Having the right tools and setting up your workspace efficiently can make all the difference.
Essential Baking Tools and Equipment
1. Mixing Bowls: You’ll need a large mixing bowl for combining your wet and dry ingredients, as well as a smaller bowl for creaming the butter and sugar.
2. Measuring Cups and Spoons: Accurate measurements are crucial for successful baking. Use dry measuring cups for flour and sugar and liquid measuring cups for molasses.
3. Electric Mixer: A stand mixer or hand mixer will make the creaming process quick and easy, ensuring a well-mixed dough.
4. Spatula and Rubber Scraper: These tools are perfect for scraping down the sides of your mixing bowl and ensuring that all ingredients are combined evenly.
5. Baking Sheets: Choose heavy-duty baking sheets to prevent warping and ensure even baking. Lining them with parchment paper can also help prevent sticking.
6. Cooling Rack: Once your cookies are baked, a cooling rack allows air circulation, preventing them from becoming soggy.
Setting Up Your Workspace for Efficiency
Organizing your kitchen can streamline the baking process. Clear off your countertop and gather all your ingredients and tools before you start. This preparation not only saves time but also minimizes the risk of forgetting any ingredients.
Importance of Ingredient Temperature and Preparation
For the best results, ensure that your butter is at room temperature before you begin. Room temperature butter creams more easily with sugar, resulting in a light and airy texture. Similarly, other ingredients like eggs should also be at room temperature. This practice helps the dough come together smoothly.
Gathering the Ingredients
Now that your kitchen is prepared, let’s take a closer look at each ingredient needed for our chewy molasses cookies.
1. Unsulfured Molasses: Look for high-quality unsulfured molasses at your local grocery store or specialty shop. It should have a rich, dark color and a robust flavor.
2. Granulated Sugar: Use standard granulated sugar for sweetness. Be sure to check for any clumps, as they can affect the texture of your dough.
3. Unsalted Butter: Choose a good-quality unsalted butter for the best flavor. If you’re opting for organic or grass-fed butter, it will enhance the richness of your cookies.
4. All-Purpose Flour: A staple in most kitchens, all-purpose flour provides the structure needed for your cookies. Make sure to store it in an airtight container to maintain its freshness.
5. Baking Soda: This leavening agent is crucial for achieving the right texture. Ensure your baking soda is fresh by checking the expiration date.
6. Spices: Ground ginger, cinnamon, and cloves are typically used. Choose fresh spices for the best flavor, as old spices can lose their potency.
7. Egg: One large egg is necessary for binding the ingredients together. Ensure it’s at room temperature for optimal mixing.
Suggestions for Ingredient Substitutions
If you find yourself without certain ingredients, here are a few substitutions you can consider:
– Molasses: If you don’t have unsulfured molasses, you can substitute with dark corn syrup or honey, but this will alter the flavor slightly.
– Granulated Sugar: Brown sugar can be used as a substitute, adding a hint of caramel flavor.
– Butter: For a dairy-free option, consider using coconut oil or a vegan butter alternative.
– Flour: While all-purpose flour is recommended, you can try whole wheat flour for a heartier texture, though it may change the cookie’s flavor.
Mixing the Dough: Techniques for Success
Now that we have gathered all the necessary ingredients, it’s time to start mixing the dough. The process is simple yet requires attention for the best results.
The Method for Creaming Butter and Sugar
1. Start by adding the room temperature butter and granulated sugar into a large mixing bowl. Using an electric mixer, beat them together on medium speed until the mixture is light and fluffy. This process typically takes about 3-5 minutes, and it’s important not to rush it, as proper creaming incorporates air into the dough, contributing to a soft texture.
2. Once the butter and sugar are well combined, add the unsulfured molasses and the egg to the mixture. Continue to mix until everything is fully incorporated. Scrape down the sides of the bowl as needed to ensure all ingredients are well combined.
Incorporating Molasses and Egg Effectively
Mixing in the molasses and egg should be done gradually. Begin by adding the molasses first, ensuring it blends seamlessly with the creamed butter and sugar. Then, crack the egg into the bowl, and mix until you have a smooth and cohesive mixture. The combination of molasses and egg not only adds flavor but also contributes to the chewy texture of the final cookies.
Now that we’ve covered the initial steps of preparing your kitchen, gathering ingredients, and mixing the dough, you’re well on your way to creating a batch of delightful chewy molasses cookies. Stay tuned for the next part, where we will dive into the details of shaping, baking, and enjoying these timeless treats!
Importance of Not Overmixing When Adding Dry Ingredients
When it comes to baking, the method of mixing can significantly affect the final product. This holds especially true for chewy molasses cookies. Once you combine the wet and dry ingredients, it is crucial to mix just until incorporated. Overmixing can lead to a denser cookie, as it develops the gluten in the flour. This is not what you want for chewy cookies; instead, you aim for a tender, soft texture that melts in your mouth. So, as you fold your dry ingredients into the wet mixture, do so gently and with purpose, ensuring that no dry flour remains but avoiding overly vigorous mixing.
Chilling the Dough: Why It Matters
The Science Behind Chilling Cookie Dough
Chilling cookie dough is an essential step that many bakers overlook. When you chill the dough, you allow the fat (usually butter) to solidify again after being creamed with the sugars. This solidification helps the cookies retain their shape during baking, preventing them from spreading too much. Additionally, chilling allows the flour to fully hydrate, enhancing the cookie’s texture and flavor as the ingredients meld together.
How Chilling Affects the Final Texture of the Cookies
The temperature of the dough directly influences the final texture of your cookies. If you bake your cookies with warm dough, they tend to spread out excessively, leading to thin, crispy edges rather than the desired chewy centers. By chilling the dough, you achieve thicker cookies with a delightful chewiness. Ideally, you should chill your molasses cookie dough for at least 30 minutes, but for even better results, consider letting it rest in the fridge for 1-2 hours or even overnight.
Shaping and Rolling the Cookies
Techniques for Forming Uniform Cookie Balls
Once the dough has chilled, you’re ready to shape your cookies. To create uniform cookie balls, use a cookie scoop or tablespoon to portion out the dough. This ensures that your cookies bake evenly and maintain consistent sizes. Roll each portion gently between your palms to form smooth, round balls without applying too much pressure, which could cause the cookies to become dense.
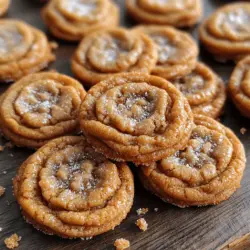
The Process of Rolling in Sugar for Texture and Sweetness
Before baking, roll each cookie ball in granulated sugar. This step is not just for sweetness; the sugar coating caramelizes as the cookies bake, adding a delightful crunch that contrasts beautifully with the chewy interior. It also enhances the visual appeal of your cookies, giving them a sparkling finish.
The Importance of Spacing on the Baking Sheet
When placing your cookies on the baking sheet, be mindful of spacing. Cookies need room to spread as they bake. A good rule of thumb is to leave about 2 inches between each cookie ball. This spacing prevents them from merging into one another and ensures even baking. If you’re baking multiple trays, it’s wise to rotate the trays halfway through baking to promote uniform cooking.
Baking the Perfect Chewy Molasses Cookies
Understanding Oven Temperature and Baking Times
Getting your oven temperature right is crucial for baking cookies. Preheat your oven to 350°F (175°C). This step ensures that the cookies start baking immediately as they go in, setting the structure and texture you desire. An oven thermometer can be a useful tool to ensure accuracy, as many home ovens may be off by several degrees.
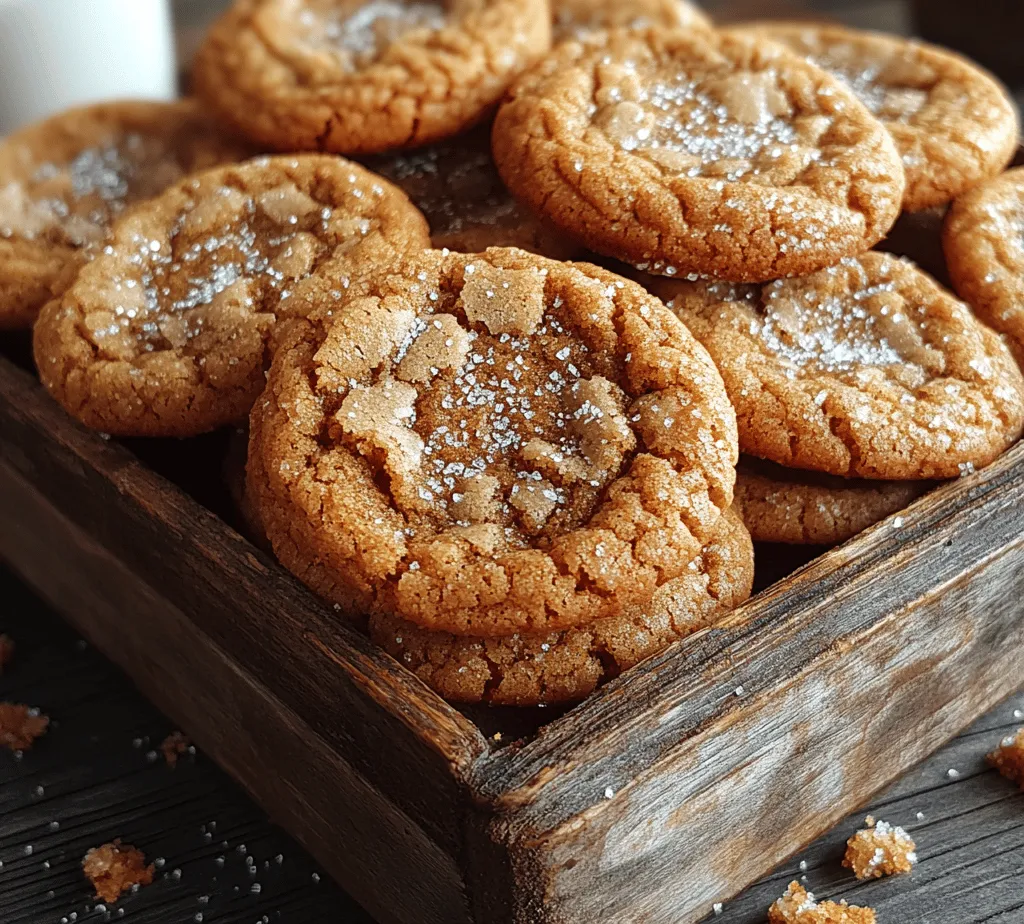
How to Recognize the Right Baking Window for Chewy Cookies
Chewy molasses cookies typically require about 10-12 minutes of baking time. Keep an eye on them as they approach the 10-minute mark. The cookies are done when the edges appear set and lightly golden, while the centers remain soft and slightly underbaked. They will continue to firm up as they cool on the baking sheet.
Tips for Testing Doneness Without Overbaking
To check for doneness without overbaking, gently press the center of a cookie with your fingertip; it should spring back slightly. If it leaves an indentation, give them an additional minute or two. Remember that cookies will continue to cook on the baking sheet due to residual heat, so it’s better to err on the side of caution.
Cooling and Storing Your Cookies
The Best Way to Cool Cookies for Optimal Texture
Once your cookies are out of the oven, transfer them to a wire rack to cool. This allows air to circulate around the cookies, preventing them from getting soggy on the bottom. Let them cool completely for the best texture; warm cookies are delicious but can be too soft to enjoy fully.
Storing Leftovers to Maintain Freshness
If you have leftover cookies (which is rare with such delicious treats), store them in an airtight container at room temperature. This will keep them fresh for up to a week. Placing a slice of bread in the container can help maintain moisture, ensuring your cookies stay chewy.
Freezing Options for Long-Term Storage
For longer-term storage, consider freezing your cookies. They freeze exceptionally well. Place cooled cookies in a single layer on a baking sheet and freeze until firm. Once frozen, transfer them to a freezer-safe bag or container, separating layers with parchment paper. Chewy molasses cookies can be kept in the freezer for up to three months. When you’re ready to enjoy them, simply thaw at room temperature or warm them in a preheated oven for a few minutes.
Serving Suggestions and Pairings
Creative Ways to Enjoy Your Chewy Molasses Cookies
Chewy molasses cookies are delightful on their own, but there are many ways to enhance the experience. Consider serving them warm with a scoop of vanilla ice cream for an indulgent dessert. The combination of warm cookie and cold ice cream creates a heavenly treat that will impress anyone.
Ideal Beverages to Accompany Your Cookies
Pair your cookies with a warm beverage to complement the spicy flavors of the molasses. A cup of hot tea, coffee, or even spiced cider makes an excellent accompaniment. The warmth of the drink enhances the cookie’s flavors and offers a comforting combination, perfect for cozy gatherings.
Serving Ideas for Gatherings and Special Occasions
For special occasions, you might consider presenting your chewy molasses cookies as part of a dessert platter. Combine them with other baked goods, like chocolate chip cookies, brownies, and seasonal treats. This variety can cater to different tastes and create a beautiful display that will be the centerpiece of any gathering.
How to Elevate Your Cookie Experience with Toppings or Dips
If you want to get creative, consider adding toppings or dips to your cookies. A drizzle of chocolate ganache or caramel sauce can elevate the flavor profile, adding richness and sweetness. Alternatively, serve your cookies with a side of spiced cream cheese frosting for dipping, giving a unique twist to the traditional cookie experience.
Conclusion: The Enduring Charm of Chewy Molasses Cookies
Chewy molasses cookies are more than just a sweet treat; they embody a rich tapestry of flavors, history, and the simple joy of baking. With their warm spices and perfectly chewy texture, these cookies stand out as a timeless favorite for all ages. By following the steps outlined in this article, you’ll not only master the art of making these delightful cookies but also appreciate the journey of traditional baking. Whether enjoyed fresh from the oven or shared with loved ones, chewy molasses cookies continue to bring warmth and happiness to our homes. Indulge in the process, savor the results, and let these cookies remind you of the joy found in every bite.