Introduction
There’s something inherently delightful about the aroma of freshly baked breadsticks wafting through your kitchen. The allure of homemade breadsticks is universal, evoking cozy nights in with family, gatherings with friends, or even just a comforting meal for one. These Crunchy Garlic Herb Breadsticks, in particular, elevate the classic side dish to new heights, offering a perfect balance of flavor, texture, and simplicity.
When you think of a perfect accompaniment to pasta dishes, soups, or salads, nothing quite compares to the experience of biting into a warm, crunchy breadstick. The combination of garlic and herbs infuses each bite with rich flavors, while the crispy exterior contrasts beautifully with the soft, chewy inside. This recipe not only promises to satisfy your cravings but also allows you to impress your guests with your culinary skills.
In this article, we will delve into the art of crafting these irresistible breadsticks, exploring the essential ingredients and techniques that will make them a staple in your kitchen. Whether you’re a seasoned baker or a novice in the kitchen, this recipe is designed to be approachable and rewarding, ensuring that the heartwarming smell of freshly baked breadsticks can soon become a regular feature in your home.
Understanding the Basics of Breadstick Dough
Before we dive into the preparation of Crunchy Garlic Herb Breadsticks, it’s essential to understand the basic components of breadstick dough. The magic behind any great breadstick lies in its ingredients, each playing a crucial role in creating the desired texture and flavor.
Key Ingredients
1. All-Purpose Flour: This is the backbone of your breadstick dough. All-purpose flour provides the necessary structure and strength to the breadsticks. While you might be tempted to experiment with other flours, all-purpose flour strikes the perfect balance for achieving that ideal chewy texture combined with a crunchy crust.
2. Yeast: The leavening agent in this recipe, yeast is responsible for making your breadsticks rise. It ferments the sugars in the dough and produces carbon dioxide, creating small pockets that give your breadsticks a light, airy quality. Using fresh yeast will yield the best results, but active dry yeast can also be used effectively.
3. Sugar: This ingredient serves a dual purpose. It not only adds a hint of sweetness to balance the savory flavors but also provides food for the yeast, promoting better fermentation and rising. Just a teaspoon is sufficient for this recipe.
4. Salt: Essential for flavor, salt also plays a critical role in regulating yeast activity. It strengthens the dough by enhancing gluten formation, ensuring a better texture in your finished breadsticks. A careful balance of salt is necessary to avoid overpowering the other flavors.
5. Warm Water: Activating the yeast requires warm water, typically between 100°F to 110°F (37°C to 43°C). This temperature range is perfect for encouraging yeast activity without killing it. Water also hydrates the flour, enabling gluten development, which contributes to the structure of the dough.
6. Olive Oil: This ingredient adds moisture and flavor to the dough, contributing to its richness. Olive oil also helps create a tender texture and can impart a subtle herbal taste that complements the garlic and herbs in the recipe.
The Kneading Process
Once you have your ingredients ready, kneading is a crucial step in developing the texture of your breadsticks. Kneading helps to strengthen the gluten in the flour, which in turn provides the necessary elasticity and structure. The dough should be kneaded until it becomes smooth and elastic, typically about 8-10 minutes by hand or 5-7 minutes using a stand mixer. A well-kneaded dough will bounce back when pressed gently and will not stick excessively to your hands or the work surface.
If you encounter sticky dough, don’t panic. Instead, sprinkle a little flour on your work surface and your hands, incorporating just enough to make the dough manageable. However, be cautious not to add too much flour, as this can result in dry breadsticks.
Step-by-Step Preparation of Crunchy Garlic Herb Breadsticks
Now that you understand the importance of each ingredient and the kneading process, let’s dive into the preparation of your Crunchy Garlic Herb Breadsticks.
Preparing the Dough
Combining Dry Ingredients
Start by measuring out your all-purpose flour, sugar, and salt. In a large mixing bowl, combine 2 ½ cups of all-purpose flour, 1 teaspoon of sugar, and 1 teaspoon of salt. Stir these dry ingredients together until well mixed. This step ensures that the yeast will be evenly distributed throughout the dough, promoting uniform rising and flavor.
Gradually Incorporating Water and Oil
Next, you will prepare the yeast mixture. In a separate bowl, combine 1 packet (2 ¼ teaspoons) of active dry yeast with 1 cup of warm water. Allow the mixture to sit for about 5-10 minutes until it becomes frothy. This bubbling action confirms that your yeast is active and ready to work.
Once the yeast is activated, slowly pour it into the bowl with your dry ingredients. Add 2 tablespoons of olive oil at the same time. Using a wooden spoon, gradually mix the wet ingredients into the flour mixture until it starts to come together. You may notice that the dough will look shaggy at this point, which is perfectly normal.
Kneading Techniques
With the mixture coming together, it’s time to knead. Turn the dough out onto a lightly floured surface. Using your palms, push the dough away from you, then fold it back over itself. Rotate the dough a quarter turn and repeat this motion. Continue until the dough is smooth and elastic, which typically takes about 8-10 minutes by hand.
If you’re using a stand mixer, attach the dough hook and mix on low speed until the dough starts to pull away from the sides of the bowl. Increase the speed to medium and continue mixing for an additional 5-7 minutes, or until the dough is smooth and elastic.
Troubleshooting Sticky Dough
If your dough feels excessively sticky, resist the urge to add too much flour. A little stickiness is normal and can be managed with a gentle touch. If it’s too sticky to handle, add just a tablespoon of flour at a time until it reaches a workable consistency.
First Rise: Importance and Process
Once your dough has been kneaded to perfection, it’s time for the first rise. This step is crucial for developing flavor and texture. Place your dough in a lightly greased bowl, cover it with a damp kitchen towel or plastic wrap, and find a warm, draft-free spot for it to rest. The ideal temperature for rising dough is around 75°F to 80°F (24°C to 27°C).
Allow the dough to rise until it has doubled in size, which typically takes about 1 to 1.5 hours. Factors such as temperature and humidity can affect rising time, so keep an eye on your dough. A good visual cue is to gently poke the dough with your finger; if the indentation remains, it’s ready for the next step.
Shaping Your Breadsticks
Once the dough has risen satisfactorily, it’s time to shape your breadsticks. Begin by gently deflating the dough on a lightly floured surface. This step releases excess gas that has built up during the first rise.
Dividing and Shaping Dough
Using a bench scraper or a sharp knife, divide the dough into equal portions. For traditional breadsticks, aim for pieces that are about 1 inch wide and 6-8 inches long. This uniformity not only provides a professional appearance but also ensures even baking.
To shape each piece, roll it gently between your hands and the work surface until it forms a smooth stick. Be mindful not to overwork the dough during this phase, as this can lead to tough breadsticks.
Importance of Uniformity in Shape for Even Baking
Uniformly shaped breadsticks will bake more evenly, with each stick achieving that perfect combination of crunch and chewiness. Once shaped, place them on a baking sheet lined with parchment paper, allowing enough space between each stick to account for their expansion during the second rise and baking.
In the next part of this article, we will explore the crucial final steps in the preparation of your Crunchy Garlic Herb Breadsticks, including the second rise, the garlic herb topping, and the baking process that will lead to the ultimate flavor and texture. Stay tuned as we guide you through the finishing touches that will make your homemade breadsticks an unforgettable addition to any meal.
Creative Shaping Options for Variety
When it comes to breadsticks, creativity in shaping can add a delightful twist to your culinary repertoire. Traditional straight breadsticks are a classic, but experimenting with different shapes can elevate your presentation and enhance the dining experience. Here are some fun and creative shaping ideas to consider:
1. Twists: To create twisted breadsticks, take a section of dough and roll it into a long rope. Then, hold both ends and twist the dough several times before placing it on the baking sheet. This technique not only adds visual appeal but also creates a crispy texture on the outer layer.
2. Knots: For a charming knot shape, roll the dough into a long strip and tie it into a loose knot. Ensure the ends are tucked underneath to avoid unraveling during baking. This shape is particularly good for soaking up dips.
3. Braided Sticks: For a more intricate design, divide the dough into three equal parts and roll each into a long rope. Braid the three strands together and tuck the ends under. This shape offers a beautiful presentation and a delightful chewiness.
4. Crescent Shapes: Roll your dough into triangles and roll them up from the wider end to the tip, forming crescent shapes. This is a playful way to present your breadsticks, making them perfect for dipping in sauces.
These creative options not only enhance the visual appeal of your garlic herb breadsticks but also invite your guests to enjoy a variety of textures and flavors in each bite.
Flavoring the Breadsticks
The magic of garlic herb breadsticks lies in the topping, which transforms simple bread into a flavor-packed delight. Here’s a detailed breakdown of how to achieve the best garlic herb topping:
Garlic Herb Topping
1. Fresh vs. Dried Herbs: While dried herbs are convenient and offer a concentrated flavor, fresh herbs can significantly enhance the taste of your breadsticks. Fresh herbs like parsley, basil, or thyme bring brightness and freshness to the dish. When using fresh herbs, chop them finely to allow their oils and flavors to infuse the breadsticks fully. If you’re using dried herbs, remember they are more potent, so you’ll need less—typically one-third of the amount compared to fresh.
2. Crushed Red Pepper Flakes: For those who enjoy a touch of heat, crushed red pepper flakes are a fantastic addition. They provide a subtle kick that pairs beautifully with the garlic and herbs. Start with a small pinch and adjust according to your spice tolerance.
3. Techniques for Applying Toppings: To ensure an even distribution of your garlic herb mixture, combine minced garlic, chopped herbs, olive oil, and any additional spices in a bowl. Use a pastry brush to apply the mixture over the breadsticks before baking. This technique not only enhances flavor but also helps create a beautiful golden crust.
Second Rise and Baking
The second rise is a crucial step in bread-making that contributes to the lightness and fluffiness of your breadsticks. Here’s how to ensure that your second rise is successful:
1. Importance of the Second Rise: Allowing the shaped breadsticks to rise a second time is essential for developing a light texture. This process allows the yeast to produce gas bubbles, which will expand during baking and create an airy structure.
2. Timing and Conditions: After shaping your breadsticks, cover them with a clean kitchen towel or plastic wrap to avoid drying out. Let them rise in a warm, draft-free area for about 30 minutes to an hour, until they have doubled in size. If your kitchen is cool, you can create a warm environment by preheating your oven to 200°F (93°C) for a few minutes, turning it off, and placing the breadsticks inside.
3. Baking Tips: For achieving the perfect crust, preheat your oven to 375°F (190°C). A hot oven will help create steam, which is essential for a crispy exterior. If you want an extra crunchy crust, place a small oven-safe dish filled with water on the lower rack of your oven while baking.
4. Visual and Auditory Indicators of Doneness: Your breadsticks should be golden brown when done. To check for doneness, tap the bottom of a breadstick; it should sound hollow. Additionally, if you have a kitchen thermometer, the internal temperature should reach around 190°F (88°C).
Finishing Touches: Presentation and Serving
Once your garlic herb breadsticks are out of the oven, it’s time to give them the finishing touches that will make them irresistible:
1. Brushing with Olive Oil: After baking, brush the warm breadsticks with olive oil to enhance their flavor and keep them moist. This step not only adds richness but also helps the herbs stick better to the surface.
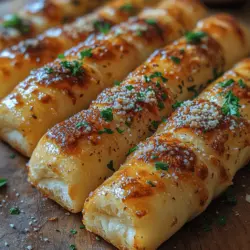
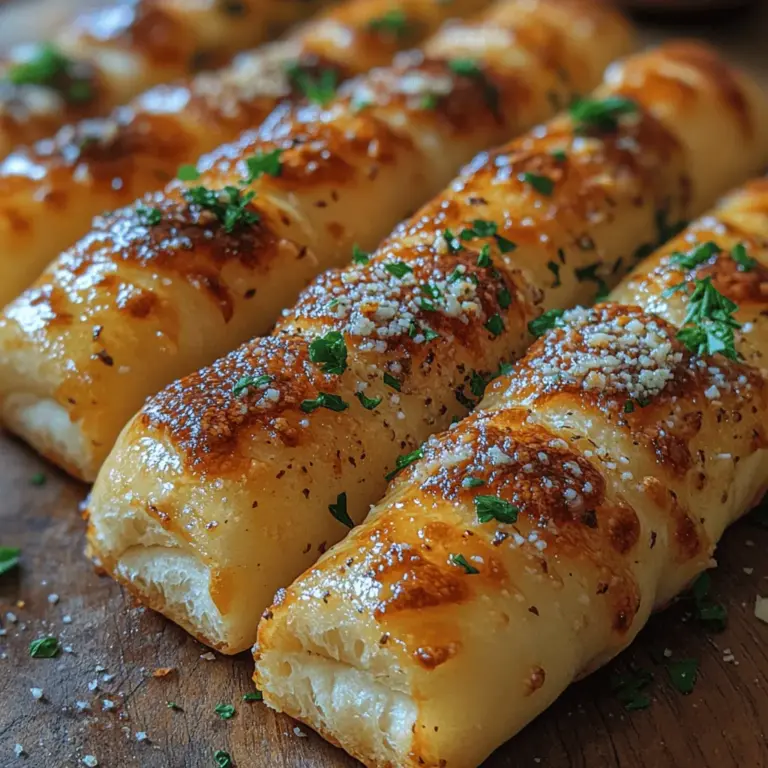
2. Garnishing with Fresh Parsley: For an extra pop of color and flavor, sprinkle freshly chopped parsley over the breadsticks before serving. This not only elevates their appearance but also adds a fresh herbaceous note.
3. Suggestions for Serving: Garlic herb breadsticks are incredibly versatile. They make a fantastic accompaniment to soups, salads, or pasta dishes. You can also serve them alongside a variety of dips such as marinara sauce, garlic butter, or creamy ranch dressing. For a fun appetizer, try pairing them with hummus or tzatziki.
4. Culinary Uses Beyond a Side: These breadsticks can also shine as a standalone snack or appetizer. Serve them at parties, game nights, or family gatherings. Their delightful flavor and aroma will surely impress your guests.
Nutritional Analysis of Garlic Herb Breadsticks
Understanding the nutritional aspects of your homemade garlic herb breadsticks can help you appreciate them even more:
1. Key Ingredients and Nutritional Benefits: The primary ingredients in your breadsticks include flour, olive oil, garlic, and herbs. Whole wheat flour can be used for added fiber and nutrients. Olive oil is rich in healthy fats, while garlic has numerous health benefits, including anti-inflammatory properties and heart health benefits.
2. Comparison to Store-Bought Alternatives: Homemade garlic herb breadsticks are generally healthier than store-bought versions, which often contain preservatives, artificial flavors, and more sodium. By making them at home, you can control the ingredients, ensuring a fresher and more wholesome option.
3. Dietary Modifications: For those with dietary restrictions, consider using gluten-free flour blends to create a gluten-free version of these breadsticks. Additionally, you can reduce the cheese or use dairy alternatives to cater to vegan diets.
Conclusion
Homemade garlic herb breadsticks are a delightful addition to any meal, bringing warmth and comfort to the dining table. The joy of making them extends beyond the simple act of baking; it’s about experimenting with flavors, exploring different shapes, and creating something special for yourself and your loved ones. These breadsticks are not just a side; they can be a centerpiece of your gatherings, inviting everyone to enjoy their warm aroma and delicious taste.
As you embark on your baking journey, don’t hesitate to experiment with various toppings, shapes, and flavors. Whether it’s adding a sprinkle of cheese, a dash of lemon zest, or even incorporating different herbs, the possibilities are endless. Incorporate these garlic herb breadsticks into your family meals or special occasions, and watch them become a favorite that everyone looks forward to. Happy baking!