Introduction
Focaccia bread is a delightful staple of Italian cuisine, loved for its rich flavor and versatile nature. Originating from the ancient civilizations of the Mediterranean, this flat oven-baked bread has become a favorite across various cultures and kitchens around the world. Its popularity can be attributed to its unique texture and ability to pair seamlessly with a variety of dishes, from antipasto to sandwiches. Whether enjoyed as a simple side, topped with vibrant seasonal vegetables, or served as a base for creative culinary concoctions, focaccia bread is a true crowd-pleaser.
In recent years, the no-knead method of baking has gained traction among home bakers and culinary enthusiasts alike. This approach simplifies the bread-making process, making it accessible to anyone, regardless of their baking experience. By allowing time and fermentation to work their magic, no-knead recipes result in beautifully airy and fluffy breads without the need for labor-intensive kneading. This method not only saves time but also yields a focaccia that boasts a light and cloud-like texture, perfectly suited for soaking up olive oil or dipping in balsamic vinegar.
The appeal of this Cloud-Like No-Knead Focaccia Bread lies in its impossibly soft interior and golden, crispy crust. The versatility of focaccia means that it can be customized with a range of toppings, from fresh herbs and sea salt to roasted vegetables and cheeses. In this article, we will delve into the intricacies of crafting this delectable bread, ensuring you enjoy the process as much as the finished product.
Understanding Focaccia
Focaccia, often referred to as “Italian flatbread,” is a unique type of bread known for its characteristic thickness and airy texture. At its core, focaccia is made with simple ingredients: flour, water, yeast, and salt. However, the magic happens in the preparation and baking process, which allows for a variety of textures and flavors.
The history of focaccia is as rich as its flavor. It dates back to ancient Rome, where it was referred to as “panis focacius,” meaning bread baked in the ashes. Over the centuries, focaccia has evolved into numerous regional variations, each showcasing the local ingredients and culinary traditions. In Liguria, for instance, the focaccia is often drizzled with olive oil and sprinkled with sea salt, while in Apulia, it may be topped with tomatoes and olives, reflecting the bountiful produce of the region.
Focaccia plays a significant role in Italian culture and cuisine. It is frequently served as a starter or accompaniment to meals, and it is a common feature on Italian tables during gatherings and celebrations. The bread’s ability to be enjoyed in various forms—whether plain, herb-infused, or generously topped—makes it a versatile choice that complements a wide array of dishes.
Ingredients Breakdown
To create the perfect Cloud-Like No-Knead Focaccia Bread, it’s essential to understand the role each ingredient plays in the recipe. Here’s a detailed breakdown of the key components you’ll need:
All-Purpose Flour
All-purpose flour is the foundation of this focaccia recipe. Its moderate protein content provides the necessary structure for the bread while allowing it to rise beautifully. For an optimal texture, it’s important to use high-quality flour that can absorb water effectively. If you want to experiment, you could substitute part of the all-purpose flour with bread flour for an even chewier texture.
Active Dry Yeast
Active dry yeast is the leavening agent responsible for fermentation and rising. When activated with warm water, the yeast begins to feed on the sugars in the flour, producing carbon dioxide and contributing to the bread’s fluffy texture. Using fresh yeast is crucial for achieving the desired results, so check the expiration date before starting your baking adventure.
Salt
Salt serves two primary functions in bread-making: enhancing flavor and controlling yeast activity. It’s important to incorporate salt into the dough to ensure a balanced flavor profile, as it elevates the taste of the focaccia. Additionally, salt helps to regulate the fermentation process, preventing the yeast from overactive and ensuring a well-risen loaf.
Warm Water
The temperature of the water is critical when activating yeast. Warm water—ideally between 100°F and 110°F—creates the perfect environment for the yeast to thrive. Water that is too hot can kill the yeast, while water that is too cold will slow down the fermentation process. Always measure the temperature of your water to avoid any mishaps.
Extra Virgin Olive Oil
Extra virgin olive oil is not just a delicious addition; it plays a vital role in the texture and flavor of the focaccia. It adds moisture to the dough and contributes to the bread’s golden crust. When baking focaccia, drizzling olive oil on top before baking not only enhances the flavor but also creates a beautifully crispy exterior. For an authentic touch, use high-quality olive oil with a robust flavor profile.
Fresh Herbs and Toppings
One of the best aspects of focaccia is its versatility when it comes to toppings. Fresh herbs, such as rosemary or thyme, can be scattered over the dough before baking to infuse the bread with aromatic flavors. You can also experiment with toppings like sea salt, caramelized onions, cherry tomatoes, or olives to create a personalized version that suits your taste preferences. The possibilities are endless, and this is where you can truly make the recipe your own.
Preparing the Dough
Now that you have gathered all your ingredients, it’s time to prepare the dough. Follow these step-by-step instructions to ensure a successful outcome:
1. Combine Dry Ingredients: Start by measuring out your all-purpose flour, salt, and active dry yeast. In a large mixing bowl, whisk together the flour and salt until well combined. It’s important to keep the salt and yeast separate at this stage, as direct contact can inhibit yeast activation.
2. Activate the Yeast: In a separate container, combine the warm water and active dry yeast. Allow the mixture to sit for about 5-10 minutes, or until it becomes frothy. This indicates that the yeast is activated and ready to work its magic.
3. Mix Wet and Dry Ingredients: Once the yeast is activated, pour the yeast mixture into the bowl with the flour and salt. Add in the extra virgin olive oil at this stage. Using a wooden spoon or your hands, mix the ingredients until they form a shaggy, wet dough. It’s essential to combine the ingredients thoroughly, but avoid over-mixing; the dough should be sticky and slightly loose.
4. Desired Dough Consistency: Aim for a wet and sticky dough. Unlike traditional bread recipes that require kneading, this no-knead method relies on a high hydration level to create that airy texture. If the dough seems too dry, add a splash of warm water and mix until the desired consistency is achieved.
5. Visual Cues: As you mix, keep an eye out for visual cues. The dough should come together but still appear shaggy and a bit messy. When you stretch the dough slightly, it should hold its shape without tearing apart.
Now that your dough is prepared, it’s time to let it rise and develop flavor through the magic of fermentation.
First Rise: The Magic of Fermentation
Fermentation is a crucial step in bread-making that transforms the simple mixture of flour, water, yeast, and salt into a flavorful, airy loaf. During this process, the yeast consumes sugars and releases carbon dioxide, causing the dough to rise. Understanding how to create the ideal environment for fermentation is key to achieving the best results.
1. Cover the Dough: After preparing your dough, transfer it to a lightly greased bowl. Cover the bowl with a clean kitchen towel or plastic wrap to prevent it from drying out. This step creates a warm, humid environment that is conducive to fermentation.
2. Ideal Rising Environment: For optimal rising, place the bowl in a warm spot away from drafts. A temperature between 70°F and 80°F is ideal for yeast activity. If your kitchen is cool, you can preheat your oven to the lowest setting for a few minutes, then turn it off and place the bowl inside.
3. Timing the First Rise: Allow the dough to rise for at least 1-2 hours or until it has doubled in size. The time may vary depending on the ambient temperature. Keep an eye on the dough, and look for visual indicators that signal it’s ready for the next step—bubbles forming on the surface and a significant increase in volume are good signs of a successful rise.
By understanding the key elements involved in preparing your Cloud-Like No-Knead Focaccia Bread, you will set yourself up for success in the kitchen. Enjoy the process, embrace the aromas that fill your home, and get ready to bake a loaf of focaccia that will impress family and friends alike. In the next part of this article, we will explore how to prep for baking and the delightful toppings that will make your focaccia truly shine.
Importance of Preheating the Oven and the Skillet or Baking Sheet
Before baking your cloud-like no-knead focaccia, it is crucial to preheat your oven and the skillet or baking sheet you plan to use. Preheating ensures that the bread cooks evenly and develops a beautifully golden crust. A hot oven initiates the Maillard reaction, which enhances flavor and color. To achieve optimal results, set your oven to 425°F (220°C) for at least 30 minutes before you place the focaccia inside. If you’re using a cast-iron skillet, place it in the oven to heat as well; this will help create a crusty bottom that contrasts beautifully with the airy interior of the focaccia.
Techniques for Shaping the Dough
Once your dough has risen and looks bubbly and airy, it’s time to shape it. There are two primary techniques for shaping focaccia: stretching and rolling.
– Stretching vs. Rolling: The stretching method is preferred for no-knead focaccia because it preserves the air bubbles that form during fermentation. Gently press the dough into the skillet using your fingertips, stretching it to fit the shape of the pan. Avoid using a rolling pin, as this can deflate the dough and lead to a denser texture.
– Ensuring Even Thickness: Aim for a uniform thickness across the dough. This ensures that it bakes evenly, preventing some parts from becoming overdone while others remain undercooked. If necessary, carefully lift and stretch any thicker areas while keeping the overall integrity of the dough intact.
The Art of Dimpling: Why It Matters for Texture and Flavor Absorption
Dimpling the focaccia is a signature step that not only adds visual appeal but also plays a crucial role in the texture and flavor.
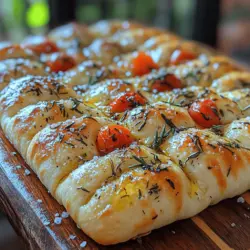
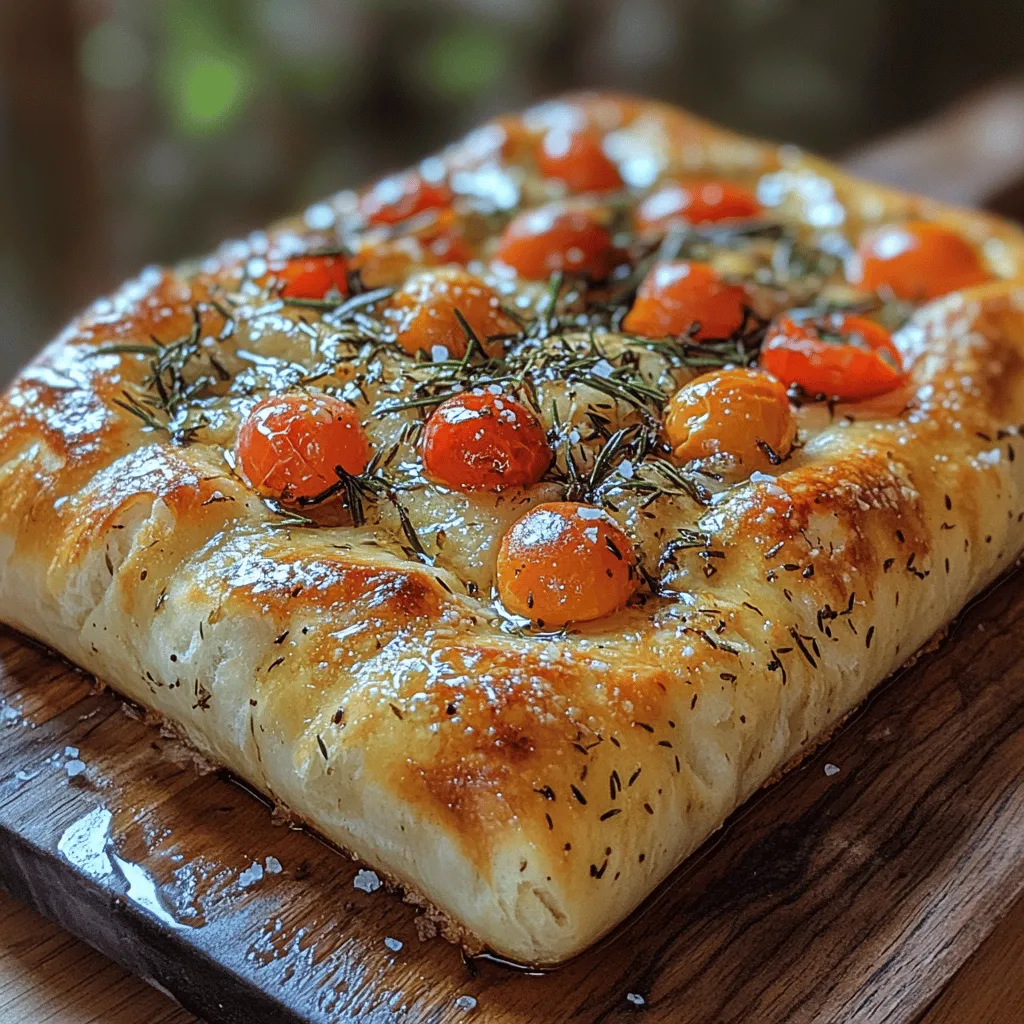
– Dimpling Technique: After spreading the dough into your prepared skillet or baking sheet, use your fingertips to create deep dimples all over the surface. These dimples serve two purposes: they create pockets for oil and toppings to settle into, enhancing the flavor absorption, and they also help the focaccia rise properly by letting steam escape during baking.
Second Rise: Final Touches
Once you’ve shaped and dimpled your dough, it’s time for the second rise—a critical step that allows the dough to expand further and develop a light, airy texture.
– Importance of the Second Rise: The second rise typically lasts 20 to 30 minutes and occurs at room temperature. This additional fermentation period allows the gluten structure to strengthen, resulting in a focaccia that is both chewy and soft in the center. Keep the dough covered with a clean kitchen towel to prevent it from drying out.
Recommendations for Topping Variations
Now comes the fun part—toppings! While a classic focaccia is often topped with rosemary and sea salt, there are numerous creative options to explore.
– Classic Rosemary and Sea Salt: Simply sprinkle fresh rosemary leaves and a generous pinch of flaky sea salt over the dimples before baking. The aroma of rosemary will infuse the bread, creating a delightful flavor profile.
– Creative Options: Consider adding sliced olives, halved cherry tomatoes, or thinly sliced garlic. These toppings not only enhance the taste but also contribute visual interest to the final product. Experiment with combinations to find your favorite!
– Visual Indicators for a Perfectly Risen Focaccia: The dough should look puffy and increased in volume after the second rise, signaling that it’s ready for baking. The surface should feel soft and slightly tacky to the touch, indicating that it has retained moisture.
Baking the Focaccia
Getting the baking right is essential for achieving that perfect crust on your focaccia.
– Optimal Baking Temperature and Time: Bake your focaccia in the preheated oven at 425°F (220°C) for about 20 to 25 minutes. Keep a close eye on it as baking times can vary depending on your oven and the thickness of the dough.
– What to Look for in Terms of Color and Texture: The focaccia should turn a beautiful golden brown, with the edges crisping nicely. The internal texture should be airy and springy. When you tap the bottom of the bread, it should sound hollow, indicating that it has cooked through properly.
– Techniques for Ensuring Even Baking: If your oven has hot spots, consider rotating the skillet halfway through the baking time. This will help achieve an evenly baked focaccia, avoiding any burnt or undercooked sections.
Cooling and Serving Suggestions
After baking, it’s important to let the focaccia cool before slicing. This cooling period allows the steam to escape, preventing the bread from becoming soggy.
– Importance of Letting the Bread Cool: Cooling on a wire rack for about 10 to 15 minutes helps maintain the crust’s integrity while allowing the flavors to settle. If you cut into the focaccia too soon, you may lose the airy texture and moisture within.
– Suggestions for Serving:
– Pairing with Dips: Serve your focaccia with a dish of high-quality olive oil for dipping or a drizzle of balsamic vinegar. The rich flavors complement the bread beautifully.
– Using as a Sandwich Base: Slice the focaccia horizontally and fill it with your favorite sandwich ingredients, such as fresh mozzarella, tomatoes, basil, and a drizzle of pesto for a delicious twist.
– Serving Alongside Soups or Salads: Focaccia makes a fantastic accompaniment to soups and salads, providing a hearty, satisfying element to your meal.
Nutritional Information
Understanding the nutritional benefits of your ingredients is essential for making informed choices in the kitchen.
– Overview of Nutritional Content: A typical serving of focaccia (1 slice) contains approximately 150 calories, 5 grams of fat, 22 grams of carbohydrates, and 3 grams of protein. The exact values may vary depending on the toppings used.
– Discussion of Health Benefits: Using quality ingredients like extra virgin olive oil not only boosts flavor but also adds heart-healthy fats. Fresh herbs like rosemary provide antioxidants, and whole grain flour can contribute additional fiber.
Conclusion
Making cloud-like no-knead focaccia at home is not only easy but incredibly rewarding. The simplicity of the recipe allows for creativity with toppings and flavor combinations, making it a versatile addition to your culinary repertoire. Whether enjoyed as a snack, sandwich base, or side dish, this focaccia will elevate any meal.
I encourage you to experiment with different toppings and variations—perhaps adding sun-dried tomatoes, fresh herbs, or even a sprinkle of cheese to make it your own. The satisfaction of creating such a delightful bread from scratch is unparalleled, and I hope you enjoy the journey as much as the delicious result. Embrace the versatility of focaccia and relish in the joy of sharing it with family and friends at your next gathering or cozy dinner.