
Crispy Dill Pickle Chicken Tenders have taken the culinary world by storm, captivating the taste buds of food enthusiasts everywhere. This delightful recipe combines the tangy flavor of dill pickles with the crunchiness of perfectly fried chicken tenders, making it an irresistible dish for chicken lovers. From the first bite, you will experience a burst of flavor that balances savory, tangy, and crunchy elements, delivering an unforgettable dining experience. In this comprehensive guide, we will explore the origins of the recipe, its unique flavor profile, and provide step-by-step instructions to create this mouthwatering dish. Whether you are preparing a family dinner or hosting a party, these chicken tenders will surely impress your guests.
Understanding the Ingredients
The Magic of Chicken Tenders
Chicken tenders, often referred to as chicken strips or chicken fingers, are a popular choice among both children and adults. These tender pieces of chicken breast are highly sought after for their juicy texture and versatility in flavoring. Not only are chicken tenders delicious, but they also offer a lean source of protein that can fit into a variety of dietary plans. A standard serving of chicken breast is low in fat while being rich in essential nutrients such as vitamins B6 and B12, niacin, and phosphorus. This makes chicken tenders not only a satisfying meal option but a nutritious one as well.
The charm of chicken tenders lies in their ability to absorb flavors beautifully. When marinated properly, they can take on a variety of tastes, making them a versatile canvas for culinary creativity. In this recipe, we will elevate the classic chicken tender by infusing it with the zesty flavor of dill pickles.
The Role of Dill Pickle Juice
One of the standout ingredients in this recipe is dill pickle juice. It may sound unconventional, but the addition of pickle juice is what truly makes these chicken tenders shine. The acidic nature of the pickle juice not only enhances the overall flavor profile of the chicken but also acts as a natural tenderizer. When chicken is marinated in pickle juice, the acid breaks down proteins, allowing the meat to remain juicy and tender during cooking.
In addition to its flavor-enhancing properties, dill pickle juice provides notable health benefits. Dill pickles and their brine contain antioxidants and are a source of probiotics, which can support gut health. The brine is also low in calories, making it a healthier alternative to traditional marinades.
Essential Cooking Components
To prepare these crispy dill pickle chicken tenders, you will need a selection of key ingredients that work together to create the perfect crunchy texture and rich flavor. Here’s a breakdown of what you’ll need:
– Chicken Tenders: The star of the dish, chicken tenders should be fresh and of high quality. Slicing chicken breasts into tenders can also be an option.
– Dill Pickle Juice: As discussed, this ingredient is essential for marination, providing both flavor and tenderness.
– All-Purpose Flour: This will serve as the first layer in the breading process, helping to create a barrier that seals in moisture.
– Spices: A blend of spices such as garlic powder, onion powder, paprika, and black pepper will add depth of flavor to the chicken.
– Eggs: Beaten eggs help the breading adhere to the chicken, creating a cohesive and crunchy outer layer.
– Panko Breadcrumbs: These Japanese-style breadcrumbs are coarser than traditional breadcrumbs, contributing to a light and crispy texture when fried.
– Parmesan Cheese: Adding grated Parmesan cheese to the breadcrumb mixture not only enhances the flavor but also aids in achieving a golden-brown crust.
Each ingredient plays a critical role in crafting these delightful chicken tenders. The combination of flavors and textures will leave your taste buds dancing with joy.
Preparing the Chicken Tenders
Marination Process
The marination of chicken tenders in dill pickle juice is a crucial step that greatly impacts the final flavor and juiciness of the dish. Here’s how to properly marinate your chicken:
1. Choose Your Chicken: Start with fresh chicken tenders. If you cannot find pre-cut tenders, you can easily slice boneless, skinless chicken breasts into strips approximately 1-2 inches wide.
2. Prepare the Marinade: In a large bowl or a resealable plastic bag, pour in enough dill pickle juice to fully submerge the chicken. The amount will vary depending on how many tenders you are preparing, but aim for at least 1 cup of pickle juice for every pound of chicken.
3. Marinate: Add the chicken tenders to the bowl or bag, ensuring they are well-coated in the pickle juice. Seal the bag or cover the bowl with plastic wrap. Place it in the refrigerator and allow the chicken to marinate for at least 1 hour. For maximum flavor absorption, consider marinating for up to 4 hours, or even overnight if you have the time. This longer marination period will ensure that the chicken is infused with the tangy flavor of dill pickles.
4. Drain and Pat Dry: After marination, remove the chicken from the pickle juice and let it drain. Pat the tenders dry with paper towels to remove excess moisture. This step is important for achieving a crispy texture during frying.
Setting Up Your Breading Stations
Creating a well-organized breading station is essential for the success of your crispy dill pickle chicken tenders. Follow these steps to set up your breading stations:
1. Prepare the Stations: You will need three shallow dishes or plates for the breading process:
– Station 1: Place all-purpose flour mixed with seasonings (such as salt, pepper, garlic powder, and paprika).
– Station 2: Beat 2-3 eggs in another dish. This will act as the binding agent for the breadcrumbs.
– Station 3: Combine panko breadcrumbs and grated Parmesan cheese in the final dish.
2. Breading Process: Take each chicken tender and follow these steps:
– First, dredge the chicken in the flour mixture, ensuring it is evenly coated. Shake off any excess flour.
– Next, dip the floured chicken tender into the beaten eggs, allowing any excess to drip off.
– Finally, coat the chicken in the panko and Parmesan mixture, pressing gently to ensure the breadcrumbs adhere well.
Setting up your breading station in this organized manner minimizes mess and ensures that each chicken tender is perfectly coated. The sequence of flour, egg, and breadcrumbs is crucial for achieving that coveted crunchy outer layer.
The Dredging Technique
The dredging technique is a key aspect of preparing crispy chicken tenders. To achieve the ultimate crunch, it is essential to follow these steps carefully:
1. Flour Dredge: The initial coating of flour serves to absorb moisture and create a barrier around the chicken. This step is vital for ensuring that the chicken stays juicy inside while achieving a crispy exterior.
2. Egg Wash: The egg wash acts as glue, helping the breadcrumbs stick to the chicken. Make sure to cover the chicken completely with the egg wash, but do not allow it to pool excessively.
3. Panko Coating: The final coating of panko breadcrumbs and Parmesan cheese is what provides the signature crunch. Gently press the breadcrumbs onto the chicken to ensure an even coating. For an extra crispy texture, you can double-dip the chicken by repeating the egg wash and breadcrumb steps.
By following this dredging technique, you will create chicken tenders that are not only crispy on the outside but also tender and flavorful on the inside, thanks to the dill pickle marinade.
In the next part of this recipe article, we will delve into the cooking process, including frying techniques, baking options, and serving suggestions to make your Crispy Dill Pickle Chicken Tenders a hit at any gathering. Stay tuned for the delicious continuation of this culinary adventure!
Instructions for Dredging Chicken Tenders
To achieve the perfect Crispy Dill Pickle Chicken Tenders, the dredging process is crucial. This three-step method ensures a well-coated chicken that is flavorful and crunchy.
1. Prepare Your Dredging Stations: Set up three shallow bowls. In the first bowl, add about 1 cup of all-purpose flour. In the second bowl, crack 2 large eggs and whisk them until they are well combined. In the third bowl, combine 1 cup of panko breadcrumbs with 1/2 cup of grated Parmesan cheese, 1 teaspoon of garlic powder, 1 teaspoon of onion powder, and 1 teaspoon of dried dill. This mixture will give the chicken tenders a beautiful, flavorful crust.
2. Dredging Process:
– Flour First: Take each chicken tender and lightly coat it in the flour. Shake off any excess flour. This step is essential because it helps the egg wash adhere properly to the chicken.
– Egg Wash: Next, dip the floured chicken tender into the egg mixture, ensuring it’s completely coated. This wet layer will help the panko mixture stick during the final dredging.
– Panko-Parmesan Coating: Finally, press the chicken tender into the panko-Parmesan mixture, ensuring it’s well-coated. Use your hands to gently press the mixture onto the chicken to ensure it sticks.
3. Rest the Coated Chicken: Once all chicken tenders are coated, place them on a wire rack or a plate and let them rest for about 10-15 minutes. This resting period helps the coating adhere to the chicken better and creates a crispier crust when fried.
Tips for Ensuring Coating Adherence
– Use Room Temperature Chicken: Ensure your chicken tenders are at room temperature before dredging. Cold chicken can cause the coating to slide off during frying.
– Don’t Rush the Process: Take your time with each step. Properly coating each tender will yield better results.
– Avoid Overcrowding: When frying, don’t overcrowd the pan. This can lower the oil temperature and lead to soggy tenders.
– Press Firmly: When coating the chicken in the panko mixture, press down firmly to ensure the crumbs adhere well.
Frying the Chicken Tenders
Choosing the Right Oil
Selecting the right oil is essential for frying chicken tenders. Here are some excellent choices:
– Canola Oil: With a high smoke point of about 400°F, canola oil is neutral in flavor and great for frying.
– Peanut Oil: This oil has a slightly higher smoke point (around 450°F) and adds a unique flavor to fried foods.
– Vegetable Oil: A versatile option with a smoke point around 400°F, it’s widely used for frying due to its mild flavor.
When frying, ensure that the oil is preheated to the right temperature to achieve that perfect crisp without overcooking the chicken.
Safety Tips for Frying at Home
– Use a Deep Fry Thermometer: This will help you monitor the oil temperature accurately.
– Have a Lid Nearby: In case of flare-ups, keep a lid nearby to smother flames.
– Avoid Water: Never drop wet chicken into hot oil, as this can cause dangerous splatter.
Achieving the Perfect Crisp
1. Preheat the Oil: Heat your chosen oil in a deep skillet or fryer to 350°F. Use a thermometer to ensure the temperature is accurate. Frying at this temperature helps create a golden crust while keeping the inside tender and juicy.
2. Fry in Batches: Carefully add the chicken tenders to the hot oil, frying in batches to avoid overcrowding. Each batch should take about 4-5 minutes per side, depending on the thickness of the tenders.
3. Check for Doneness: The chicken is done when it reaches an internal temperature of 165°F and has a golden-brown exterior. Use a meat thermometer to check the temperature accurately.
4. Drain Well: Once cooked, place the chicken tenders on a paper towel-lined plate to drain excess oil. This will keep them crispy.
Serving Suggestions
Presentation Techniques
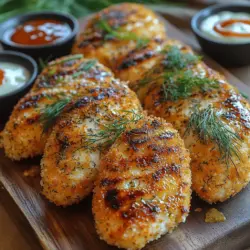
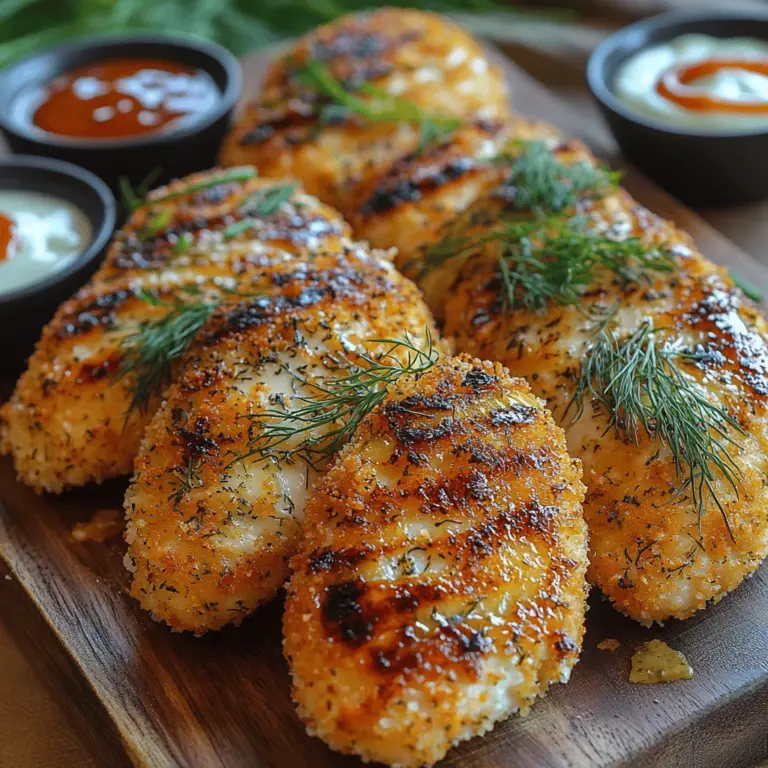
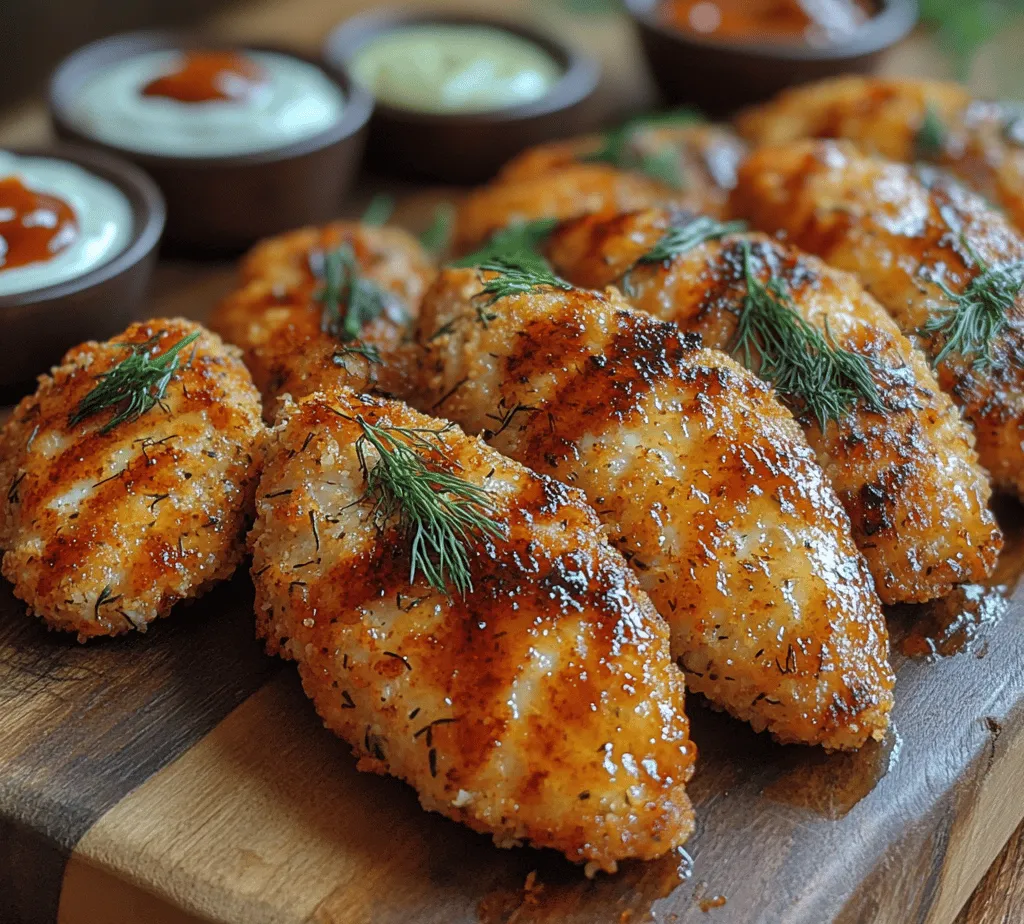
Presenting your Crispy Dill Pickle Chicken Tenders in an appealing manner can elevate the dining experience. Here are some creative ideas:
– Platter Style: Arrange the tenders on a large platter, garnished with fresh dill and lemon wedges for a pop of color.
– Individual Servings: Serve each tender on a small plate with a side of dipping sauce for a more personalized touch.
– Crispy Stack: Stack a few tenders on top of each other, secured with a toothpick, and serve with dipping sauces on the side.
Pairing Suggestions for Dipping Sauces
The right dipping sauces can enhance the flavors of your chicken tenders. Here are a few delicious options:
– Ranch Dressing: A classic choice that pairs well with the dill flavors in the chicken.
– Spicy Sriracha Mayo: For those who enjoy a kick, mixing mayonnaise with sriracha creates a creamy, spicy dip that’s irresistibly good.
– Honey Mustard: A sweet and tangy complement that balances the savory chicken.
Garnishing with Fresh Dill
Fresh dill not only adds visual appeal but also enhances the flavor profile of the dish. When garnishing:
– Sprinkle Finely Chopped Dill: Just before serving, sprinkle freshly chopped dill over the tenders for added freshness.
– Add Lemon Zest: A sprinkle of lemon zest can brighten the overall flavor, making the dish more vibrant.
– Include Other Herbs: Consider garnishing with parsley or chives to add color and flavor complexity.
Nutritional Information
Caloric Breakdown
Crispy Dill Pickle Chicken Tenders are a delicious indulgence, but it’s important to be aware of their nutritional content. On average, a serving of three tenders contains approximately:
– Calories: 350
– Total Fat: 18g
– Saturated Fat: 4g
– Cholesterol: 95mg
– Sodium: 600mg
– Protein: 25g
– Carbohydrates: 25g
– Fiber: 1g
Potential Substitutions for Healthier Versions
If you’re looking to make this dish a bit healthier without sacrificing flavor, consider these substitutions:
– Use Whole Wheat Flour: Replace all-purpose flour with whole wheat flour for added fiber.
– Baked Option: Instead of frying, bake the tenders at 425°F for 20-25 minutes, flipping halfway through. Spray lightly with cooking oil for a crispier texture.
– Low-Fat Cheese: Use reduced-fat Parmesan cheese to cut down on calories while maintaining flavor.
Conclusion
Crispy Dill Pickle Chicken Tenders are more than just a meal; they offer a delightful blend of flavors and textures, capturing the essence of comfort food. With the detailed instructions and insights provided, you can master this recipe and impress family and friends at your next gathering. The tangy, crispy tenders are sure to be a hit, bringing joy and satisfaction to every dining experience. Enjoy your culinary adventure with these flavorful tenders, and let the crispy, tangy goodness unfold with each bite.