Introduction
Taco salad cups are a delightful twist on the classic taco salad, offering a fun and interactive dining experience. These crispy, edible bowls are perfect for serving individual portions, making them not only visually appealing but also a practical choice for gatherings. Whether you’re hosting a family dinner, throwing a party, or simply looking for a meal prep option that excites your taste buds, taco salad cups deliver on all fronts. The combination of fresh ingredients and savory fillings ensures that each bite is packed with flavor, while the crunch of the tortilla cups adds an irresistible texture.
One of the best aspects of taco salad cups is their versatility. You can customize them to suit your preferences, whether you prefer a meaty, vegetarian, or even vegan filling. With fresh vegetables, protein-rich ingredients, and zesty toppings, taco salad cups can be a healthy yet satisfying meal option that appeals to a wide range of dietary needs.
In this article, we will guide you through the preparation of these delightful taco salad cups, covering everything from the ingredients you’ll need to the steps involved in creating the perfect crunchy vessel for your salad. Let’s dive into the details!
Understanding the Ingredients
To create delicious taco salad cups, it’s essential to understand the role each ingredient plays in the overall flavor and texture of the dish. Here’s a breakdown of the main components you’ll need:
Tortillas
Tortillas are the foundation of the taco salad cups. When baked, they transform into crispy edible bowls that hold all your vibrant fillings. You can use corn or flour tortillas, depending on your preference. Corn tortillas are gluten-free and have a more robust flavor, while flour tortillas offer a softer texture.
Substitution Tip: If you’re avoiding gluten, opt for corn tortillas or even gluten-free wraps. For a lower-carb option, consider using lettuce leaves instead of tortillas.
Protein
The protein adds heartiness to your taco salad cups. Ground beef is a classic choice, but you can easily substitute it with ground turkey, chicken, or even plant-based alternatives like lentils or textured vegetable protein (TVP) for a vegan version.
Substitution Tip: For those watching their fat intake, lean ground turkey or chicken are excellent alternatives, while black beans or chickpeas can provide a protein-packed vegetarian option.
Fresh Vegetables
Fresh vegetables are crucial for adding vibrant color, crunch, and nutrition to your salad. Common choices include diced tomatoes, shredded lettuce, bell peppers, red onions, and corn. Each vegetable contributes unique flavors and textures, ensuring a balanced bite.
Substitution Tip: Feel free to mix and match based on seasonal availability or personal preference. Avocado, radishes, or even diced cucumbers can make excellent additions.
Cheese
Adding cheese enhances the creaminess and flavor of your taco salad cups. Cheddar cheese is a popular option, but you can also use Monterey Jack or even crumbled feta for a different taste profile.
Substitution Tip: If you’re looking for a lighter option, consider using Greek yogurt as a topping instead of sour cream, which can also add a tangy flavor.
Toppings
No taco salad is complete without toppings! Classic choices include sour cream, salsa, and guacamole. These toppings add moisture and richness, balancing the flavors of the salad.
Substitution Tip: For a dairy-free option, you can swap sour cream for a vegan yogurt or avocado-based dressing.
Understanding each ingredient’s role allows you to tailor the recipe to your tastes and dietary needs, ensuring that your taco salad cups are just as delicious as they are unique.
The Preparation Process
Preparation is key to crafting the perfect taco salad cups. Let’s break down the essential steps involved in bringing this recipe to life, focusing on the importance of each stage.
Preheating the Oven
Preheating your oven is the first crucial step in making the tortilla cups. A hot oven is necessary to achieve that perfect crispiness. Aim for a temperature of 350°F (175°C), allowing your tortillas to bake evenly without becoming overly browned or burnt.
Making Tortilla Cups
Creating the tortilla cups is where the fun begins! Here’s how to do it:
1. Choose Your Tortillas: Start with medium-sized corn or flour tortillas. If using larger tortillas, you may need to adjust the baking time accordingly.
2. Shape the Cups: Lightly brush both sides of the tortillas with oil. This step adds flavor and helps them crisp up during baking. Next, you can either press the tortillas into muffin tins, creating a cup shape, or drape them over the inverted cups in a baking dish.
3. Baking: Place the shaped tortillas in the preheated oven and bake for 10-15 minutes until they are golden brown and crispy. Keep a close eye on them to prevent burning. The result should be perfectly crispy tortilla cups ready to be filled.
Cooking the Meat
While the tortilla cups are baking, it’s time to prepare the meat filling. Here’s how to ensure it’s flavorful and well-cooked:
1. Brown the Meat: In a skillet over medium heat, add a little oil and ground meat of your choice. Cook until it’s browned, breaking it apart with a spatula as it cooks. This step is crucial for enhancing the meat’s flavor and ensuring a pleasant texture.
2. Seasoning: Once the meat is browned, drain any excess fat (if necessary) and season with taco seasoning. You can use a store-bought mix or make your own with chili powder, cumin, garlic powder, and onion powder. The seasoning adds depth to the meat, making it the star of your taco salad cups.
Creating the Salad Filling
With your tortilla cups baking and the meat cooking, it’s time to prepare the salad filling. This step is where the freshness of the ingredients shines through:
1. Chop the Vegetables: Dice your choice of fresh vegetables. Tomatoes, bell peppers, and onions are great options. Ensure they are cut into small, even pieces to make for easy filling and eating.
2. Combine the Ingredients: In a large mixing bowl, combine the chopped vegetables, cooked meat, and any additional ingredients such as beans or corn. Toss everything together to ensure an even distribution of flavors.
3. Add Fresh Herbs: Consider adding fresh cilantro or parsley for an extra layer of flavor. These herbs can brighten up the dish and complement the other ingredients beautifully.
4. Toppings: Prepare your toppings such as shredded cheese, salsa, and sour cream or yogurt. Having these ready will make assembly quicker and easier once the tortilla cups are ready.
By following these preparation steps, you’ll ensure that each component of your taco salad cups is perfectly cooked and bursting with flavor.
In the next part of this article, we will delve further into the assembly of the taco salad cups and provide tips for presenting them beautifully. Stay tuned for more delicious details on how to create this fun and satisfying dish!
Assembling the Taco Salad Cups
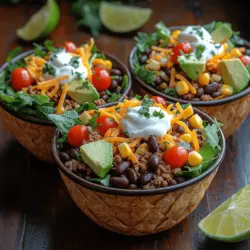
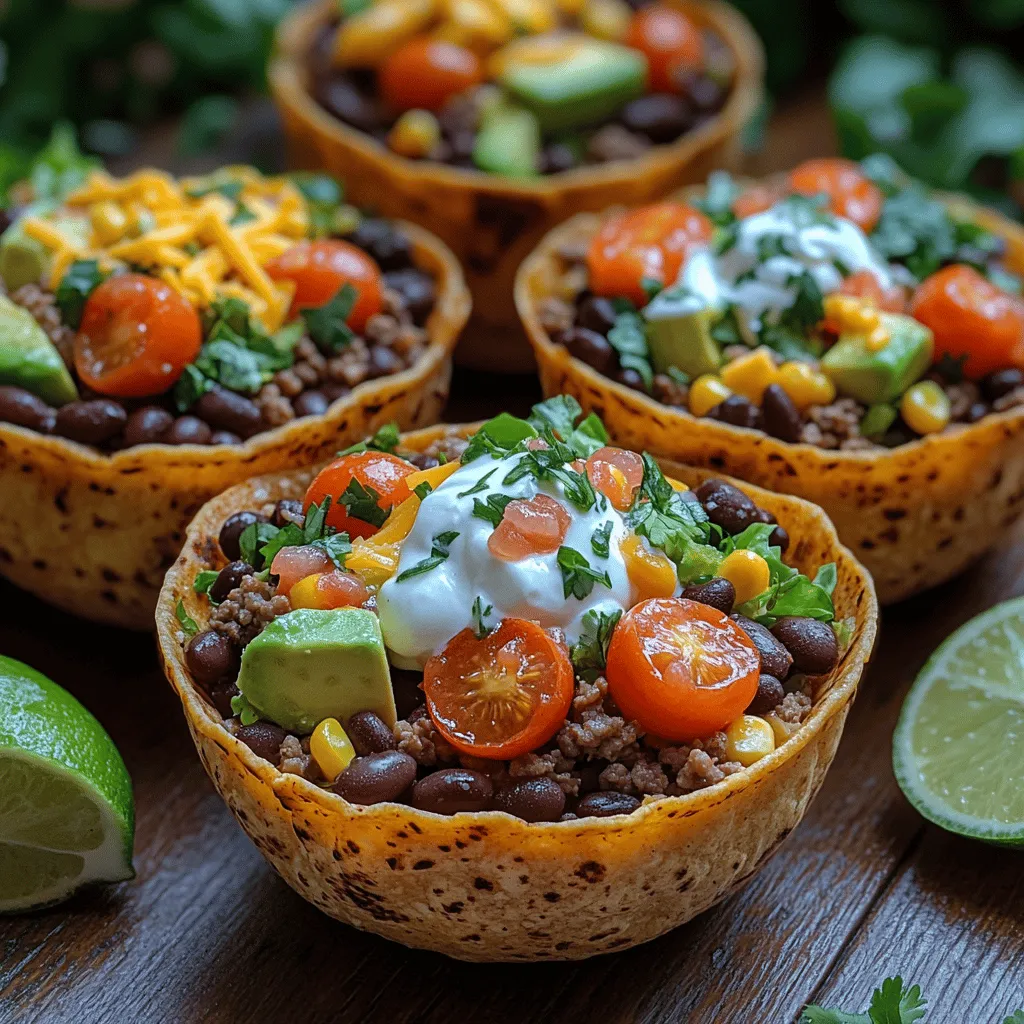
Creating the perfect Crunchy Taco Salad Cups involves an artful assembly that not only looks appealing but also enhances the flavor experience. To achieve this, follow these step-by-step instructions for optimal presentation and taste.
1. Prepare the Cups: Start by ensuring your taco cups are ready. If you’re using store-bought tortilla cups, arrange them on a serving platter. If you prefer homemade cups, mold tortillas into muffin tins and bake them until crispy. This can take about 10-12 minutes at 350°F (175°C). Allow them to cool before adding the filling.
2. Layering Ingredients: Begin with a base layer of refried beans or black beans. This not only adds flavor but also acts as a barrier to prevent the cups from getting soggy. Spread about a tablespoon of beans at the bottom of each cup.
3. Add Proteins: Next, layer your choice of protein—seasoned ground beef, turkey, or a plant-based option like lentils or jackfruit. Spoon a generous amount into each cup, ensuring it sits snugly atop the beans. This layering technique helps to maintain the structure of each cup while enhancing the flavor profile.
4. Incorporate Fresh Vegetables: Top the protein with a mix of diced tomatoes, shredded lettuce, and chopped onions. The fresh veggies add a delightful crunch and a burst of color, making the presentation even more appetizing.
5. Cheese and Dressing: Sprinkle shredded cheese over the top—cheddar or a Mexican blend works beautifully. Then, drizzle your favorite dressing, whether a creamy ranch or zesty salsa, to tie all the flavors together.
6. Finishing Touches: Finally, add any additional toppings based on personal preference. This could include sliced jalapeños for heat, diced avocado for creaminess, or a handful of cilantro for freshness. Consider placing a dollop of sour cream or guacamole on top for an extra indulgent finish.
Serving Suggestions and Pairings
Once your Crunchy Taco Salad Cups are assembled, it’s time to serve them in a way that complements this delightful dish.
– Best Practices for Serving: Present the taco salad cups on a large, colorful platter to draw attention. Consider garnishing the platter with additional lime wedges and cilantro sprigs for a pop of color. This setup not only looks inviting but makes it easy for guests to help themselves.
– Side Dishes: To enhance the meal, consider serving a side of cilantro lime rice or Mexican street corn. These sides pair beautifully with the flavors of the taco salad cups and provide a hearty addition to the meal. Additionally, you could offer a variety of salsas—mild, medium, and hot—so guests can customize their spice levels.
– Beverage Pairings: For drinks, a light Mexican beer such as Corona or Pacifico complements the flavors of the taco salad cups perfectly. Alternatively, if you prefer a non-alcoholic option, a refreshing mocktail made with lime juice, mint, and sparkling water can cleanse the palate and enhance the festive atmosphere.
Storage and Reheating Tips
If you find yourself with leftovers after enjoying your Crunchy Taco Salad Cups, proper storage and reheating techniques will help maintain their freshness.
– Storing Leftovers: To keep the components fresh, it’s best to store the taco salad ingredients separately. Place the tortilla cups in an airtight container at room temperature for up to two days. Store the protein, beans, and toppings in separate containers in the refrigerator. This prevents the cups from becoming soggy and allows you to enjoy them later without compromising texture.
– Reheating: When ready to enjoy your leftovers, reheat the protein in a skillet over medium heat until warmed through. For the tortilla cups, you can briefly pop them in the oven at 350°F (175°C) for about 5 minutes to restore their crispiness. Avoid microwaving the cups as this will make them chewy.
– Repurposing Leftovers: If you have leftover ingredients, consider repurposing them into new meals. For example, mix the seasoned protein with rice for a quick burrito bowl, or combine the beans and veggies for a nutritious salad. This not only reduces waste but also sparks creativity in the kitchen.
Nutritional Information
Understanding the nutritional content of your Crunchy Taco Salad Cups can help you make healthier choices while enjoying this delicious meal. Here’s a general breakdown per serving (assuming one taco salad cup with fillings):
– Calories: Approximately 250-300 calories
– Protein: 15-20 grams (depending on the protein choice)
– Fats: 10-15 grams (largely from cheese and avocado)
– Carbohydrates: 30-35 grams (from the tortilla and beans)
The ingredients used in this recipe provide numerous health benefits. Beans are an excellent source of dietary fiber, which aids in digestion and keeps you feeling full longer. Avocados contribute healthy fats that are beneficial for heart health, while fresh vegetables add essential vitamins and minerals. By choosing lean proteins and incorporating plenty of vegetables, you create a balanced meal that is both satisfying and nutritious.
Conclusion
Crunchy Taco Salad Cups are more than just a meal; they are a versatile and delicious option that can be tailored to fit various tastes and dietary needs. Whether hosting a gathering, preparing a quick weeknight dinner, or indulging in a fun lunch, these salad cups are sure to impress.
Encourage experimentation with different toppings and ingredients, allowing each person to customize their cups to their liking. The joy of sharing meals prepared with fresh ingredients can enhance any occasion, creating lasting memories with family and friends around the table. Enjoy the vibrant flavors, textures, and the satisfaction that comes from creating a wholesome dish like Crunchy Taco Salad Cups!