Mini Chicken Caesar Crunch Wraps: A Delicious, Easy-to-Make Recipe
Wraps have gained immense popularity in the culinary world, providing a convenient and versatile meal option that appeals to a wide range of tastes. From quick lunches to satisfying dinners, wraps can be customized to suit any palate, making them a favorite for busy families and health-conscious individuals alike. One standout option among the myriad of wrap recipes is the Mini Chicken Caesar Crunch Wrap. This dish not only brings together the classic flavors of a Caesar salad but also incorporates a delightful crunch that elevates the entire experience.
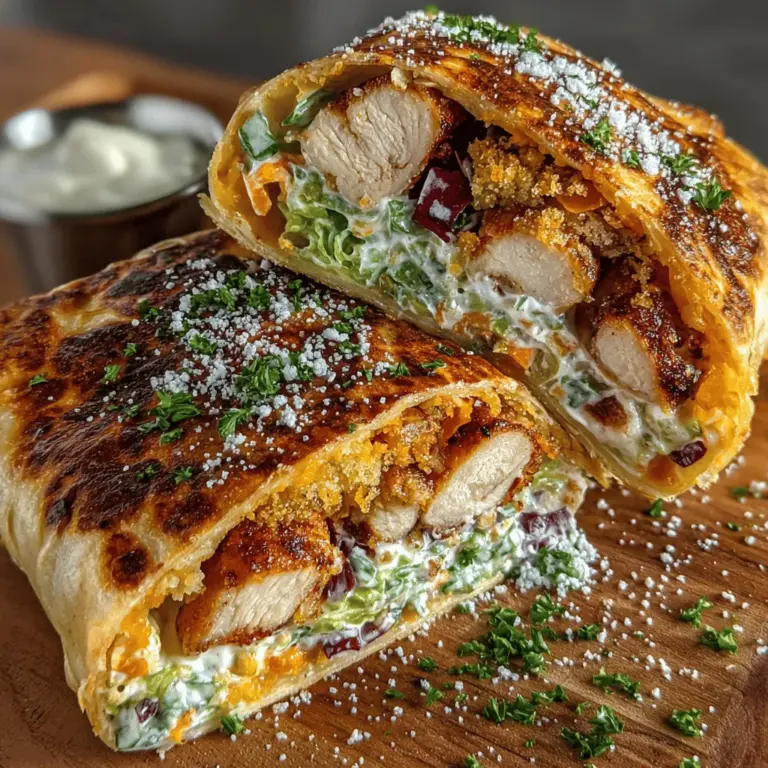
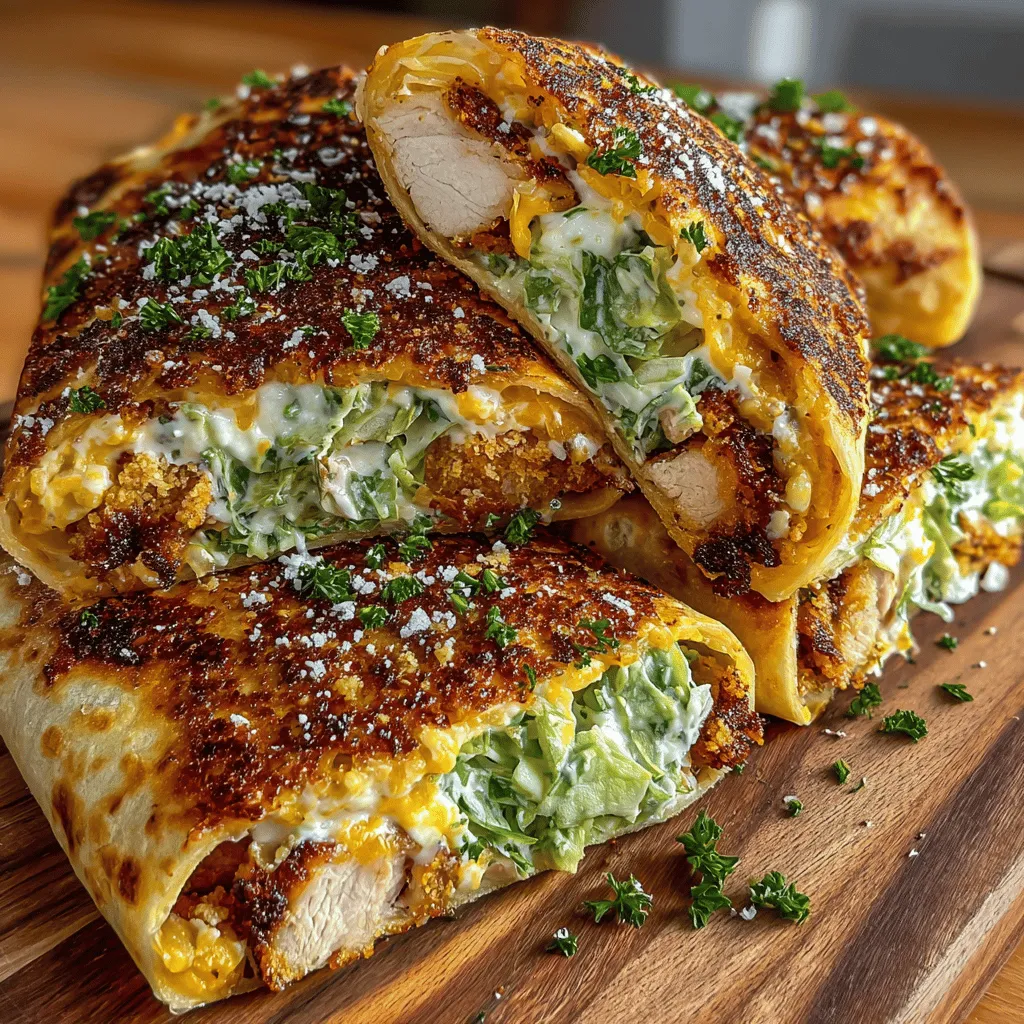
Mini Chicken Caesar Crunch Wraps are not only delicious but also easy to prepare, making them an ideal choice for both novice cooks and seasoned chefs. They offer a harmonious balance of flavors and textures, combining tender chicken, crisp romaine lettuce, creamy Caesar dressing, and crunchy croutons, all wrapped in a warm tortilla. This recipe is a celebration of simplicity and freshness, perfect for lunchboxes, picnics, or a casual dinner at home. Let’s dive deeper into the ingredients that make this wrap so special and explore the initial steps to create your own mini culinary masterpiece.
Understanding the Ingredients
Before we embark on the step-by-step preparation of Mini Chicken Caesar Crunch Wraps, it’s essential to understand the key ingredients that contribute to this dish’s delightful taste and texture. Each component plays a unique role, ensuring that every bite is satisfying and flavorful.
Chicken: The Protein Source
At the heart of this wrap is chicken, a fantastic source of lean protein that is essential for maintaining a balanced diet. Protein is vital for muscle growth, repair, and overall health, making chicken an excellent choice for a nutritious meal. When preparing your chicken, consider the seasoning and cooking technique, as these factors significantly influence the final flavor of the dish. Grilling, baking, or sautéing the chicken with a blend of spices can infuse it with a depth of flavor that complements the other ingredients beautifully.
Romaine Lettuce: Freshness and Crunch
Romaine lettuce is a staple in Caesar salads, and it also plays a crucial role in our crunch wrap. This leafy green is known for its crisp texture and vibrant color, providing both visual appeal and a refreshing bite. Nutritionally, romaine lettuce is low in calories and packed with vitamins A and K, along with essential minerals. Its crunchiness balances the softness of the chicken and the creaminess of the dressing, making each bite a delightful experience.
Caesar Dressing: Flavor Enhancer
The Caesar dressing is another key component that brings this wrap to life. Typically made from a blend of ingredients including garlic, anchovies, Parmesan cheese, lemon juice, and olive oil, Caesar dressing offers a rich and tangy flavor that enhances the overall taste of the wrap. This creamy dressing not only adds depth but also helps to bind the ingredients together, ensuring that every element is perfectly coated and flavorful.
Parmesan Cheese: Flavor and Texture
Parmesan cheese is a classic addition to Caesar salads and is equally important in our crunch wrap. This hard cheese adds a savory, nutty flavor that complements the chicken and dressing beautifully. Additionally, its texture can vary from finely grated to shaved, allowing for versatility in presentation. Whether you choose to sprinkle it on top or mix it in, Parmesan cheese enriches the overall flavor profile of the dish.
Croutons: Crunch and Contrast
To achieve the perfect crunch in your Mini Chicken Caesar Crunch Wraps, croutons are a must. These little nuggets of toasted bread provide a satisfying crunch that contrasts with the tender chicken and creamy dressing. You can either purchase pre-made croutons or make your own by toasting cubes of bread with olive oil and seasoning. Either way, croutons add a delightful textural element that keeps the wrap exciting with each bite.
Flour Tortillas: Versatility
Flour tortillas serve as the vessel for our delicious wrap. Their soft yet sturdy nature makes them ideal for holding all the ingredients together without falling apart. Available in various sizes, flour tortillas can be easily adapted to create mini versions or larger wraps, depending on your preference. Their mild flavor allows the other ingredients to shine, while their pliability ensures a comfortable eating experience.
Mozzarella Cheese: Creaminess
In addition to Parmesan, mozzarella cheese is included in the wrap for its creamy texture and melting quality. This cheese adds a layer of richness that enhances the overall flavor while providing a gooey, satisfying element. When melted, mozzarella creates a delightful stretchiness that makes each bite even more enjoyable.
Optional Garnish: Fresh Parsley
While not essential, a sprinkle of fresh parsley can elevate your Mini Chicken Caesar Crunch Wraps both visually and flavor-wise. This vibrant herb adds a pop of color and a hint of freshness that complements the rich flavors of the wrap. Plus, parsley is known for its health benefits, including being a source of antioxidants and vitamins.
Step-by-Step Guide to Making Mini Chicken Caesar Crunch Wraps
Now that we’ve explored the essential ingredients, it’s time to roll up our sleeves and get cooking. Follow these detailed instructions to prepare your Mini Chicken Caesar Crunch Wraps:
Preparing the Chicken
1. Select Your Chicken: Start with boneless, skinless chicken breasts or thighs, depending on your preference. Thighs tend to be juicier, while breasts are leaner.
2. Seasoning: In a bowl, season the chicken generously with salt, pepper, and your choice of spices. A blend of garlic powder, onion powder, and Italian seasoning works wonderfully to enhance the natural flavors of the chicken.
3. Cooking the Chicken: Choose your cooking method. For grilled chicken, preheat your grill to medium-high heat. Cook the chicken for about 6-7 minutes per side, or until the internal temperature reaches 165°F. If you prefer to sauté, heat a tablespoon of olive oil in a skillet over medium heat, and cook the chicken for approximately 6-8 minutes on each side. Alternatively, bake the chicken in the oven at 375°F for about 25-30 minutes or until fully cooked.
4. Resting and Slicing: Once the chicken is cooked, let it rest for a few minutes to retain its juices. Then, slice it into bite-sized pieces to make it easier to incorporate into the wraps.
This sets the stage for assembling your Mini Chicken Caesar Crunch Wraps, where all the flavors and textures will come together to create a delightful meal. In the next section, we will continue with the assembly process and tips for serving these delicious wraps.
Making the Caesar Mixture
Creating the perfect Caesar mixture is essential for ensuring that every bite of your Mini Chicken Caesar Crunch Wraps is packed with flavor. To achieve an even distribution, follow these tips:
1. Use Fresh Ingredients: Start with fresh Romaine lettuce and high-quality Parmesan cheese. Fresh ingredients elevate the flavor of your wraps and contribute to a better texture.
2. Properly Chop the Lettuce: Chop the Romaine into bite-sized pieces. This ensures that the lettuce is easy to bite into and can be evenly mixed with the other ingredients, avoiding any large, unwieldy pieces.
3. Combine Ingredients in a Bowl: In a large mixing bowl, combine cooked, chopped chicken breast, chopped Romaine lettuce, grated Parmesan cheese, and Caesar dressing. For a homemade dressing, consider using a blend of mayonnaise, lemon juice, Worcestershire sauce, garlic powder, and anchovy paste.
4. Mix Thoroughly but Gently: Use a spatula or wooden spoon to gently fold the ingredients together. This technique helps maintain the integrity of the lettuce while ensuring that the dressing coats every piece uniformly.
5. Taste and Adjust: Before assembling the wraps, taste the mixture. If you need more zing, add a bit more lemon juice or Parmesan. If it’s too thick, a splash of water or extra dressing can help loosen it up.
By following these steps, you’ll create a Caesar mixture that complements the wraps perfectly, making every bite a delicious experience.
Assembling the Wraps
Proper assembly is key to creating secure and tasty Mini Chicken Caesar Crunch Wraps. Here are some techniques to help you wrap them perfectly:
1. Choose the Right Tortillas: Use large flour tortillas or whole wheat tortillas. Their flexibility makes them easier to wrap without tearing.
2. Layering Technique: Start by placing a generous spoonful of the Caesar mixture in the center of the tortilla, leaving space around the edges. This prevents overflow during the wrapping process.
3. Fold the Sides: Begin by folding in the sides of the tortilla about one-third of the way. This forms the base for your wrap and prevents any ingredients from spilling out.
4. Roll from the Bottom: Next, fold the bottom of the tortilla over the filling. Tightly roll it up while tucking in the sides as you go for a tight seal.
5. Secure with Toothpicks: If you’re concerned about the wraps coming undone, secure them with toothpicks until ready to cook. This step is especially useful if you’re preparing multiple wraps in advance.
By mastering these assembly techniques, you’ll ensure that your wraps are not only visually appealing but also easy to eat.
Cooking the Wraps
Now that your wraps are assembled, it’s time to cook them to perfection. Follow these steps to achieve a golden-brown finish that adds a delightful crunch:
1. Preheat Your Pan: Heat a non-stick skillet or griddle over medium heat. A well-heated pan ensures that the wraps cook evenly and get crispy without burning.
2. Add Oil or Butter: Lightly coat the pan with olive oil or melted butter. This step adds flavor and helps achieve that coveted golden crust.
3. Place Wraps in the Pan: Carefully place the wraps seam-side down in the skillet. This helps seal the wrap as it cooks, preventing any ingredients from spilling out.
4. Cooking Time: Cook each wrap for about 2-3 minutes on one side until golden brown. Carefully flip the wraps using tongs and cook the other side for another 2-3 minutes.
5. Check for Crispiness: The wraps are done when they are crispy and golden brown on both sides. If you prefer them extra crispy, you can cook them for an additional minute on each side.
6. Rest Before Cutting: Once cooked, allow the wraps to rest for a minute before slicing them in half. This helps maintain their structure and keeps the filling from spilling out.
By following these cooking techniques, you’ll create Crunch Wraps that are not only visually appealing but also satisfyingly crunchy.
Nutritional Information
Understanding the nutritional profile of your Mini Chicken Caesar Crunch Wraps can help you enjoy them guilt-free. Here’s a breakdown of what you can expect per serving:
– Calories: Approximately 400 calories per wrap.
– Protein: Each wrap contains about 30 grams of protein, making it a great option for muscle repair and growth.
– Fats: With around 15 grams of fat, primarily from the chicken and dressing, this recipe balances healthy fats with protein.
– Carbohydrates: Expect around 40 grams of carbohydrates, which provide essential energy.
– Vitamins and Minerals: This recipe is rich in vitamins A and C from the Romaine lettuce, calcium from the Parmesan cheese, and iron from the chicken.
Incorporating these wraps into a balanced diet is easy. Their protein content makes them a filling option for lunch or dinner, while the fresh vegetables provide necessary nutrients. Pair them with a side salad or roasted vegetables for a complete meal.
Serving Suggestions
To enhance your dining experience, consider these serving suggestions for your Mini Chicken Caesar Crunch Wraps:
1. Side Dishes: Pair your wraps with a light side salad, such as a classic Caesar salad or a simple arugula salad with lemon vinaigrette. You could also serve them with sweet potato fries or a vegetable platter for a balanced meal.
2. Dipping Sauces: Enhance the flavor with dipping sauces. A side of extra Caesar dressing for dipping complements the wraps beautifully. Alternatively, a tangy yogurt-based sauce or a spicy sriracha aioli can add an exciting flavor twist.
3. Beverage Pairings: Consider pairing the wraps with a light beverage. An iced tea, sparkling water with lemon, or a crisp white wine like Sauvignon Blanc complements the flavors of the wraps perfectly.
By thoughtfully choosing sides and drinks, you can elevate your meal, making it even more enjoyable.
Variations on the Recipe
Feel free to get creative with your Mini Chicken Caesar Crunch Wraps! Here are some variations and substitutions to accommodate various dietary preferences:
1. Dietary Restrictions: For a gluten-free option, use corn tortillas or gluten-free wraps. For vegetarian options, swap out the chicken for roasted chickpeas or grilled vegetables like bell peppers and zucchini.
2. Extra Toppings: Add extra flavors and textures by including toppings like sliced avocado, crispy bacon, or different cheeses such as feta or blue cheese. You could also include sliced cucumbers or cherry tomatoes for added freshness.
3. Flavor Enhancements: Experiment with various dressings or marinades for the chicken. A spicy chipotle or honey mustard dressing can add a new dimension to the flavor profile.
4. Spicy Kick: For those who enjoy a bit of heat, consider adding diced jalapeños or a drizzle of hot sauce to the Caesar mixture before wrapping.
With these variations, you can customize the recipe to suit your taste, making it a versatile dish for any occasion.
Conclusion
Mini Chicken Caesar Crunch Wraps offer a delightful blend of flavors and textures, all wrapped up in a convenient package. Their ease of preparation makes them an ideal choice for busy weeknights or casual gatherings with friends. Whether you serve them as a quick lunch or as a fun dinner option, these wraps are sure to be a hit.
We encourage you to try this recipe and enjoy a quick meal that is both satisfying and nutritious. With the ability to customize and adapt it to your preferences, Mini Chicken Caesar Crunch Wraps can become a staple in your recipe collection. Enjoy the crunch, savor the flavors, and make mealtime a delightful experience!
