Introduction
If you’re on the hunt for a dessert that encapsulates the essence of indulgence, nostalgia, and sheer joy, look no further than the Chocolate Chip Cookie Ice Cream Pie. This delightful treat combines the best elements of two beloved classics: the warm, buttery goodness of chocolate chip cookies and the creamy, refreshing sensation of ice cream. Imagine taking a bite and experiencing the crisp texture of a cookie crust, followed by the smooth, rich ice cream filling studded with chocolate chips. It’s a flavor explosion that is sure to satisfy your sweet tooth and leave you reaching for seconds.
This dessert is more than just a treat; it’s a celebration of flavors and textures that work harmoniously together. The sweet, crumbly cookie crust provides a sturdy base that perfectly contrasts the velvety ice cream. The combination of warm, melted chocolate and chilled ice cream creates a delightful temperature play that is simply irresistible. Whether you’re serving it at a summer barbecue, a birthday party, or just as an after-dinner indulgence, this Chocolate Chip Cookie Ice Cream Pie is sure to impress friends and family alike.
Get ready to embark on a fun and creative culinary adventure as we explore the steps to making this nostalgic dessert. With its easy preparation and delightful results, you’ll soon discover why this recipe has become a favorite among dessert lovers everywhere.
Understanding the Components of Chocolate Chip Cookie Ice Cream Pie
To make the perfect Chocolate Chip Cookie Ice Cream Pie, it’s essential to understand its components. Each element plays a crucial role in achieving that ideal balance of flavors and textures, ensuring your pie is nothing short of spectacular.
Description of the Cookie Crust
At the heart of this dessert lies the cookie crust, which serves as the foundation of the pie. This crust is typically made from crushed chocolate chip cookies combined with melted butter. The result is a deliciously sweet and slightly crunchy base that holds up beautifully under the weight of the ice cream. The beauty of using chocolate chip cookies for the crust is that it amplifies the cookie flavor throughout the pie, making each bite a delightful experience.
Importance of Using Quality Chocolate Chip Cookies
When it comes to choosing the cookies for your crust, quality matters. Whether you opt for homemade or store-bought cookies, using high-quality chocolate chip cookies will make a noticeable difference in the final product. Homemade cookies allow you to control the ingredients, ensuring a fresher taste and better texture. On the other hand, if time is of the essence, select a premium brand of store-bought cookies that have a rich flavor and a satisfying crunch.
Differences Between Homemade vs. Store-Bought Cookies
Homemade cookies offer the opportunity to customize flavors, such as adding a pinch of sea salt or using different types of chocolate. Additionally, the freshness of homemade cookies enhances the overall taste of the pie. Store-bought cookies can be a convenient alternative and can yield excellent results, especially when you’re short on time. The key is to choose a cookie that you love, as it will be the star player in your pie.
Overview of Ice Cream Filling
The ice cream filling is where the magic happens. Softened vanilla ice cream becomes the creamy layer that complements the cookie crust. Vanilla is a classic choice, as it allows the flavors of the chocolate chips and cookie crust to shine. However, the versatility of this dessert allows for an array of ice cream flavors; you can experiment with mint chocolate chip, cookies and cream, or even coffee ice cream for a unique twist.
Significance of Using Softened Vanilla Ice Cream
Using softened ice cream is crucial for achieving the right consistency. Softening the ice cream slightly makes it easier to spread evenly into the crust without breaking it apart. This step ensures that the filling blends seamlessly with the crust, creating a harmonious dessert that melts in your mouth. Be sure to take your ice cream out of the freezer about 15-20 minutes before you plan to assemble your pie.
Potential Variations in Flavors
While vanilla ice cream is a classic choice, don’t hesitate to get creative with your flavors. Mint chocolate chip ice cream can add a refreshing twist, while cookies and cream can introduce delightful chunks of cookies into the mix. For a richer flavor, consider using chocolate ice cream or a swirl of caramel or fudge sauce. The possibilities are endless, allowing you to tailor the pie to your taste preferences.
Gathering Your Ingredients
Before diving into the preparation of your Chocolate Chip Cookie Ice Cream Pie, it’s essential to gather all your ingredients. This will not only streamline your cooking process but also ensure that you have everything you need for a successful dessert.
Detailed Ingredient List
Here’s what you will need:
– For the Cookie Crust:
– 2 cups chocolate chip cookies (homemade or store-bought)
– ½ cup unsalted butter, melted
– ¼ cup granulated sugar (optional, for added sweetness)
– For the Ice Cream Filling:
– 1 quart vanilla ice cream (softened)
– 1 cup mini chocolate chips (for added texture and flavor)
– Whipped cream for topping (optional)
Importance of Unsalted Butter for Flavor Control
When making your cookie crust, it’s crucial to use unsalted butter. This allows you to have better control over the level of saltiness in your dessert. Salt enhances the flavors of sweet ingredients, but using unsalted butter gives you the flexibility to adjust the saltiness to your preference. It will also prevent your crust from tasting overly salty, allowing the sweetness of the cookies to shine through.
Explanation of Mini Chocolate Chips and Their Role in the Recipe
Mini chocolate chips are a fantastic addition to the ice cream filling. Their smaller size allows them to distribute evenly throughout the ice cream, ensuring that every bite is bursting with chocolate flavor. They also add a delightful texture that contrasts beautifully with the smooth ice cream. If you prefer, you can use regular chocolate chips, but mini chips tend to blend more seamlessly into the filling.
Insight into Whipped Cream Options
Topping your pie with whipped cream adds an extra layer of decadence. You can choose between sweetened and unsweetened whipped cream, depending on your taste preference. Sweetened whipped cream adds a touch of sweetness that complements the pie perfectly, while unsweetened whipped cream allows the flavors of the pie to take center stage. For a fun twist, consider adding a hint of vanilla extract or a sprinkle of cocoa powder to your whipped cream for added flavor.
Optional Ingredients and Their Contributions
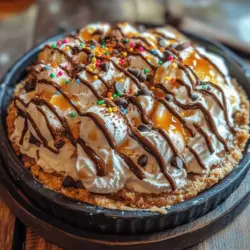
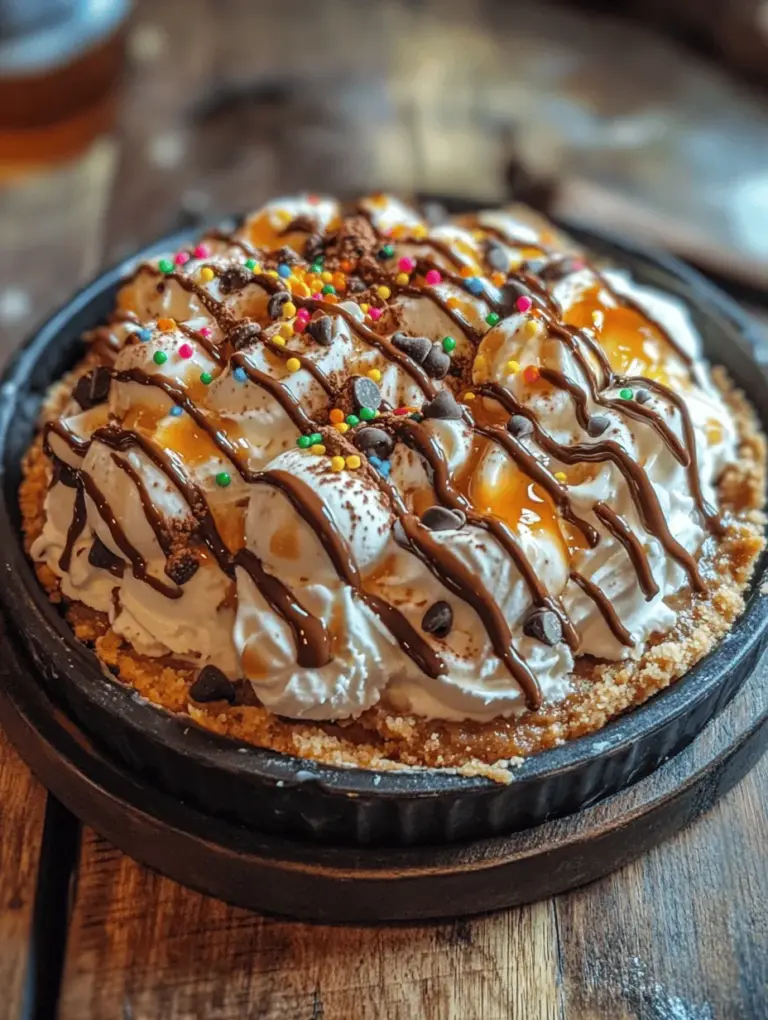
While the primary ingredients are key to the success of your pie, consider incorporating optional ingredients for added flair. Chopped nuts, such as walnuts or pecans, can introduce a satisfying crunch to your filling. Sprinkles can add a festive touch, making your pie visually appealing for special occasions. Additionally, sauces like chocolate or caramel can be drizzled over the whipped cream for an extra layer of flavor and presentation.
Discussing the Choice of Garnishes
Garnishes can elevate the presentation of your Chocolate Chip Cookie Ice Cream Pie. Consider using crushed chocolate cookies, sprinkles, or even a few chocolate chips to sprinkle on top of the whipped cream. Fresh mint leaves can also add a pop of color and freshness. These small details can make your dessert not only delicious but also Instagram-worthy.
Step-by-Step Guide to Making Chocolate Chip Cookie Ice Cream Pie
Now that you have a clear understanding of the components and ingredients, it’s time to dive into the step-by-step process of creating your Chocolate Chip Cookie Ice Cream Pie. Follow these instructions closely to achieve a dessert that will impress everyone at your gathering.
Preparing the Cookie Crust
1. Preheat Your Oven: Start by preheating your oven to 350°F (175°C). This ensures that your crust bakes evenly and achieves the perfect level of crispiness.
2. Crush the Cookies: If you’re using homemade cookies, allow them to cool completely before crushing. Place the cookies in a food processor and pulse until they reach a fine crumb consistency. Alternatively, you can place the cookies in a resealable plastic bag and crush them with a rolling pin.
3. Mix with Butter: In a mixing bowl, combine the crushed cookies with melted unsalted butter and granulated sugar (if using). Stir until the mixture is well combined and resembles wet sand.
4. Press Into the Pan: Grease a 9-inch pie dish or tart pan with a little butter or cooking spray. Transfer the cookie mixture to the pan and press it firmly into the bottom and up the sides. It’s essential to press evenly to create a sturdy base that will hold your ice cream.
5. Bake the Crust: Place the pie crust in the preheated oven and bake for 10-12 minutes, or until it is lightly golden and firm to the touch. Keep an eye on it to avoid overbaking, as it can quickly become too hard.
Importance of Even Pressing for a Sturdy Base
When pressing the cookie mixture into the pan, ensure that you apply even pressure throughout. This will help form a solid crust that won’t crumble when you slice into the pie. Use the bottom of a measuring cup or your fingers to create an even layer, making sure there are no gaps or weak spots.
Tips for Achieving the Perfect Baked Crust
To achieve the perfect baked crust, consider the following tips:
– Don’t Overmix: When combining the crushed cookies and butter, mix just until combined. Overmixing can lead to a tough crust.
– Monitor Baking Time: Keep a close eye on your crust as it bakes. You want it to be lightly golden but not burnt.
– Cool Completely: Allow the crust to cool completely before adding the ice cream filling. This step is crucial to prevent the ice cream from melting too quickly.
Mixing the Ice Cream Filling
1. Soften the Ice Cream: Take your softened vanilla ice cream out of the freezer and let it sit for about 15-20 minutes until it’s easy to scoop and spread.
2. Fold in Chocolate Chips: In a large mixing bowl, gently fold in the mini chocolate chips into the softened ice cream. Be careful not to overmix, as you want to maintain the creamy texture.
3. Fill the Crust: Once your crust has cooled, spoon the ice cream mixture into the cookie crust. Use a spatula or the back of a spoon to spread it evenly. Make sure to fill it to the edges for a beautiful presentation.
4. Smooth the Top: After filling the crust, smooth the top of the ice cream with a spatula. This will create an even surface for any toppings you might want to add later.
5. Freeze: Cover the pie with plastic wrap and place it in the freezer for at least 4 hours, or until firm. This allows the ice cream to set properly, making it easier to slice and serve.
With these initial steps, you’re well on your way to creating a delicious Chocolate Chip Cookie Ice Cream Pie. Stay tuned for the final touches and serving suggestions in the next part of this article!
Techniques for Softening Ice Cream Without Melting
Working with ice cream can be a bit tricky; you want it soft enough to scoop and spread but not so melted that it loses its texture. The best way to soften ice cream without it turning into a soupy mess involves a couple of simple techniques:
1. Refrigeration: Remove your ice cream from the freezer and place it in the refrigerator for about 15-20 minutes before you plan to use it. This method allows the ice cream to soften gradually without melting.
2. Countertop Method: If you don’t have time to wait, you can leave the ice cream on the countertop for 5-10 minutes. Keep an eye on it to ensure it doesn’t melt too much.
3. Scoop and Soften: Another quick trick is to scoop out the ice cream into a mixing bowl and let it sit at room temperature for about 5 minutes. This exposes more surface area to the warmth of the air, softening it more quickly.
Tips for Evenly Distributing Mini Chocolate Chips
When it comes to creating that perfect Chocolate Chip Cookie Ice Cream Pie, ensuring that mini chocolate chips are evenly distributed throughout the ice cream mixture is key to achieving a balanced flavor and texture. Here are a few handy tips:
1. Chill the Mixing Bowl: Before adding your softened ice cream, chill your mixing bowl in the freezer for 10 minutes. This helps to keep the ice cream from melting too quickly while mixing.
2. Pre-mix the Chips: Before adding the mini chocolate chips to the ice cream, toss them in a little bit of flour or cornstarch. This will help to prevent them from sinking to the bottom when combined.
3. Gentle Folding: When incorporating the chocolate chips into the ice cream, use a gentle folding motion rather than stirring vigorously. This maintains the ice cream’s structure and ensures the chips are evenly dispersed.
Assembling the Pie
Once you have your cookie crust ready and the ice cream softened, it’s time to assemble your Chocolate Chip Cookie Ice Cream Pie. Here’s how to do it step by step:
1. Layer the Ice Cream: Start by scooping the softened ice cream into the cookie crust. Use a spatula or the back of a spoon to spread it evenly. If you’re using multiple flavors, layer them carefully to create a marbled effect.
2. Add a Layer of Toppings: Before adding the next layer of ice cream, sprinkle a handful of mini chocolate chips or other toppings over the first layer. This adds texture and flavor.
3. Finish with Ice Cream: If you’re layering another flavor or more ice cream on top, repeat the process, ensuring each layer is as even as possible.
4. Top It Off: Once you’ve added the final layer of ice cream, smooth the top with a spatula to create an even surface for the whipped cream.
Strategies for Layering and Presentation
Layering not only contributes to the flavor profile of your pie but also enhances its presentation. Here are some strategies:
1. Use Clear Pans: If possible, use a glass pie dish or a clear springform pan. This way, guests can see the lovely layers of ice cream and cookie crust.
2. Contrast Colors: When layering ice cream, choose contrasting colors for visual appeal. For instance, using vanilla and chocolate ice cream will create a beautiful striped effect.
3. Whipped Cream Application: Once you’ve smoothed the top layer of ice cream, pipe whipped cream around the edges for a decorative touch. This also helps to secure the toppings you may want to add later.
Importance of Using a Spatula for Smooth Whipped Cream Application
Applying whipped cream smoothly is essential for both aesthetics and taste. Here’s why a spatula is your best friend in this process:
– Even Coverage: A spatula allows for more control when spreading, ensuring that the whipped cream covers the entire surface without tearing the ice cream beneath.
– Neat Edges: With a spatula, you can create clean and defined edges, which is crucial for presentation. A smooth top not only looks professional but also enhances the eating experience.
– Layering Toppings: If you plan to add toppings like chocolate shavings, sprinkles, or fruit, having a smooth whipped cream base helps them to stick better and look uniform.
Freezing the Pie
After assembling your pie, it’s time to freeze it. Freezing is crucial for setting the pie and achieving the right texture. Here’s what you need to know:
1. Initial Freeze: Place the pie in the freezer uncovered for about 30 minutes. This initial freeze helps the layers firm up.
2. Covering: After this, cover the pie with plastic wrap or aluminum foil to prevent freezer burn. Make sure it’s sealed tightly.
3. Freezing Time: For optimal firmness, freeze the pie for at least 4 hours, but overnight is preferable if you want it to set completely.
Explanation of the Freezing Process and Its Impact on Texture
The freezing process is essential for the final texture of your Chocolate Chip Cookie Ice Cream Pie. Here’s how it affects the pie:
– Firmness: Freezing solidifies the ice cream, giving it that delightful scoopable texture while maintaining the integrity of each layer.
– Flavor Meld: As the pie freezes, the flavors meld together, enhancing the overall taste. The cookie crust absorbs some moisture, making it softer while still maintaining a slight crunch.
– Stability: A well-frozen pie holds its shape when sliced, ensuring that you get clean, beautiful slices with every serving.
Recommended Freezing Times for Optimal Firmness
To achieve the best texture and flavor for your pie, consider these freezing recommendations:
– Minimum Time: As mentioned, freezing for at least 4 hours is crucial to allow the ice cream to firm up properly.
– Ideal Time: For the best results, freeze the pie overnight. This gives all layers ample time to set and ensures that the flavors have fully developed.
– Serving: When ready to serve, let the pie sit at room temperature for about 5-10 minutes before slicing. This will make it easier to cut through the layers without compromising the structure.
Flavor Variations and Customizations
One of the most wonderful aspects of the Chocolate Chip Cookie Ice Cream Pie is its versatility. Here are some ideas for flavor variations and customizations:
1. Exploring Different Ice Cream Flavors: While classic vanilla or chocolate works beautifully, don’t hesitate to explore flavors like mint chocolate chip, cookies and cream, or even fruity options like strawberry or mango.
2. Seasonal Variations: Tailor your pie to the seasons. In the fall, try adding pumpkin spice ice cream for a festive twist. During the winter holidays, peppermint ice cream can add a refreshing flavor to your pie.
3. Alternative Crust Options: While a cookie crust is traditional, consider trying other options like a graham cracker crust or an Oreo crust for added flavor.
4. Using Different Cookies: Why not mix things up by using different cookies in your crust? Oreos or even gingersnaps can provide a unique flavor profile that complements the ice cream.
5. Creative Toppings and Garnishes: Top your pie with whipped cream, chocolate sauce, or caramel drizzle. Fresh fruits like strawberries or bananas can add a refreshing touch.
6. Other Drizzle Options: For an extra indulgent experience, consider drizzling with peanut butter or Nutella, along with crunchy toppings like crushed nuts or candy bars.
Serving Suggestions and Presentation Ideas
Your Chocolate Chip Cookie Ice Cream Pie is not only delicious but also perfect for a variety of occasions. Here are some serving suggestions and presentation ideas:
1. Ideal Occasions: This pie is perfect for birthday parties, family gatherings, summer barbecues, or even casual weeknight desserts. It’s a crowd-pleaser that’s sure to impress.
2. Slicing and Serving Tips: For clean slices, use a sharp knife dipped in warm water. Wipe the knife clean between cuts to maintain the integrity of each slice.
3. Creative Plating Ideas: Serve slices on a decorative plate, adding a dollop of whipped cream and a sprinkle of mini chocolate chips on the side. You could also add a small scoop of additional ice cream for a delightful contrast.
Conclusion
Making and enjoying a Chocolate Chip Cookie Ice Cream Pie is a delightful experience that combines the best of both worlds: a delicious cookie crust and creamy ice cream. The joy of creating this dessert lies not only in the process but also in the memories you build while sharing it with friends and family.
Consider sharing this recipe with loved ones, as it’s sure to become a favorite. Homemade desserts have a unique way of bringing people together, and this pie is no exception. Whether you’re celebrating a special occasion or just enjoying a sunny day, there’s nothing quite like the satisfaction of indulging in a slice of this delightful pie. Embrace the joy of creating and savoring homemade desserts, and let this Chocolate Chip Cookie Ice Cream Pie be a sweet addition to your culinary repertoire.