Introduction
Cheesy garlic breadsticks have become a beloved staple in many households, perfectly complementing a variety of meals, from pasta dishes to salads and soups. Their irresistible combination of gooey cheese, rich garlic flavor, and soft, fluffy bread makes them a favorite appetizer or snack. Whether served as a side at family dinners or enjoyed on their own, these breadsticks are sure to bring a smile to anyone’s face.
The beauty of homemade cheesy garlic breadsticks lies not just in their taste but also in the experience of creating them from scratch. Making breadsticks at home allows you to customize flavors, control ingredient quality, and enjoy the delightful aroma of baking bread wafting through your kitchen. This recipe will guide you step-by-step through the process of creating your own batch of cheesy garlic breadsticks, allowing you to indulge in the joy of baking while impressing your family and friends.
So, roll up your sleeves and prepare to dive into this delicious recipe that will transform your meal into something truly special.
Understanding the Basics of Breadstick Making
Before diving into the specifics of the recipe, it’s essential to understand the fundamentals of breadstick making. The key to achieving that perfect texture lies in the dough-making process, which involves combining ingredients in the right proportions and allowing them to work together harmoniously.
The Dough-Making Process
Creating the dough is the first and most crucial step in making cheesy garlic breadsticks. It typically starts with flour, which serves as the foundation of the bread. As you mix in other ingredients, the dough begins to form a cohesive structure.
Kneading the dough is another vital aspect of this process. This technique helps develop gluten, which gives the bread its elasticity and chewiness. The act of kneading ensures that the ingredients are thoroughly combined and that air is incorporated, which contributes to the rise of the dough during fermentation.
Key Ingredients and Their Roles
Each ingredient in the cheesy garlic breadsticks recipe plays a significant role, contributing to the overall flavor, texture, and success of the breadsticks. Let’s take a closer look at these essential components:
– All-Purpose Flour: This versatile flour provides the structure for your breadsticks. While all-purpose flour works perfectly, you can also experiment with bread flour for a chewier texture or whole wheat flour for a healthier twist.
– Sugar: A small amount of sugar is crucial for activating the yeast. It feeds the yeast, helping it produce carbon dioxide, which causes the dough to rise.
– Instant Yeast: Instant yeast is preferred for its convenience and reliability. It doesn’t require proofing like active dry yeast, meaning you can mix it directly into the dry ingredients. Understanding the differences between yeast types can help you choose the best option for your baking needs.
– Salt: Salt is essential not only for flavor but also for strengthening the gluten structure in the dough. It helps regulate yeast activity, ensuring a balanced rise and perfect texture.
– Warm Water: The temperature of the water is critical for yeast activation. Ideally, it should be warm (around 110°F or 43°C) to create an optimal environment for the yeast to thrive without killing it.
– Olive Oil: Adding olive oil enhances the flavor of the breadsticks and contributes to a softer texture. It also helps to keep the breadsticks moist as they bake.
– Unsalted Butter: Using unsalted butter allows you to control the amount of salt in your recipe. Butter adds richness and flavor, making your breadsticks even more delicious.
– Garlic, Herbs, and Cheeses: These ingredients are what truly elevate your cheesy garlic breadsticks. Fresh or roasted garlic provides a robust flavor, while a blend of herbs, such as oregano and parsley, adds depth. A mix of cheeses—typically mozzarella and parmesan—ensures a melty, gooey finish.
– Optional Toppings: Feel free to get creative! You can personalize your breadsticks with toppings like crushed red pepper flakes, additional herbs, or even a sprinkle of everything bagel seasoning to suit your taste.
Insight Into the Fermentation Process
The fermentation process is where the magic happens. As the yeast consumes the sugar in the dough, it produces carbon dioxide gas and alcohol, causing the dough to rise. This process not only contributes to the leavening of the breadsticks but also enhances their flavor. Allowing the dough to rise for sufficient time—typically 1 to 2 hours—enables the flavors to develop fully and results in a light, airy texture.
Visual Cues for Dough Readiness
When making breadsticks, it’s essential to recognize when your dough is ready for the next step. After kneading, the dough should be smooth, elastic, and slightly tacky to the touch. You can perform the “windowpane test” to gauge its readiness: take a small piece of dough and stretch it gently. If it forms a thin, translucent membrane without tearing, your dough is ready for the first rise.
Ingredients Breakdown
Now that we have a solid understanding of the basics, let’s delve deeper into each ingredient required for our cheesy garlic breadsticks. Selecting quality ingredients is vital for achieving the best results, so pay attention to the details.
1. All-Purpose Flour: Look for a high-quality all-purpose flour that is unbleached for the best texture. If you prefer a heartier flavor, you can substitute up to half of the all-purpose flour with whole wheat flour.
2. Sugar: Granulated white sugar is the most common choice for this recipe. However, you can also use honey or agave syrup as a natural sweetener. Just be mindful that using liquid sweeteners may slightly alter the dough’s hydration.
3. Instant Yeast: Instant yeast can be found in most grocery stores. If you only have active dry yeast, you can still use it, but remember to activate it in warm water with a pinch of sugar before adding it to the dry ingredients.
4. Salt: Sea salt or kosher salt are excellent options for this recipe. Avoid using table salt if possible, as it can have a more pronounced flavor and may result in a different texture.
5. Warm Water: Use filtered or tap water that is warm but not hot. A food thermometer can be handy to ensure you’re in the ideal temperature range for yeast activation.
6. Olive Oil: Extra virgin olive oil provides the best flavor; however, if you prefer a milder taste, light olive oil will work too. You can also substitute melted butter for a richer flavor if desired.
7. Unsalted Butter: Unsalted butter is ideal as it allows you to control the salt level in the breadsticks. If you only have salted butter, simply reduce the amount of salt you add to the dough.
8. Garlic, Herbs, and Cheeses: Fresh garlic is preferred for its pungent flavor, but you can also use garlic powder in a pinch. For herbs, dried oregano and parsley are common choices. For the cheese, a combination of shredded mozzarella for stretchiness and grated parmesan for flavor works beautifully.
9. Optional Toppings: Consider adding toppings like a sprinkle of sea salt, garlic powder, or even fresh herbs on top before baking for an extra flavor boost.
Step-by-Step Guide to Making Cheesy Garlic Breadsticks
Preparing the Dough
Mixing and Kneading: Start by combining the all-purpose flour, sugar, instant yeast, and salt in a large mixing bowl. Whisk these dry ingredients together until evenly mixed. In a separate bowl, combine the warm water and olive oil. Gradually pour the wet ingredients into the dry mixture, stirring with a wooden spoon or spatula until a shaggy dough begins to form.
Once the dough starts coming together, transfer it to a floured surface for kneading. Knead the dough for about 8-10 minutes until it becomes smooth and elastic. Remember to check the texture using the windowpane test to ensure it’s ready for the first rise.
First Rise
The Rising Process: After kneading, shape the dough into a ball and place it in a lightly greased bowl, turning it to coat all sides with oil. Cover the bowl with a clean kitchen towel or plastic wrap to keep the moisture in and let it rise in a warm, draft-free area. This first rise typically takes about 1-2 hours, or until the dough has doubled in size.
During this time, the yeast will work its magic, creating air pockets that will contribute to the lightness of your breadsticks. Once the dough has risen, gently punch it down to release the air before proceeding to shape your breadsticks.
In the next part of this article, we will explore how to shape the dough into delightful breadsticks, add the cheesy garlic topping, and bake them to perfection. Stay tuned for more deliciousness!

Ideal Conditions for Dough Rising
Creating the perfect cheesy garlic breadsticks begins with the dough, and ensuring it rises properly is crucial to achieving the desired texture. The ideal conditions for dough rising include a warm, draft-free environment. Yeast thrives at temperatures between 75°F and 85°F (24°C to 29°C). To create the perfect environment for your dough, consider these tips:
– Use Your Oven: Preheat your oven to its lowest setting for just a minute, then turn it off. Place the covered bowl of dough inside. The residual warmth will help the yeast activate and rise the dough efficiently.
– Humidity Matters: If your kitchen is dry, lightly mist the dough with water and cover it with a damp cloth to keep it from drying out while it rises.
– Warm Water: When mixing your dough, ensure your water is warm but not hot. Temperatures around 110°F (43°C) are ideal for activating the yeast without killing it.
Preparing the Garlic Butter
Garlic butter is the secret sauce that elevates your cheesy garlic breadsticks from ordinary to extraordinary. Here’s how to prepare this flavorful topping:
1. Basic Garlic Butter Recipe: Start with 1/2 cup (one stick) of unsalted butter, softened to room temperature. Add 4-5 cloves of minced garlic, depending on your taste preference, and mix thoroughly.
2. Infusing Flavors: To enhance the garlic butter, consider incorporating fresh herbs like parsley, basil, or oregano. Simply chop a tablespoon of your preferred herb and mix it into the softened butter along with the garlic.
3. Balancing Flavors: It’s essential to balance the garlic’s pungency with a hint of salt and a squeeze of lemon juice. The acidity from the lemon will brighten the flavors, preventing the butter from becoming too heavy.
Shaping the Breadsticks
Once your dough has risen and your garlic butter is ready, it’s time to shape the breadsticks. Follow these techniques to ensure they turn out perfectly:
1. Rolling and Cutting the Dough: On a lightly floured surface, roll out the risen dough into a rectangle about 1/2 inch thick. Using a sharp knife or pizza cutter, cut the dough into strips approximately 1 inch wide.
2. Uniformity is Key: For even baking, it’s crucial to maintain uniformity in size. If your breadsticks are all the same thickness, they will bake evenly and develop the same texture.
3. Twisting the Strips: For added texture and presentation, consider twisting each strip before placing it on the baking sheet. This not only looks appealing but also allows for more surface area to absorb the garlic butter.
Adding the Toppings
With the breadsticks shaped, it’s time to layer on the flavors:
1. Layering Flavors: Brush each breadstick generously with your prepared garlic butter, ensuring that the garlic bits and herbs are evenly distributed across the surface.
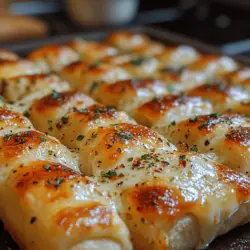
2. Visual Presentation: For a delightful aesthetic, sprinkle shredded mozzarella and parmesan cheese over the top of the dough strips. The cheese should be applied generously, as it will melt and create an irresistible gooey topping.
Final Rising
Before baking, let the shaped breadsticks undergo a second rise:
1. Understanding the Second Rise: This step is crucial for developing texture and flavor. Cover the shaped breadsticks with a clean kitchen towel and allow them to rise for about 30 minutes in a warm spot. You’ll notice they will puff up slightly.
Baking the Breadsticks
Baking is where your cheesy garlic breadsticks truly come to life:
1. Optimal Baking Temperature: Preheat your oven to 375°F (190°C). This temperature allows the breadsticks to bake evenly, resulting in a golden brown crust.
2. Timing Is Everything: Bake the breadsticks for about 15-20 minutes or until they are golden brown and the cheese is bubbling.
3. Visual Signs of Doneness: Look for a nice golden color on the tops and ensure the cheese is melted and slightly crispy around the edges.
Adding Final Toppings
The finishing touches can elevate your dish:
1. Importance of Finishing Touches: Once the breadsticks are out of the oven, brush them again with garlic butter for added richness and flavor.
2. Cheese Variations: Consider adding a sprinkle of grated parmesan or a dusting of Italian seasoning for an extra flavor boost.
Serving Suggestions
Cheesy garlic breadsticks are incredibly versatile and can complement a variety of dishes:
– Ideal Pairings: Serve your breadsticks alongside a rich tomato soup, a crisp garden salad, or your favorite pasta dish to create a satisfying meal.
– Presentation Ideas: For gatherings or family meals, arrange the breadsticks in a basket lined with a clean cloth. This not only keeps them warm but also adds an inviting touch to your dinner table.
Nutritional Information
Understanding the nutritional value of your cheesy garlic breadsticks can help you make informed choices:
– Calories and Nutritional Benefits: Each serving of cheesy garlic breadsticks contains approximately 200-250 calories, depending on the amount of cheese and butter used. They provide carbohydrates for energy and a moderate amount of protein from the cheese.
– Dietary Considerations: For those following a gluten-free diet, consider substituting regular flour with a gluten-free all-purpose flour blend. This can help in making a gluten-free version without sacrificing taste.
Conclusion
Making cheesy garlic breadsticks at home is not only a delightful culinary experience but also a great way to bond with family and friends. The joy of pulling a fresh batch right out of the oven, the aroma of garlic and melted cheese wafting through your kitchen, and the satisfaction of sharing them with loved ones is unparalleled. With this recipe, you’re equipped to create a delicious treat that will impress everyone at your table. So gather your ingredients, roll up your sleeves, and enjoy the process of making these irresistible cheesy garlic breadsticks!