Introduction
In the realm of desserts, no-bake cheesecakes have carved out a special niche for themselves, beloved for their creamy texture and the ease with which they can be prepared. Whether you’re hosting a summer barbecue, celebrating a birthday, or simply indulging in a sweet craving, no-bake cheesecakes offer a delightful solution that requires minimal effort yet yields maximum satisfaction. Among these treats, the Decadent No Bake Oreo Cheesecake stands out as a true crowd-pleaser, sure to impress family and friends alike.
Imagine the rich, creamy filling infused with the iconic flavor of Oreos, sitting atop a perfectly crunchy crust made from everyone’s favorite cookies. This dessert not only satisfies your sweet tooth but also brings a sense of nostalgia, evoking memories of childhood treats. The best part? You don’t need to worry about turning on the oven, making it an ideal choice for those hot summer days or spontaneous gatherings.
What makes this cheesecake particularly appealing is its straightforward preparation method. Both novice bakers and seasoned kitchen veterans will find this recipe easy to follow, requiring just a handful of ingredients and a few simple steps. With no baking involved, the Decadent No Bake Oreo Cheesecake is a perfect introduction to the world of cheesecakes, allowing you to create something impressive without the stress of traditional baking.
Understanding the Ingredients
To craft the perfect Decadent No Bake Oreo Cheesecake, it’s essential to understand the main components that contribute to its rich flavor and creamy texture. Each ingredient plays a pivotal role, and the quality of these ingredients can significantly impact the final result.
The Crust
The foundation of any cheesecake is its crust, and for this recipe, we turn to the classic Oreo cookie. Using whole Oreo cookies combined with melted butter creates a flavorful and crunchy base that perfectly complements the creamy filling. The chocolatey notes of the cookies not only add depth to the flavor but also provide a delightful contrast to the smoothness of the cheesecake.
When choosing your Oreos, consider using the regular variety for the most authentic flavor, but feel free to experiment with different flavors if you’re feeling adventurous. The butter is equally important, as it binds the cookie crumbs together, ensuring a solid crust that holds its shape when sliced.
The Cheesecake Filling
The star of the show is undoubtedly the cheesecake filling, which is achieved primarily through the use of cream cheese, powdered sugar, and heavy cream. Cream cheese provides the rich and tangy flavor essential to a cheesecake, while powdered sugar adds the necessary sweetness without being overly granulated, which can disrupt the smooth texture of the filling.
Heavy cream is crucial in this recipe, as it contributes to the lightness and fluffiness of the cheesecake. When whipped properly, it adds a luscious mouthfeel that elevates the dessert beyond the ordinary. The balance of these ingredients is key; using quality cream cheese and fresh heavy cream will result in a more flavorful and enjoyable cheesecake.
Garnish
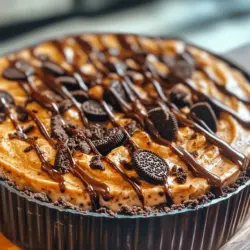
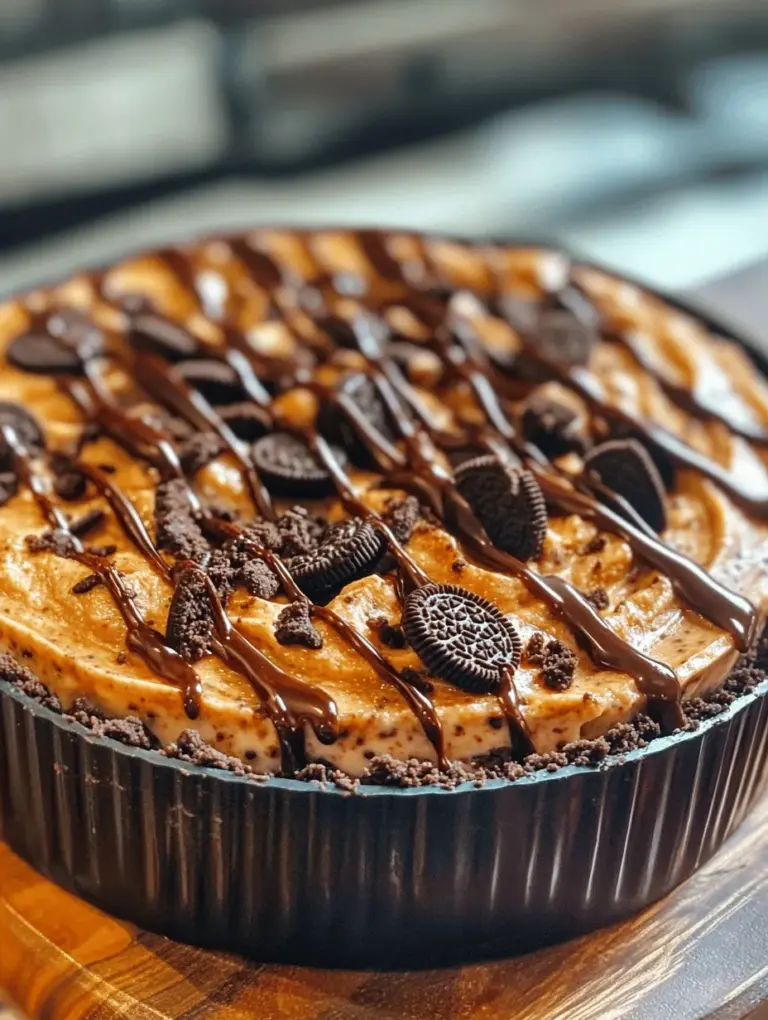
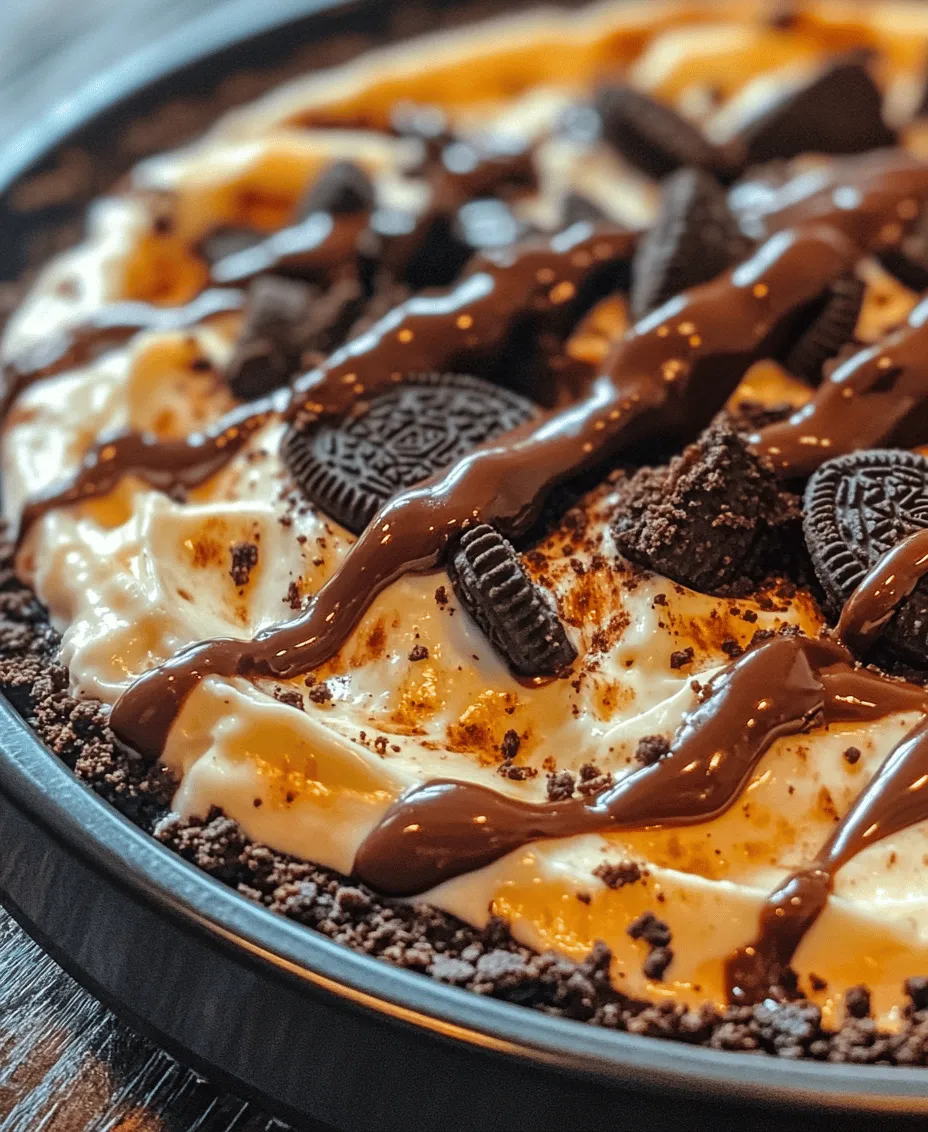
To enhance both the presentation and flavor of your cheesecake, garnishing is a vital step. Crushed Oreos sprinkled on top of the cheesecake not only provide a visual appeal but also impart that beloved Oreo taste with every bite. For an added touch of indulgence, a drizzle of chocolate sauce can elevate your cheesecake to gourmet status. This simple addition brings an extra layer of sweetness and richness, making your dessert even more irresistible.
Step-by-Step Guide to Making No Bake Oreo Cheesecake
Now that we’ve covered the ingredients, it’s time to dive into the step-by-step process of creating your very own Decadent No Bake Oreo Cheesecake. Follow these detailed instructions to ensure a flawless outcome.
Preparing the Crust
1. Crush the Oreos: Begin by placing the Oreo cookies in a food processor and pulse until they are finely crushed. If you don’t have a food processor, you can also place the cookies in a zip-top bag and crush them with a rolling pin. Aim for a texture similar to sand, ensuring there are no large chunks remaining.
2. Combine with Butter: Once you have your cookie crumbs, transfer them to a mixing bowl and add the melted butter. Mix until the crumbs are fully coated and the mixture resembles wet sand. This is crucial for the crust to hold together once set.
3. Press into the Pan: Grease a 9-inch springform pan lightly to prevent sticking. Pour the crumb mixture into the pan and use the back of a measuring cup or your fingers to press the crumbs firmly and evenly across the bottom. Ensure that the crust is compact to avoid crumbling when slicing the cheesecake. Aim for an even thickness of about 1/4 inch.
Making the Cheesecake Filling
1. Prepare the Cream Cheese: In a large mixing bowl, use an electric mixer to beat the cream cheese until it is smooth and free of lumps. This step is crucial as any lumps will be difficult to smooth out later, affecting the texture of the cheesecake.
2. Add Powdered Sugar: Gradually add the powdered sugar to the cream cheese, mixing well until fully incorporated. Taste the mixture to ensure it has reached your desired level of sweetness. Adjust accordingly by adding more sugar if needed.
3. Whip the Heavy Cream: In a separate bowl, pour in the heavy cream and start whipping it using the electric mixer. Whip until stiff peaks form; this means that when you lift the beaters, the cream holds its shape without collapsing. This step is essential, as whipped cream adds lightness to the cheesecake filling.
4. Fold Together: Gently fold the whipped cream into the cream cheese mixture using a spatula. Be careful not to deflate the whipped cream; the goal is to maintain that airy texture. Fold until there are no visible streaks of cream remaining.
5. Incorporate Crushed Oreos: Finally, fold in the crushed Oreos, reserving some for the garnish if desired. This step enhances the flavor profile, ensuring that every bite is packed with delicious Oreo goodness.
By following these steps, you are well on your way to creating a Decadent No Bake Oreo Cheesecake that is not only easy to make but also sure to impress anyone lucky enough to taste it. With a solid understanding of the ingredients and a clear path laid out for preparation, you’re set for a delightful baking experience that will culminate in a dessert everyone will adore. Enjoy the process and savor the anticipation of indulging in your delicious creation!
The Role of Whipped Cream in Achieving a Light and Fluffy Cheesecake Texture
Whipped cream is a crucial component in crafting a light and fluffy texture for your No Bake Oreo Cheesecake. When incorporated correctly, it adds airiness and volume to the filling, which balances the density of the cream cheese and creates a luxurious mouthfeel. For best results, use heavy cream to whip; its higher fat content allows for more stability and structure in the final dessert.
Start by chilling your mixing bowl and beaters in the refrigerator for about 10 minutes before whipping the cream. This simple step enhances the whipping process, resulting in soft peaks that are ideal for folding into your cheesecake mixture. Aim for a texture that is fluffy yet still holds its shape, which is key to achieving that decadent consistency you desire.
Incorporating the Oreo Cookies
The star of this dessert, the Oreo cookie, plays a vital role not only in flavor but also in texture and visual appeal. To prepare the cookies for incorporation, crush them into coarse crumbs, leaving some larger pieces for added texture. This will enhance the overall experience as you indulge in each slice of cheesecake.
Folding in Chopped Oreo Cookies Without Deflating the Mixture
Once your whipped cream is ready, it’s time to fold in the chopped Oreo cookies. The key here is to incorporate them gently to avoid deflating your whipped cream. Start by adding a small portion of the whipped cream to the cream cheese mixture, stirring it in to lighten the batter. Then, gently fold in the rest of the whipped cream using a spatula.
To do this, slide the spatula down the side of the bowl, scraping the bottom and bringing the mixture from the bottom to the top. Rotate the bowl as you go to ensure even distribution of the cookies throughout the cheesecake. This technique helps maintain the airy texture while ensuring that the Oreo flavor is evenly distributed.
Assembling the Cheesecake
With your filling ready, it’s time to assemble your cheesecake. Carefully pour the cheesecake mixture over the prepared Oreo crust. Use a spatula to smooth the top, ensuring an even layer. This step is crucial for a beautiful presentation when you slice into the cheesecake.
Decorative Techniques to Enhance the Presentation
Presentation can elevate any dessert, and your No Bake Oreo Cheesecake is no exception. Consider adding a few decorative touches to impress your guests. Here are some ideas:
1. Swirls of Whipped Cream: Pipe dollops of whipped cream around the edge of the cheesecake for a beautiful border.
2. Crushed Oreos: Sprinkle crushed Oreo cookies on top for a contrasting texture.
3. Chocolate Sauce: Drizzle chocolate sauce over the top for an extra touch of decadence.
4. Oreo Halves: Place whole Oreo cookie halves upright on top for a striking visual.
These simple touches can make your cheesecake an eye-catching centerpiece at any gathering.
Chilling the Cheesecake
The chilling process is essential for setting your No Bake Oreo Cheesecake. As it chills, the filling firms up, transforming from a creamy batter to a sliceable dessert. Allow your cheesecake to chill in the refrigerator for at least 4-6 hours, though overnight is even better for optimal flavor development and texture.
During this time, the flavors meld together, and the crust becomes a delightful contrast to the creamy filling. The longer you can resist the temptation to dive in, the more satisfying the cheesecake will be.
Serving Suggestions for No Bake Oreo Cheesecake
When it’s finally time to serve your No Bake Oreo Cheesecake, presentation is key. Here are some tips to elevate your serving style:
1. Slice Carefully: Use a hot knife to slice through the cheesecake smoothly. Dip the knife in hot water, wipe it dry, and then cut for clean edges.
2. Plating: Serve each slice on a dessert plate, and consider garnishing with a dollop of whipped cream and a sprinkle of crushed Oreo for that extra flair.
3. Beverage Pairing: This cheesecake pairs beautifully with a variety of beverages. Consider serving it with a glass of cold milk, a rich cup of coffee, or even a sweet dessert wine to complement the flavors.
Nutritional Information
Understanding the nutritional aspects of your No Bake Oreo Cheesecake can help you indulge mindfully. Here’s a quick overview:
– Calories: A typical slice contains approximately 300-400 calories, depending on the size and specific ingredients used.
– Fat: The rich cream cheese and whipped cream contribute to the fat content, which can range from 20-25 grams per slice.
– Sugar: With the addition of sugar and cookies, expect around 20-25 grams of sugar per serving.
While this cheesecake is indeed an indulgence, it’s important to practice portion control. Enjoying a smaller slice can satisfy your sweet tooth without overdoing it.
Conclusion
The Decadent No Bake Oreo Cheesecake is a delightful treat that combines simplicity with indulgence. The ease of preparation and the rich flavors make it an ideal dessert for gatherings or a special treat at home. Embrace the no-bake process and create a dessert that is sure to impress your friends and family.
Whether you are celebrating a special occasion or simply craving something sweet, this cheesecake delivers on all fronts—texture, flavor, and visual appeal. So gather your ingredients, follow the steps, and prepare to treat yourself to a creamy slice of heaven that will leave everyone asking for seconds. Enjoy your culinary adventure with this delicious dessert!