
Introduction
Chocolate biscuits hold a special place in the hearts of dessert lovers around the world. Their delightful combination of crispy edges and soft, chewy centers makes them a favorite treat for both children and adults alike. Whether enjoyed with a cup of tea, shared at gatherings, or simply savored alone, chocolate biscuits evoke a sense of comfort and indulgence. In today’s fast-paced world, where many people juggle work, family, and personal commitments, the demand for quick and easy recipes has never been greater. This is where our “Deliciously Quick Chocolate Biscuits” recipe comes into play, offering a simple solution to satisfy those chocolate cravings without requiring extensive preparation or baking time.
In this article, we will guide you through every step of making these delicious biscuits, ensuring that you can whip up a batch in no time. Perfect for spontaneous gatherings or a late-night snack, this recipe will show you how to create delightful chocolate biscuits that are sure to impress. Let’s dive into the essential ingredients that make this recipe a success, and then we will explore the preparation steps involved.
Understanding the Ingredients
To create the perfect chocolate biscuits, it’s essential to understand the role each ingredient plays in the recipe. Each component contributes not only to the flavor but also to the texture and overall quality of the biscuits. Here’s a detailed breakdown of the key ingredients you’ll need:
All-Purpose Flour
All-purpose flour serves as the foundation of most biscuit recipes, providing the necessary structure and texture. Its moderate protein content allows for the right balance between tenderness and chewiness. When combined with the other ingredients, it helps the biscuits rise and maintain their shape during baking.
Cocoa Powder
Cocoa powder is the star ingredient in this recipe, adding a rich chocolate flavor that elevates the biscuits from ordinary to extraordinary. It brings not only taste but also a deep color to the biscuits. For the best results, opt for high-quality unsweetened cocoa powder, as it will provide a more intense chocolate taste.
Granulated Sugar
Granulated sugar is essential for sweetening the biscuits and plays a crucial role in achieving the desired texture. It helps to create a crispy exterior while contributing to browning during baking. The sugar also interacts with the other ingredients to create a balanced flavor profile, making the biscuits irresistibly delicious.
Baking Powder and Baking Soda
Both baking powder and baking soda act as leavening agents in this recipe, helping the biscuits rise and become light and fluffy. Baking powder is a combination of an acid and a base, while baking soda requires an acidic ingredient to activate it. These agents work together to create air pockets in the dough, resulting in the perfect biscuit texture.
Salt
Salt is an often-overlooked ingredient, yet it plays a vital role in enhancing the overall flavor of the biscuits. It helps to balance the sweetness of the sugar and brings out the chocolate flavor, making each bite more enjoyable. A small amount of salt can make a significant difference in the final taste of your biscuits.
Unsalted Butter
Unsalted butter adds richness and moisture to the biscuits, creating a tender crumb. The fat in the butter coats the flour particles, preventing gluten formation and resulting in a softer texture. Using unsalted butter allows you to control the salt content in your recipe, ensuring a balanced flavor.
Egg
The egg acts as a binder in this recipe, helping to hold the ingredients together while adding moisture. It contributes to the overall structure of the biscuits and aids in achieving a chewy texture. When beaten, eggs also incorporate air into the mixture, further contributing to the rise of the biscuits.
Vanilla Extract
Vanilla extract adds depth and complexity to the flavor of the biscuits. Its aromatic qualities enhance the chocolate taste, making the overall experience more satisfying. A splash of vanilla can elevate even the simplest of recipes, and this one is no exception.
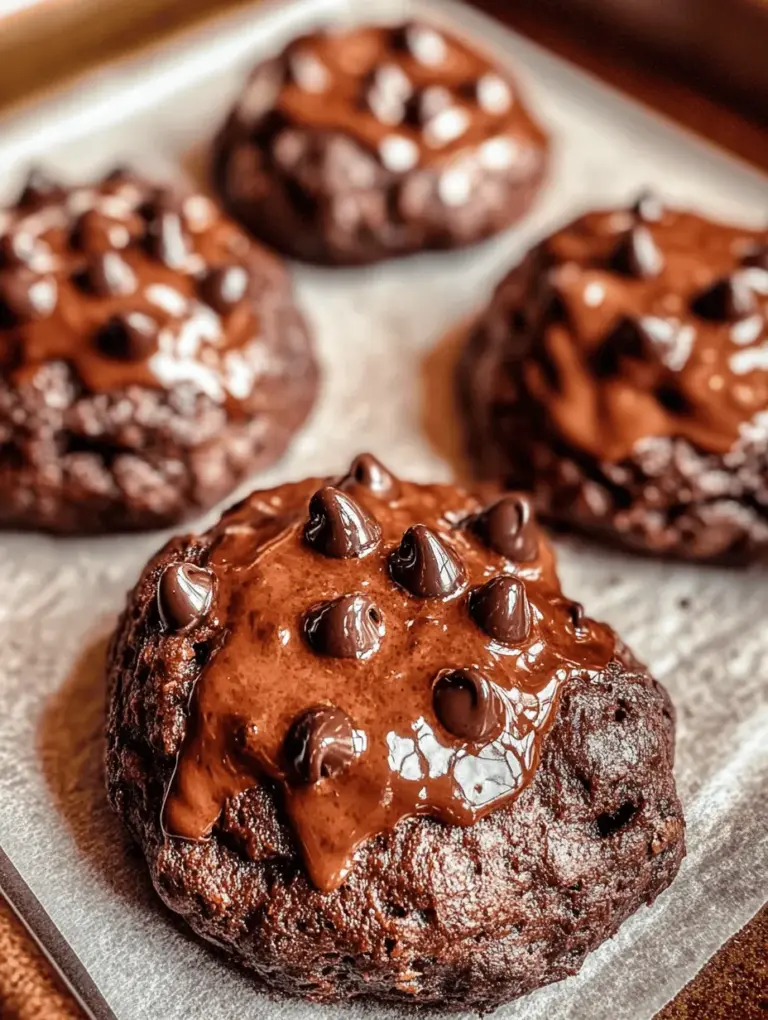
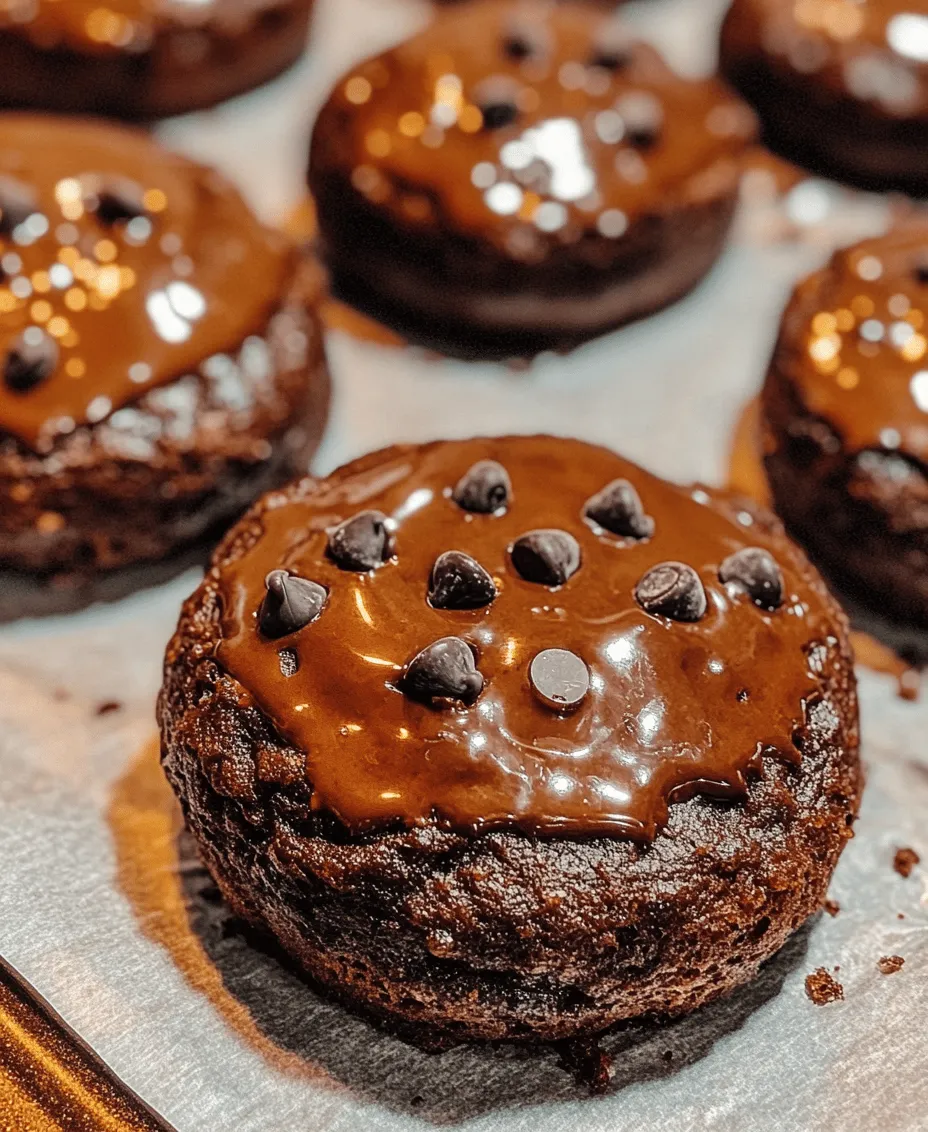
Chocolate Chips (Optional)
For those who want to take their chocolate indulgence to the next level, chocolate chips are an optional ingredient to consider. They can be mixed into the dough to create pockets of molten chocolate that melt in your mouth. Choose semi-sweet or dark chocolate chips based on your personal preference, or even try a mix for a variety of flavors.
Preparation Steps Explained
With a solid understanding of the ingredients, the next step is to prepare for baking. Here are the essential preparation steps to ensure your chocolate biscuits turn out perfectly.
Preheating the Oven
The first step in the biscuit-making process is preheating the oven. This is crucial because baking requires consistent temperatures for even cooking. Setting your oven to the correct temperature (usually around 350°F or 175°C for biscuits) ensures that the biscuits bake evenly and achieve that desirable golden-brown color. While the oven heats up, you can prepare the other ingredients, making the most of your time and streamlining the process.
Mixing Dry Ingredients
Once your oven is preheated, it’s time to start mixing the dry ingredients. Begin by sifting the all-purpose flour, cocoa powder, baking powder, baking soda, and salt together in a large mixing bowl. Sifting not only helps to break up any clumps in the dry ingredients but also ensures an even distribution of the leavening agents throughout the mixture. This step is vital for achieving a uniform texture in your biscuits.
When mixing the dry ingredients, use a whisk or a fork to combine them thoroughly. This will help aerate the mixture, allowing for better incorporation with the wet ingredients later on. The goal is to create a dry mixture that is well-blended and free of lumps, setting the stage for a smooth biscuit dough.
Stay tuned for the next part of this article, where we will delve into the process of combining the wet ingredients, shaping the dough, and finally baking these delicious chocolate biscuits to perfection!
Creaming Butter and Sugar
The creaming process is a foundational technique in baking that significantly influences the texture of your chocolate biscuits. Begin by placing your softened butter in a large mixing bowl. Using an electric mixer or a wooden spoon, beat the butter until it is creamy and smooth. This process should take about 2-3 minutes. The goal is to incorporate air into the butter, which will help your biscuits rise and become light and fluffy.
Next, gradually add the granulated sugar while continuing to mix. The mixture should turn pale and fluffy, creating a light texture that is essential for achieving the right consistency in your biscuits. When properly creamed, the mixture will hold its shape and have a slightly increased volume, which is a good indicator that it’s ready for the next steps.
Adding Egg and Vanilla
Eggs play a crucial role in baking by adding moisture, structure, and richness to the dough. In this recipe, adding one large egg will enhance the texture and flavor of your chocolate biscuits. Crack the egg into the creamed butter and sugar mixture and mix until fully incorporated. The egg will help bind the ingredients together, resulting in a cohesive dough.
Additionally, vanilla extract is essential for enriching the flavor profile of your biscuits. Add one teaspoon of pure vanilla extract after incorporating the egg. This will not only enhance the chocolate flavor but also add a delightful aroma to your biscuits. Mix until everything is well combined, ensuring that the mixture is smooth and homogenous.
Combining Mixtures
Now it’s time to combine the wet and dry ingredients. In a separate bowl, whisk together the all-purpose flour, cocoa powder, baking powder, and a pinch of salt until evenly blended. This step is crucial as it ensures that the leavening agent is evenly distributed throughout the flour, preventing any bitter pockets in your biscuits.
To avoid overmixing, which can lead to dense biscuits, gently fold the dry ingredients into the wet mixture. Use a spatula or wooden spoon, and incorporate the flour mixture gradually. Start by adding about a third of the dry ingredients, folding it in with gentle strokes. Repeat this process until all the dry ingredients are combined with the wet mixture. Be careful not to overmix; stop as soon as you see no dry flour, as this will help maintain a tender texture in your biscuits.
Shaping the Biscuits
With your biscuit dough ready, it’s time to shape your biscuits. Using a tablespoon or cookie scoop, portion out the dough and roll it into balls. Aim for uniform sizes, about one inch in diameter, which will help them bake evenly. Place the dough balls onto a lined baking sheet, making sure to leave enough space between each biscuit—about two inches apart. This spacing allows the biscuits to spread as they bake without merging into one another.
For a decorative touch, you can slightly flatten the balls with the back of a fork or your palm, but be careful not to flatten them too much. The biscuits will puff up during baking, so a gentle press is all that’s needed.
Baking Process
Preheat your oven to 350°F (175°C) before placing your biscuits inside. Baking time typically ranges from 10 to 12 minutes, depending on your oven and the size of your biscuits. As the biscuits bake, keep an eye on them towards the end of the baking time. The edges should appear set and firm, while the centers may still look slightly soft. This is normal, as biscuits will continue to firm up as they cool.
To check for doneness, lightly press the center of a biscuit. If it springs back, they are ready to come out of the oven. If there’s an indentation, they may need a minute or two longer. Once baked, remove the biscuits from the oven and let them sit on the baking sheet for about 5 minutes before transferring them to a wire rack to cool completely.
Cooling the Biscuits
Cooling your biscuits is a vital step in the baking process. While they may be tempting to devour right out of the oven, allowing them to cool on a wire rack helps set their structure and prevents them from becoming soggy. As the biscuits cool, they will firm up and develop the perfect texture—crispy on the outside and soft on the inside.
It’s best to let them cool for at least 15-20 minutes before serving. This cooling time not only enhances their texture but also intensifies the chocolate flavor as the biscuits reach room temperature.
Nutritional Information
Chocolate biscuits can be a delightful treat, but it’s essential to consider their nutritional profile. A typical homemade chocolate biscuit contains about 100-120 calories, depending on the size and specific ingredients used. The main components include carbohydrates from flour and sugar, fats from butter, and some protein from the egg.
For those looking to lighten the recipe or accommodate dietary restrictions, consider these alternatives:
– Whole Wheat Flour: Substitute half of the all-purpose flour with whole wheat flour for added fiber and nutrients.
– Natural Sweeteners: Replace granulated sugar with coconut sugar or a natural sweetener like honey or maple syrup to reduce refined sugars.
– Coconut Oil: For a dairy-free option, use melted coconut oil in place of butter. This will also impart a subtle coconut flavor to your biscuits.
Serving Suggestions
Chocolate biscuits are incredibly versatile and can be enjoyed in various ways. Here are some creative ideas for serving your delicious creations:
– Pairing with Beverages: Serve your biscuits with a glass of cold milk, a steaming cup of coffee, or a soothing herbal tea. The rich chocolate flavor pairs beautifully with these beverages, enhancing the overall experience.
– Toppings: Elevate your biscuits by adding a scoop of vanilla ice cream or a dollop of whipped cream on top. You can also serve them with fresh fruits like strawberries or raspberries for a refreshing contrast to the rich chocolate.
– Presentation Ideas: For special occasions such as birthdays or tea parties, arrange the biscuits on a decorative platter. Consider dusting them with powdered sugar for an elegant touch or drizzling melted chocolate over them for a decadent finish.
Storing and Reheating Tips
To maintain the freshness of your chocolate biscuits, follow these best practices for storage. After the biscuits have cooled completely, store them in an airtight container at room temperature. They can typically last for about 4-5 days before losing their optimal texture.
If you want to keep them for more extended periods, consider freezing them. Place the biscuits in a single layer on a baking sheet and freeze for about an hour. Once frozen, transfer them to a freezer-safe bag or container. They can last up to three months in the freezer. To enjoy, simply thaw them at room temperature or warm them in the oven at 350°F (175°C) for about 5-10 minutes to restore their delightful texture.
Conclusion
Making chocolate biscuits is not only easy but also a rewarding experience that promises to satisfy even the most ardent chocolate lovers. With simple ingredients and straightforward steps, you can whip up a batch of these delicious treats in no time. Whether enjoyed alone or dressed up with toppings and beverages, chocolate biscuits are perfect for any occasion.
Don’t hesitate to try this recipe for a quick and delightful treat that will surely become a favorite in your household. Gather your ingredients, follow the steps, and indulge in the joy of homemade chocolate biscuits that are sure to impress friends and family alike. Enjoy your baking adventure!