
Introduction
Imagine a dessert that embodies elegance and comfort all in one bite – that’s exactly what Vanilla Custard Squares deliver. These delightful squares feature a luxuriously creamy custard nestled within a perfectly baked crust, making them a show-stopping dessert for any occasion. Whether you’re hosting a dinner party, celebrating a special event, or simply indulging in a sweet treat at home, Vanilla Custard Squares are versatile enough to impress your guests and satisfy your own sweet tooth.
The history of custard desserts stretches back centuries, with roots in medieval European cuisine. Once considered a luxury reserved for the wealthy, custard has since become a beloved staple in many households. My own fond memories of custard desserts stem from family gatherings, where my grandmother would whip up her famous custard tart, filling the kitchen with the sweet aroma of vanilla. It’s a dessert that not only tantalizes the taste buds but also evokes cherished memories, making it perfect for sharing with loved ones.
In this article, we will guide you through the process of making these creamy vanilla custard squares from scratch, ensuring that every step is simple and foolproof. You’ll learn the intricacies of preparing custard, crafting the ideal crust, and achieving that silky texture that makes this dessert so special. Let’s dive into the world of custard and discover how to create these delightful squares.
Understanding Vanilla Custard
Vanilla custard is a rich, creamy mixture that serves as the foundation for many desserts. It is made primarily from milk, sugar, and egg yolks, which come together to create a smooth texture that is both indulgent and comforting. The primary role of custard in desserts is to provide a luscious filling that complements a variety of crusts, cakes, and pastries.
There are several types of custards, each with its own unique characteristics and uses in different cuisines. For instance, pastry cream, often used in éclairs and cakes, is a thicker custard that is perfect for filling pastries. In contrast, crème brûlée features a baked custard topped with a layer of caramelized sugar, creating a delightful contrast of textures. No matter the variety, custards are celebrated for their versatility and ability to elevate any dessert.
When it comes to custard, there’s no comparison between homemade and store-bought options. Homemade custard boasts a freshness and depth of flavor that simply cannot be replicated with pre-packaged products. By making your custard from scratch, you control the quality of ingredients, ensuring that every bite is rich with the taste of real vanilla and the creaminess of whole milk. Furthermore, making custard at home allows you to adjust the sweetness and flavor to your liking, resulting in a dessert that is truly personalized.
Ingredients Breakdown
To create the perfect Vanilla Custard Squares, it’s essential to understand the role of each ingredient in the recipe. Here’s a breakdown of what you’ll need:
For the Custard Filling:
– Whole Milk: This ingredient provides the creamy base for the custard. The higher fat content in whole milk helps achieve a smooth, rich texture that is essential for delicious custard.
– Granulated Sugar: This serves as the primary sweetener in the custard. It balances the richness of the milk and enhances the overall flavor.
– Powdered Sugar: Often used in conjunction with granulated sugar, powdered sugar adds a touch of sweetness while also ensuring a smooth texture in the final custard.
– Cornstarch: This ingredient acts as a thickening agent, helping to create a custard that holds its shape when cut into squares. It also contributes to the silky mouthfeel.
– Vanilla Extract: The star of the show, vanilla extract infuses the custard with its signature flavor. For an even more intense vanilla experience, consider using vanilla bean paste or the seeds from a vanilla pod.
– Butter: Adding richness and depth, butter enhances the flavor of the custard and gives it a luxurious finish.
For the Crust:
– All-Purpose Flour: The base of the crust, all-purpose flour provides structure. The right texture is crucial for a crust that is both flaky and sturdy enough to hold the custard.
– Egg Yolk: This adds richness and helps bind the dough together. The fat in the yolk contributes to a tender crust while also enhancing its flavor.
– Cold Water: Used to bring the dough together, cold water prevents the fat from melting and helps create a flaky texture in the final crust.
Preparing the Perfect Crust
The crust is an essential component of any custard square, providing a delicious contrast to the creamy filling. Here’s how to prepare the perfect crust for your Vanilla Custard Squares.
1. Mixing the Dough: Start by combining the all-purpose flour, granulated sugar, and a pinch of salt in a mixing bowl. This ensures that the dry ingredients are evenly distributed. Next, cut in cold butter using a pastry cutter or your fingertips until the mixture resembles coarse crumbs. The key here is to handle the dough as little as possible to avoid developing gluten, which can lead to a tough crust.
2. Incorporating the Egg Yolk: Once the butter is combined with the dry ingredients, add the egg yolk to the mixture. This will enrich the dough and provide additional flavor. Use a fork to mix in the yolk until it’s evenly distributed.
3. Adding Cold Water: Gradually add cold water, one tablespoon at a time, mixing gently until the dough comes together. You want the dough to be moist but not sticky. If you overwork the dough, it can become tough – a light touch is key.
4. Chilling the Dough: Once your dough is formed, shape it into a disk, wrap it in plastic wrap, and refrigerate for at least 30 minutes. Chilling the dough helps to relax the gluten, resulting in a tender crust that bakes to perfection.
5. Rolling Out the Dough: After chilling, lightly flour your work surface and roll out the dough to a thickness of about 1/8 inch. Carefully transfer the rolled dough to your baking dish, pressing it gently into the corners and sides. Trim any excess dough, leaving a little overhang to account for shrinkage during baking.
Tips for the Perfect Crust
– Avoid Overworking the Dough: Handle the dough as little as possible to maintain a tender texture. If you notice the dough starting to soften, return it to the refrigerator for a quick chill.
– Use Cold Ingredients: Ensure that your butter and water are cold. This helps create a flaky crust as the cold fat will create steam during baking, resulting in a light texture.
– Blind Baking: To ensure a crisp crust, you’ll need to blind bake your crust before adding the custard filling. This process involves partially baking the crust without the filling.
Blind Baking the Crust
Blind baking is a crucial step in the preparation of Vanilla Custard Squares, as it prevents the crust from becoming soggy when the custard is added. Here’s how to successfully blind bake your crust:
1. Preheat the Oven: Start by preheating your oven to 375°F (190°C). This temperature is ideal for achieving a golden-brown crust.
2. Prepare the Crust: Once the crust is shaped in your baking dish, line it with parchment paper or aluminum foil. This will help prevent the crust from puffing up during baking. Fill the lined crust with pie weights, dried beans, or uncooked rice to weigh it down.
3. Bake the Crust: Place the crust in the preheated oven and bake for about 15-20 minutes, or until the edges are lightly golden. Keep an eye on it to ensure it doesn’t brown too much.
4. Check for Doneness: After the initial baking time, carefully remove the weights and parchment paper. If the crust appears wet or soft in the center, return it to the oven for an additional 5-10 minutes until it is fully set and lightly golden.
5. Cool the Crust: Once baked, remove the crust from the oven and let it cool completely before adding the custard filling. This step is vital to maintain the texture and prevent any unwanted moisture transfer.
Variations for the Crust
While the classic crust is delicious on its own, feel free to experiment with flavors. Consider adding a pinch of nutmeg or cinnamon to the flour mixture for a subtle spice. Alternatively, you can use almond flour for a nutty twist, or even incorporate cocoa powder for a chocolate crust.
Creating the Creamy Vanilla Custard
Now that you have your crust prepared and baked, it’s time to turn your attention to the star of the show: the creamy vanilla custard. This step requires careful attention to temperature control to achieve that silky, luscious texture.
1. Combine Ingredients: In a medium saucepan, combine the whole milk, granulated sugar, cornstarch, and a pinch of salt. Whisk the mixture together over medium heat until the sugar and cornstarch are dissolved.
2. Heat the Mixture: Continue to heat the mixture, stirring constantly to prevent it from sticking to the bottom of the pan. As the mixture heats, you will notice it thickening. Bring it just to a simmer but avoid boiling, as this can cause the custard to curdle.
3. Temper the Egg Yolks: In a separate bowl, whisk the egg yolks until they are well combined. To temper the yolks, gradually add a small amount of the hot milk mixture to the yolks while whisking vigorously. This process raises the temperature of the egg yolks slowly, preventing them from becoming scrambled when added to the hot mixture.
4. Combine and Thicken: Once the yolks are tempered, pour the yolk mixture back into the saucepan with the remaining milk mixture. Continue to cook over medium heat, stirring constantly until the custard thickens and coats the back of a spoon.
5. Add Vanilla and Butter: Remove the saucepan from the heat and stir in the vanilla extract and butter. The butter adds richness and a silky finish to the custard. Be sure to mix until the butter has completely melted and is fully incorporated into the custard.
By following these steps, you’ll create a creamy vanilla custard that is both decadent and delightful. This custard will be poured into your pre-baked crust, creating a dessert that is sure to impress family and friends alike. Prepare to indulge in the wonderful world of creamy vanilla custard squares, where every bite is a celebration of flavor and texture. Stay tuned for the next part of this recipe, where we’ll guide you through assembling and serving your delicious creation.
Combining Flavors: Finishing the Custard
As you approach the final steps of creating your creamy vanilla custard, the addition of vanilla extract and butter is crucial for elevating the flavor and texture. Once your custard has thickened, it’s time to infuse it with these rich ingredients.
1. Adding Vanilla Extract: Use pure vanilla extract for the best flavor. A typical measurement is about 1-2 teaspoons, depending on your taste preference. Stir the extract into the custard mixture off the heat. This allows the vanilla’s aromatic qualities to fully integrate without losing any potency.
2. Incorporating Butter: Next, add about 2 tablespoons of unsalted butter while the custard is still warm. The butter will melt into the custard, creating a velvety texture that’s both luxurious and smooth. The fat from the butter helps to enhance the overall mouthfeel of your custard, making each bite a delightful experience.
3. Final Mixing: Ensure that the vanilla and butter are thoroughly combined by whisking gently. This final step not only enriches the flavor but also gives the custard a glossy finish that is visually appealing.
Assembling the Custard Squares
With your custard perfected, it’s time to assemble your custard squares. This step is critical to ensure that you achieve a beautiful and tasty dessert.
1. Pouring the Custard: Start by pouring the warm custard over the cooled crust. It’s essential to do this slowly and evenly to avoid disturbing the crust underneath. A spatula can help guide the custard for an even spread.
2. Even Spreading: Use a spatula to gently spread the custard to the corners of the pan, ensuring that it is level. An even layer of custard will set uniformly, contributing to the overall texture of the dessert.
3. Chilling: Once the custard is poured and spread evenly, cover the pan with plastic wrap or foil, ensuring it does not touch the surface of the custard to avoid condensation. Chill in the refrigerator for at least 4-6 hours or overnight for best results. The custard should be firm to the touch but still have a slight jiggle when you gently shake the pan, indicating it is set properly.
The Art of Presentation
Presentation is key when serving your creamy vanilla custard squares. A visually appealing dessert can elevate any dining experience.
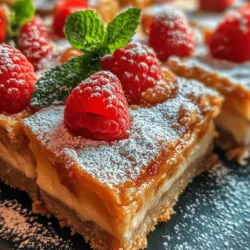
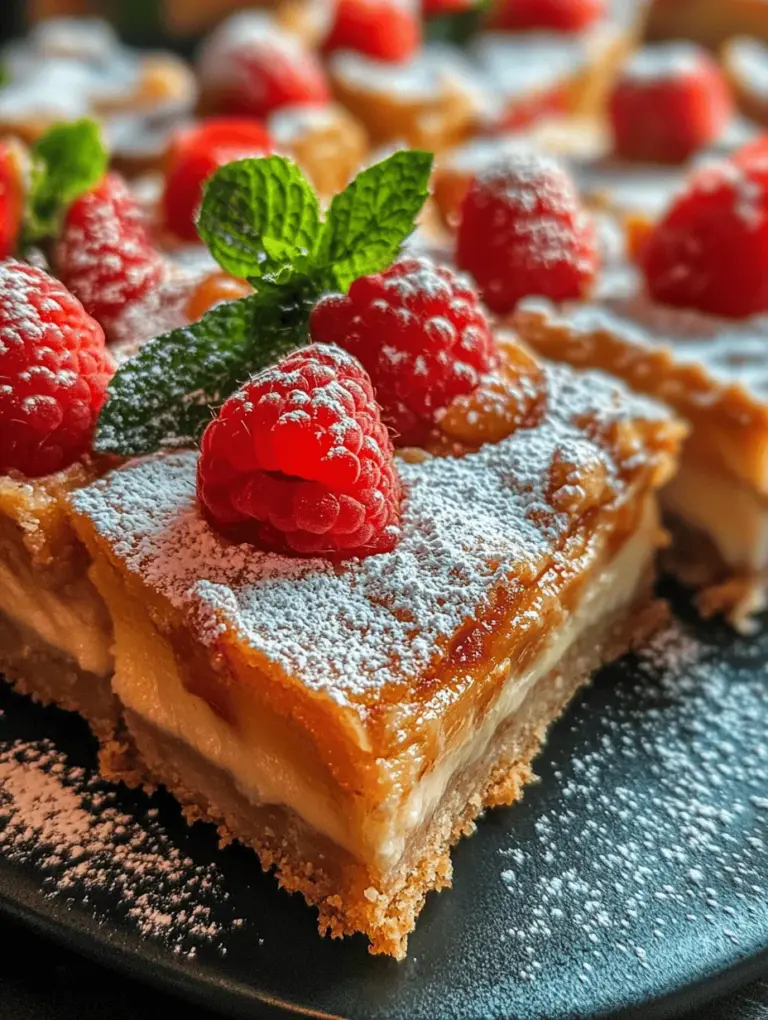
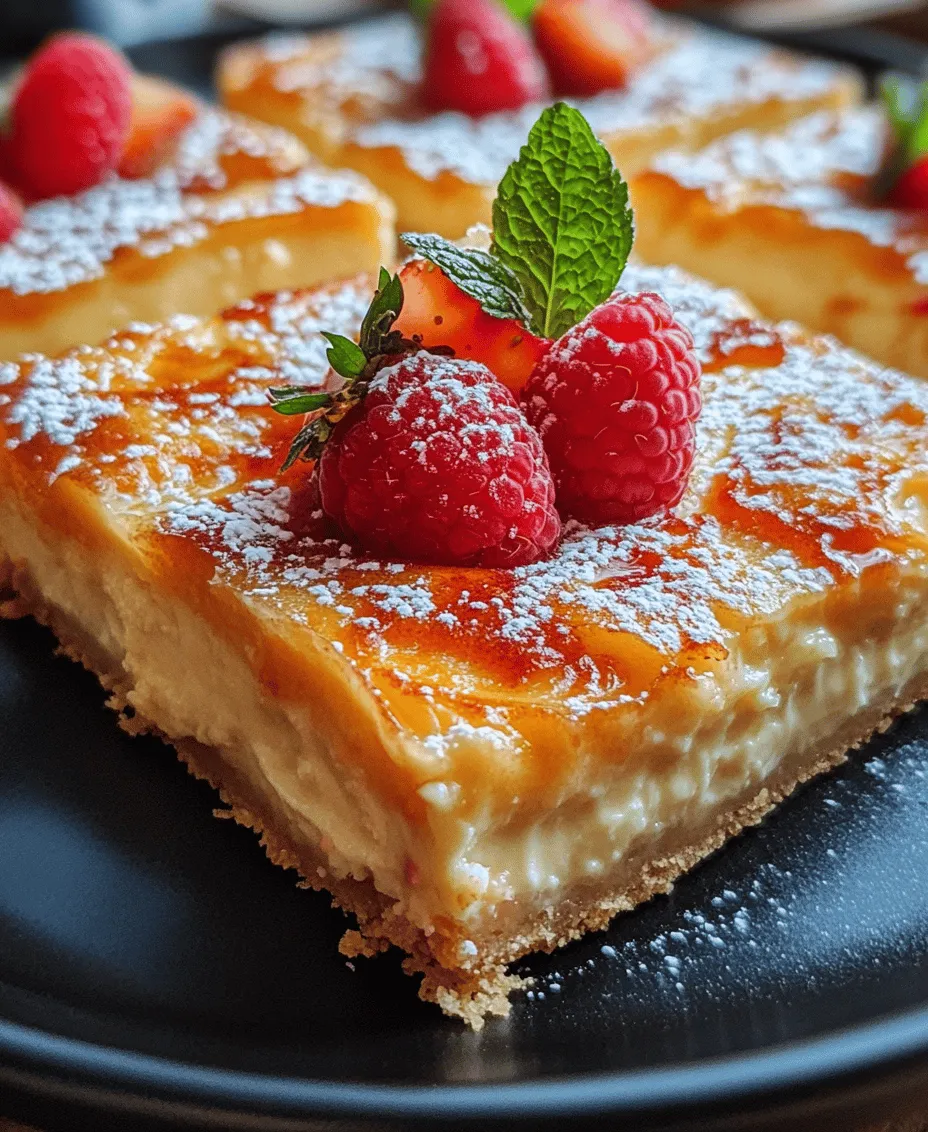
1. Garnishing with Fresh Berries: Fresh berries add a burst of color and flavor. Raspberries, strawberries, or blueberries are excellent choices. Scatter them generously on top of the custard squares just before serving for a fresh touch.
2. Mint Leaves for Freshness: Adding a few mint leaves not only enhances the aesthetic but also provides a refreshing aroma. Place them strategically alongside the berries for an elegant look.
3. Dusting of Powdered Sugar: For an elegant finish, lightly dust the top of the custard squares with powdered sugar. This adds a touch of sweetness and sophistication, making your dessert irresistible.
Serving Suggestions
Creamy vanilla custard squares are versatile and suitable for various occasions. Here are some ideas for serving:
1. Family Gatherings: These squares are perfect for casual family dinners or weekend get-togethers. Their appealing presentation and delightful taste will surely impress your loved ones.
2. Celebratory Events: Whether it’s a birthday, anniversary, or holiday celebration, custard squares make for an elegant dessert that feels special yet is easy to prepare.
3. Elegant Dinner Parties: Serve these custard squares at your next dinner party to wow your guests. Pair them with a glass of dessert wine or a rich coffee to complement the sweetness of the custard.
Storage and Shelf Life
To ensure your vanilla custard squares remain fresh and delicious, proper storage is essential.
1. Refrigeration: Store any leftover custard squares in an airtight container in the refrigerator. When stored correctly, they can last for up to 3-4 days. It’s advisable to keep the squares covered to prevent them from absorbing any odors from other foods.
2. Maintaining Texture and Flavor: To maintain the best texture and flavor, avoid cutting into the squares until you are ready to serve. Once cut, ensure you store the squares with a layer of plastic wrap over them to minimize exposure to air.
3. Freezing Options: If you want to store them for longer, you can freeze the custard squares. Cut them into portions and wrap each piece tightly in plastic wrap and then foil before placing them in a freezer-safe container. They can be frozen for up to 2 months. When ready to enjoy, thaw in the refrigerator overnight before serving.
Conclusion
Creating creamy vanilla custard squares is a rewarding experience that combines simple ingredients with culinary skills to produce an elegant dessert. From recognizing the perfect thickness of your custard to the final assembly and presentation, each step contributes to the overall success of the dish.
These custard squares are perfect for family gatherings, celebratory events, or elegant dinner parties, making them a versatile addition to your dessert repertoire. Their rich flavors, smooth texture, and beautiful presentation are sure to impress anyone who takes a bite.
We encourage you to try this recipe at home, experiment with your garnishes, and enjoy the process of creating something delicious. Share your experiences and variations with friends and family, and let the joy of baking bring everyone together around the table.