
Introduction
Welcome to a culinary adventure that captures the essence of tropical bliss: the Hawaiian Paradise Cheesecake Danish. Imagine biting into a warm, flaky pastry filled with a luscious cream cheese mixture, topped with sweet, caramelized pineapple. This delightful treat is perfect for breakfast, brunch, or dessert, providing a unique twist on traditional Danish pastries. The fusion of sweet King’s Hawaiian rolls, rich cream cheese, and the vibrant flavor of pineapple creates a mouthwatering experience that transports you straight to the Hawaiian islands.
Whether you are hosting a brunch gathering or simply craving an indulgent treat to brighten your day, this recipe is sure to impress your family and friends. With its easy-to-follow instructions, you’ll find that this tropical delight blends convenience with decadence, making it an ideal choice for both novice and seasoned bakers.
Let’s dive deeper into the ingredients that bring this Hawaiian Paradise Cheesecake Danish to life and start preparing for a delicious baking experience.
Understanding the Ingredients
To create the perfect Hawaiian Paradise Cheesecake Danish, it’s essential to understand each ingredient’s role in achieving that delightful balance of flavors and textures. Each component contributes to the overall experience, ensuring that every bite is as heavenly as the last.
Danish Dough Essentials
At the heart of this recipe lies the Danish dough, which provides a flaky, buttery base for the filling.
– King’s Hawaiian Sweet Rolls: These iconic rolls are the star of the show. Known for their soft, fluffy texture and slightly sweet flavor, they serve as the ideal foundation for our Danish. Their rich, sweet profile complements the cream cheese filling and caramelized pineapple perfectly, making every bite a taste of paradise.
– All-Purpose Flour: While we rely on the pre-made King’s Hawaiian rolls for convenience, having all-purpose flour on hand is essential for dusting and rolling out the dough. It prevents sticking and ensures that you can work with the pastry easily as you shape it into the perfect Danish.
– Pre-Made Dough: Using pre-made dough, such as King’s Hawaiian rolls, significantly cuts down on preparation time. This allows you to focus on the filling and toppings, making this recipe approachable for those who may be intimidated by traditional pastry-making techniques.
Cream Cheese Filling
The cream cheese filling is what truly elevates the Hawaiian Paradise Cheesecake Danish.
– Characteristics of the Cream Cheese Filling: This filling is rich and creamy, providing a delightful contrast to the flaky pastry. It should be smooth and spreadable, ensuring that it melds beautifully with the dough and toppings.
– Sugar: The addition of sugar sweetens the cream cheese filling, balancing the tanginess of the cream cheese. This sweetness is crucial for achieving that classic cheesecake flavor that we all love.
– Vanilla Extract: A splash of vanilla extract enhances the overall flavor profile, adding depth and warmth to the filling. It complements the sweetness of the sugar and the richness of the cream cheese.
– Lemon Zest: Incorporating lemon zest into the mixture introduces a refreshing citrus note that brightens the filling. It cuts through the richness, providing a well-rounded flavor that keeps each bite interesting.
– Egg Yolk: The egg yolk acts as a binding agent, helping to create a smooth filling while also adding richness. This ingredient is essential for achieving the right consistency, ensuring that the filling holds together well when baked.
Pineapple Topping
The pineapple topping is what makes this Danish truly tropical.
– Selecting Fresh Pineapple: When choosing pineapple, look for fruit that is ripe and fragrant. A fresh pineapple will have a sweet flavor and juicy texture that elevates the overall dish. Avoid canned pineapples, as they lack the vibrant taste and texture of fresh fruit.
– Flavor Profile: Fresh pineapple has a sweet and slightly tart flavor, which pairs perfectly with the cream cheese filling. This contrast enhances the overall taste of the dessert, bringing a tropical freshness that is hard to resist.
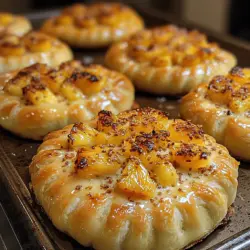
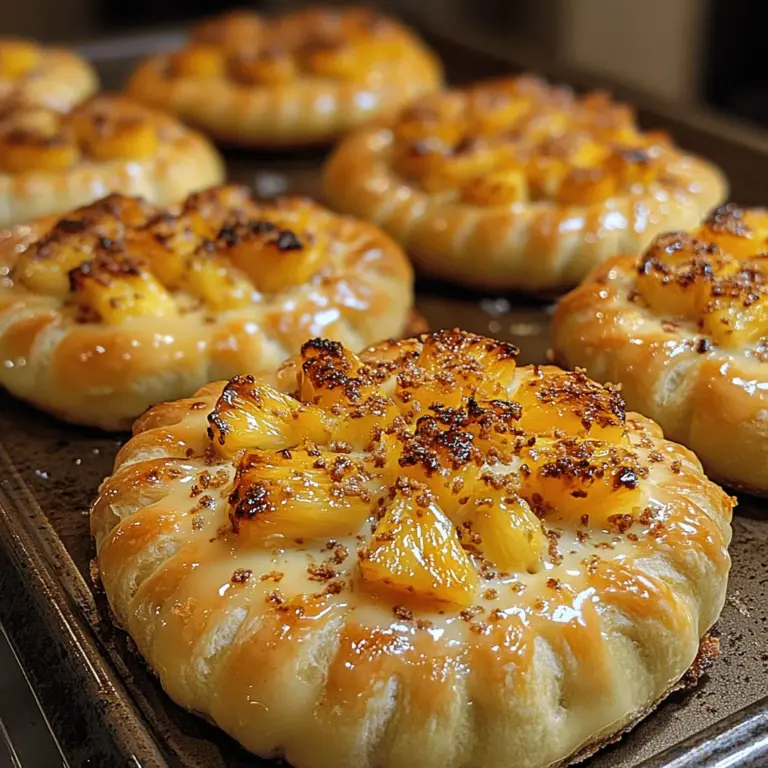
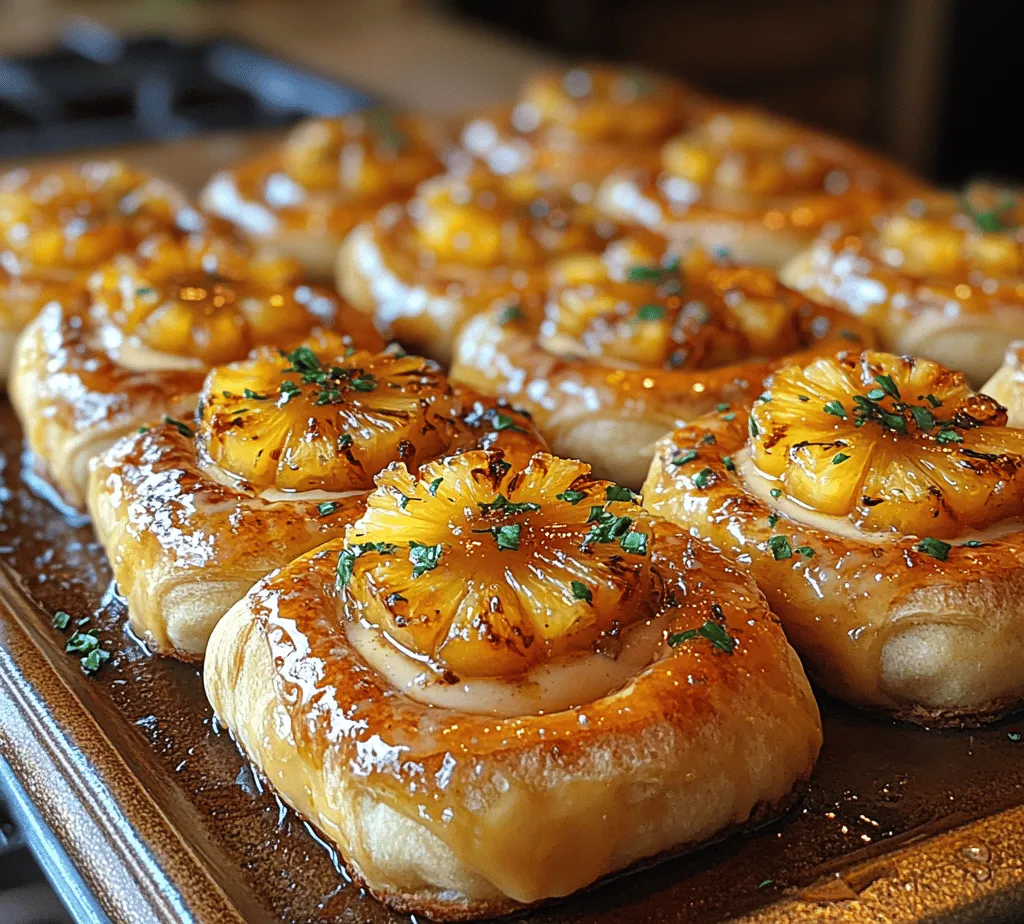
– Caramelizing Pineapple: To bring out the natural sweetness of the pineapple, we’ll caramelize it with brown sugar and cinnamon. This process involves cooking the pineapple until it softens and develops a golden, syrupy glaze. The caramelization not only enhances the flavor but also adds a beautiful, glossy finish to the Danish.
Creating the Glaze
No Danish is complete without a delicious glaze to finish it off.
– Purpose and Flavor of the Glaze: The glaze serves as a sweet finishing touch, adding a glossy sheen and extra sweetness to the pastry. It ties all the flavors together, making the Hawaiian Paradise Cheesecake Danish even more irresistible.
– Ingredients for the Glaze: Typically, the glaze consists of powdered sugar and a liquid component, such as milk or pineapple juice. The use of pineapple juice can enhance the tropical flavor of the dish, while powdered sugar creates a smooth, pourable consistency.
– Significance of the Glaze: This simple yet effective addition ensures that every bite of your Danish is not only beautiful but also bursting with flavor, making it the perfect crowning touch to your tropical treat.
Step-by-Step Preparation
Now that you have an understanding of the ingredients, let’s move on to the preparation process. Following these steps will ensure that your Hawaiian Paradise Cheesecake Danish turns out perfect every time.
Preheating the Oven
Proper oven temperature is crucial for baking.
– Importance of Proper Oven Temperature: Preheating your oven ensures that the Danish pastry cooks evenly. A well-heated oven will create a beautifully risen and golden-brown pastry, while also allowing the cream cheese filling to set properly.
– Preparing the Baking Sheet: Line your baking sheet with parchment paper to prevent sticking and to make cleanup easier. This simple step ensures that your Danish can be removed from the sheet without any hassle, preserving its shape and presentation.
By understanding the ingredients and preparing your workspace effectively, you’ll be well on your way to creating a Hawaiian Paradise Cheesecake Danish that will delight your taste buds and impress any gathering. In the next segment, we will delve deeper into the step-by-step instructions for assembling and baking this tropical treat, ensuring that you achieve the best results possible.
Preparing the Danish Dough
To create the perfect base for your Hawaiian Paradise Cheesecake Danish, you need to prepare the dough with care. Start by taking your pre-prepared Danish dough from the refrigerator. Place it on a lightly floured surface to prevent sticking.
1. Flattening and Rolling the Dough: Begin by gently pressing down on the dough with your fingertips to flatten it slightly. Using a rolling pin, roll the dough out into a rectangle, approximately 1/4 inch thick. Ensure that the dough is evenly rolled to maintain uniformity during baking.
2. Techniques for Uniformity in Dough Thickness: To achieve a consistent thickness, you can use wooden dowels placed on either side of the dough. This technique allows the rolling pin to glide smoothly over the dowels, ensuring an even surface. If the dough begins to stick, sprinkle a little more flour on the surface and the dough itself.
Making the Cream Cheese Filling
The cream cheese filling is the heart of your Danish, providing a rich and tangy contrast to the sweet pineapple topping.
1. Step-by-Step Guide to Mixing the Filling: In a medium bowl, combine 8 ounces of softened cream cheese, 1/4 cup of granulated sugar, 1 teaspoon of vanilla extract, and 1 egg yolk. Using an electric mixer, beat the mixture on medium speed until it is smooth and creamy, about 2-3 minutes. Scrape down the sides of the bowl with a spatula to ensure everything is well incorporated.
2. Tips for Achieving a Smooth and Creamy Texture: Ensure your cream cheese is softened to room temperature, as this will help achieve a lump-free filling. If you find lumps in your mixture, continue mixing or consider using a food processor for a velvety finish.
Assembling the Danish
Now that you have your dough and filling ready, it’s time to assemble your Danish.
1. Techniques for Placing the Filling and Folding the Dough: Lay the rolled-out dough on a parchment-lined baking sheet. Cut the dough into squares or rectangles, depending on your desired size. Place a generous spoonful of the cream cheese filling in the center of each piece.
2. Visual Cues for Sealing the Edges: To seal the Danish, fold the corners of the dough over the filling, creating a pinwheel or envelope shape. Press the edges firmly with your fingers to ensure a tight seal. For added security, you can use a fork to crimp the edges, which also adds a decorative touch.
Preparing the Pineapple Topping
The pineapple topping adds a tropical flair to your Danish, elevating its flavor profile.
1. Detailed Instructions for Sautéing the Pineapple: In a skillet over medium heat, melt 2 tablespoons of butter. Once melted, add 2 cups of fresh pineapple chunks. Sauté the pineapple for about 5-7 minutes, stirring occasionally, until it becomes tender and slightly caramelized.
2. Importance of Timing for Optimal Caramelization: Keep an eye on the pineapple to prevent it from becoming mushy. The aim is to achieve a golden-brown exterior while retaining the pineapple’s natural sweetness. If desired, you can sprinkle a tablespoon of brown sugar during the sautéing process to enhance caramelization.
Baking the Danish
Baking is the final step that brings all the components together.
1. Guidelines for Baking Time and Visual Indicators for Doneness: Preheat your oven to 375°F (190°C). Once your Danish are assembled, place them in the preheated oven and bake for 20-25 minutes. The Danish should be puffed up and golden brown when they are ready.
2. The Science Behind Achieving a Golden-Brown Finish: The Maillard reaction, which occurs during baking, is responsible for the beautiful golden color. This reaction happens when proteins and sugars in the dough are exposed to heat, creating that desirable crust. Ensure proper heat distribution in your oven by placing the baking sheet in the center.
Creating the Glaze
A sweet glaze ties the entire Danish together, adding a delightful finish.
1. Whisking Techniques for a Lump-Free Glaze: In a small bowl, combine 1 cup of powdered sugar with 2 tablespoons of milk or cream, and 1/2 teaspoon of vanilla extract. Using a whisk, mix until the glaze is smooth and free of lumps.
2. Consistency Adjustments Based on Preference: If the glaze is too thick, add a little more milk, one teaspoon at a time, until you reach your desired consistency. A thinner glaze will drizzle beautifully over the Danish, while a thicker glaze will create a more substantial topping.
Drizzling and Serving
Presentation is key when it comes to serving your Hawaiian Paradise Cheesecake Danish.
1. Best Practices for Glazing the Danish: Once the Danish are out of the oven and have cooled for about 10 minutes, use a spoon or a piping bag to drizzle the glaze over the top. Start in the center and move outward for an even distribution.
2. Serving Suggestions to Enhance Presentation: Serve your Danish warm or at room temperature on a large platter. Garnish with fresh mint leaves or additional pineapple slices for a vibrant look. Pair the Danish with a scoop of vanilla ice cream or a dollop of whipped cream for an indulgent treat.
Nutritional Breakdown
Understanding the nutritional aspects of your Hawaiian Paradise Cheesecake Danish can help with portion control and dietary considerations.
– Overview of Nutritional Aspects: Each Danish is approximately 300 calories, depending on the size and specific ingredients used. They contain a balance of carbohydrates, fats, and proteins, thanks to the dough and cream cheese filling.
– Portion Sizes and Potential Dietary Considerations: Consider serving half a Danish for a lighter treat or enjoy one as a satisfying dessert. If you are looking for a lighter version, you can substitute low-fat cream cheese or use a sugar alternative. Always be mindful of portion sizes, especially if you are watching your intake of sugars and fats.
Conclusion
Savor the tropical flavors of our Hawaiian Paradise Cheesecake Danish, a unique pastry that brings a taste of the islands to your kitchen. With its easy preparation and delightful combination of ingredients, this recipe is sure to become a family favorite. Whether enjoyed fresh from the oven or as a delightful treat later in the day, this Danish will leave everyone craving more. Embrace the joy of baking and share the warmth of Hawaiian-inspired treats with your loved ones.