Introduction
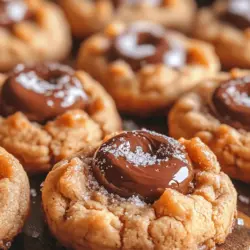
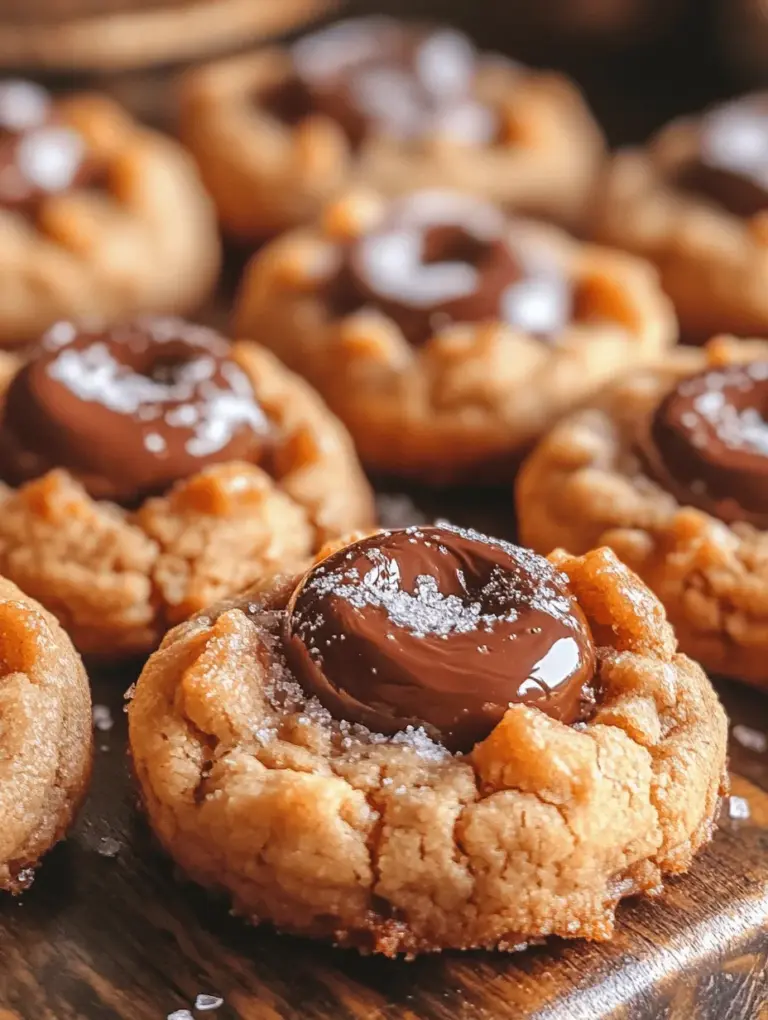
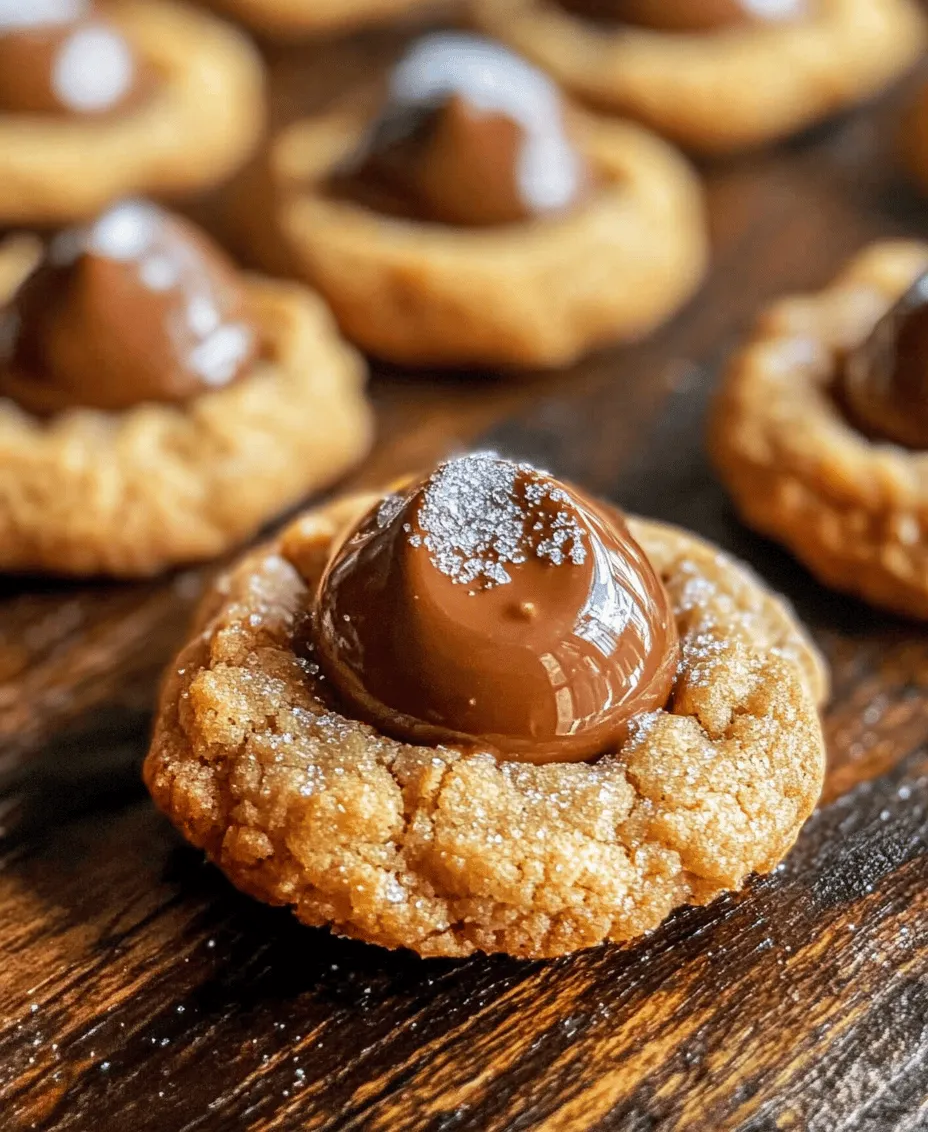
Peanut Butter Blossoms are a beloved classic in the realm of desserts, cherished by cookie lovers of all ages. Their delightful combination of creamy peanut butter and rich, velvety chocolate creates a symphony of flavors that captivates the palate. These cookies boast a soft and chewy texture, making them irresistibly delicious and a perfect treat for any occasion, from casual snacks to festive celebrations.
The unique charm of Peanut Butter Blossoms lies not only in their taste but also in their nostalgic presence in many kitchens across America. Whether you’re baking for a holiday gathering, a birthday party, or a simple family get-together, these cookies always seem to steal the show. With their recognizable shape and mouthwatering flavor, they evoke warm memories of childhood and family traditions, making them a staple in the cookie repertoire.
The Allure of Peanut Butter Blossoms
Peanut Butter Blossoms have a rich history in American baking culture, dating back to the 1930s. While the exact origin of the recipe is somewhat murky, it is widely believed that these cookies first gained popularity after being featured in various community cookbooks and magazines. Since then, they have continued to grace cookie trays and dessert tables, becoming a favorite among home bakers and professional chefs alike.
These delightful treats are especially popular during the holiday season, where they find their way into festive cookie exchanges and family celebrations. Their unique combination of flavors makes them an ideal choice for any occasion, inviting friends and family to gather and indulge in the simple joy of homemade cookies. The act of baking Peanut Butter Blossoms brings people together, fostering connections and sparking joy through the shared experience of enjoying a warm, fresh cookie straight from the oven.
The nostalgic aspect of these cookies cannot be overstated. Many of us have fond memories of baking Peanut Butter Blossoms with loved ones, watching as the chocolate kisses melt slightly into the warm cookie and eagerly waiting for them to cool just enough to devour. The tradition of baking and sharing these cookies has been passed down through generations, creating lasting memories that are cherished by families everywhere.
Understanding the Ingredients
To achieve the perfect batch of Soft & Chewy Peanut Butter Blossoms, it’s essential to understand the role each ingredient plays in the recipe. Each component contributes to the overall flavor, texture, and structure of these delectable cookies.
Creamy Peanut Butter
The star ingredient of this recipe is, of course, creamy peanut butter. Not only does it provide a rich and nutty flavor, but it also contributes to the cookies’ chewy texture. The oils in peanut butter help keep the cookies moist, ensuring that each bite is packed with that signature peanut butter taste.
Granulated vs. Brown Sugar
In this recipe, both granulated and brown sugar are utilized, each serving a unique purpose. Granulated sugar adds sweetness and helps achieve a crispy exterior, while brown sugar contributes moisture and a slight chewiness due to its molasses content. This combination results in a cookie that is both sweet and satisfying, with a texture that is soft yet holds its shape.
Unsalted Butter
Unsalted butter is used in this recipe for its ability to control the overall flavor of the cookies. By using unsalted butter, you can better manage the salt content in the dough, allowing the natural flavors of the peanut butter and chocolate to shine through. Additionally, butter adds richness and helps create a tender crumb in the final baked cookies.
Egg
The egg in this recipe serves as a binding agent, providing the necessary structure to hold the cookies together. It also adds moisture, contributing to the soft and chewy texture that makes Peanut Butter Blossoms so irresistible.
Vanilla Extract
Vanilla extract is a key ingredient that enhances the overall flavor of the cookies. It adds a warm, sweet aroma that complements the nutty notes of the peanut butter and the richness of the chocolate. A splash of vanilla elevates the taste profile, making these cookies even more delightful.
Baking Soda
Baking soda acts as a leavening agent, helping the cookies rise slightly as they bake. This ensures that the final product is light and fluffy, with a soft texture that melts in your mouth. The reaction between the baking soda and the acidic components, such as brown sugar, creates that perfect cookie lift.
All-Purpose Flour
All-purpose flour is the foundation of the cookie dough, providing structure and stability. It balances the wet ingredients and ensures that the cookies maintain their shape during baking. The right amount of flour is crucial; too much can lead to a dry cookie, while too little can result in a flat, overly chewy texture.
Chocolate Kisses
No Peanut Butter Blossom would be complete without the signature touch of chocolate kisses. These delightful chocolates are pressed into the center of each cookie right after baking, adding a rich burst of chocolate flavor that contrasts beautifully with the creamy peanut butter. As the kisses melt slightly, they create a lovely presentation and an irresistible taste that makes these cookies truly special.
Step-by-Step Instructions for Perfect Cookies
To create the ultimate Soft & Chewy Peanut Butter Blossoms, follow these detailed steps, starting with essential kitchen prep.
Prepping the Kitchen
Before diving into the mixing and baking process, it is vital to prepare your kitchen. Begin by preheating your oven to 350°F (175°C). This ensures that the cookies bake evenly and achieve that perfect golden-brown color. While the oven is heating, prepare your baking sheet by lining it with parchment paper or a silicone baking mat. This not only helps prevent the cookies from sticking but also makes cleanup a breeze.
Once your oven is ready and your baking sheet is lined, gather all your ingredients. Having everything measured and at the ready will make the baking process smoother and more enjoyable. This is a great time to ensure you have all the necessary tools on hand, including mixing bowls, measuring cups, a spoon or spatula for mixing, and a cookie scoop for even portions.
With your kitchen prepped and your ingredients gathered, you’re all set to start mixing the dough for these delightful cookies. The next steps will guide you through creating the perfect cookie dough that will result in Soft & Chewy Peanut Butter Blossoms everyone will love.
Mixing the Dough
To create the perfect Soft & Chewy Peanut Butter Blossoms, the first step is mixing the dough, which sets the foundation for the texture and flavor of your cookies. Begin by creaming together the softened unsalted butter and granulated sugar in a large mixing bowl. This process is essential as it incorporates air into the mixture, resulting in a light and fluffy texture. Use an electric mixer on medium speed for about 2-3 minutes until the mixture turns pale and creamy.
Next, add in the brown sugar, which will contribute moisture and enhance the caramel-like flavor of the cookies. Mix until fully combined. It’s crucial not to rush this step; proper creaming is key to achieving the right cookie structure. After the sugars and butter are well-blended, incorporate the peanut butter. Choose a creamy variety for the best results, as it blends seamlessly into the dough. Mix until the peanut butter is fully incorporated, ensuring there are no lumps.
Once the wet ingredients are ready, it’s time to add the eggs and vanilla extract. Beat in one egg at a time, mixing until just combined. This helps to maintain the dough’s integrity and prevents overmixing, which can lead to tough cookies. Finally, stir in the vanilla extract, which adds a delightful aroma and flavor.
Incorporating Dry Ingredients
With your wet ingredients thoroughly mixed, it’s time to incorporate the dry ingredients to form the cookie dough. In a separate bowl, whisk together all-purpose flour, baking soda, and a pinch of salt. The baking soda acts as a leavening agent, helping the cookies rise while the salt balances the sweetness.
Gradually add the dry mixture to the wet ingredients. It’s important to do this in two or three additions, mixing gently with a spatula or wooden spoon until just combined after each addition. This technique helps to ensure that the flour is evenly distributed without overworking the dough.
The goal is to achieve a dough that is slightly sticky but still holds its shape. If the dough feels too soft, you can chill it in the refrigerator for about 30 minutes, which will make it easier to handle during the shaping process.
Shaping the Cookies
Shaping your cookies correctly is vital for even baking. Start by preheating your oven to 350°F (175°C) and lining two baking sheets with parchment paper. Using a cookie scoop or your hands, portion out the dough into balls that are about one inch in diameter. Roll each ball in granulated sugar before placing them on the prepared baking sheets to create a sparkling finish.
When placing the cookie balls on the baking sheets, ensure they are spaced about 2 inches apart. This allows room for the cookies to spread as they bake. If you want to achieve a more uniform shape, gently press the top of each dough ball with the palm of your hand to flatten slightly. This helps them bake evenly while still maintaining a soft center.
Baking Process
Now that your cookies are shaped and on the baking sheets, it’s time to bake them. Place the sheets in the preheated oven and set a timer for about 8-10 minutes. Keep a close eye on them; you want to look for visual cues indicating they are ready. The edges should appear firm, while the centers still look slightly soft and puffy. If the cookies are browning too quickly, you can rotate the baking sheets halfway through baking to ensure even cooking.
Once the cookies have reached the desired appearance, remove them from the oven and let them cool on the baking sheets for about 5 minutes. This resting period helps them firm up before transferring them to a wire rack.
Adding Chocolate Kisses
The final touch to your Soft & Chewy Peanut Butter Blossoms is the chocolate kiss center. After the cookies have cooled slightly but are still warm, gently press a chocolate kiss into the center of each cookie. The warmth from the cookies will soften the chocolate, allowing it to meld beautifully with the peanut butter flavor. Timing is essential here; adding the kisses while the cookies are still warm ensures they adhere well, creating that iconic look and taste.
Baking Tips for Success
To achieve the best possible results with your Soft & Chewy Peanut Butter Blossoms, keep these baking tips in mind:
– Common Pitfalls: Overmixing can lead to tough cookies, so mix only until ingredients are combined. Additionally, be cautious not to overbake; cookies should be taken out when they still look slightly underbaked, as they will continue to cook on the baking sheet as they cool.
– Suggested Equipment: Use high-quality mixing bowls, measuring cups, and a cookie scoop for consistent sizes. A stand mixer can make the creaming process easier, but a hand mixer works just as well.
– Cooling Time: Allowing cookies to cool completely on a wire rack is crucial for achieving the right texture. This step helps the cookies firm up, maintaining their chewy center while developing flavor.
Variations on the Classic Recipe
While the classic Soft & Chewy Peanut Butter Blossoms are delightful on their own, there are plenty of ways to put a unique spin on this recipe:
– Alternative Nut Butters: For those with peanut allergies, consider using almond butter, cashew butter, or sunflower seed butter as substitutes. Each will impart its own flavor while maintaining the cookie’s chewy texture.
– Incorporating Mix-Ins: Add chocolate chips, butterscotch chips, or chopped nuts into the dough for an added layer of flavor and texture. Make sure to fold in these mix-ins gently to avoid overmixing.
– Creative Presentation: To elevate the look of your cookies, consider decorating with sprinkles before baking or using flavored chocolate kisses, such as caramel or mint, for an exciting twist.
Storage and Shelf Life
To ensure your Soft & Chewy Peanut Butter Blossoms remain fresh and delicious, follow these storage recommendations:
– Best Practices: Store cookies in an airtight container at room temperature. This will help maintain their soft and chewy texture. If you prefer, you can layer them with parchment paper to prevent sticking.
– Freezing Dough: If you want to bake cookies at a later time, freeze the unbaked dough balls. Place them on a baking sheet in the freezer until solid, then transfer to a freezer bag. When ready to bake, simply add a couple of minutes to the baking time while keeping an eye on them.
– Keeping Cookies Soft: To keep your cookies soft and chewy over time, store them with a slice of bread in the container. The bread will help maintain moisture, ensuring your cookies stay fresh for longer.
Conclusion
Baking Soft & Chewy Peanut Butter Blossoms is not just about creating a sweet treat; it’s about the joy and satisfaction that comes from making something delicious with your own hands. Each bite of these cookies delivers a perfect balance of rich peanut butter flavor and smooth chocolate, making them a favorite for family gatherings or a simple afternoon snack.
We encourage you to give this recipe a try and share the delightful results with your loved ones. There’s something inherently comforting about homemade cookies that brings happiness to both the baker and those who enjoy them. So gather your ingredients, roll up your sleeves, and indulge in the warm, inviting aroma of freshly baked Soft & Chewy Peanut Butter Blossoms.