Introduction to Tropical Bliss No-Bake Pineapple Popsicles
As the sun shines brighter and temperatures rise, there’s nothing quite like the refreshing taste of a popsicle to cool you down. Enter the Tropical Bliss No-Bake Pineapple Popsicles—a delightful fusion of tropical flavors that transports your taste buds straight to a sun-soaked paradise. These homemade treats are not only a simple indulgence for hot summer days but also a healthy choice for those looking to satisfy their sweet cravings without the guilt. Made with fresh pineapple, creamy coconut milk, and a hint of natural sweetness, this recipe is ideal for anyone who wants to enjoy a refreshing dessert without the fuss of traditional baking.
The concept of no-bake popsicles has gained popularity due to their accessibility and ease of preparation. With minimal ingredients and equipment, you can whip up a batch of these Tropical Bliss popsicles in no time. Perfect for family gatherings, pool parties, or simply enjoying a quiet afternoon, these frozen delights are a fantastic way to celebrate the flavors of summer in every bite. In this article, we will delve into the delightful world of tropical popsicles, offering you a detailed guide on how to create these blissful frozen treats from scratch.
Understanding the Ingredients
To craft the perfect Tropical Bliss No-Bake Pineapple Popsicles, it’s essential to understand the role each ingredient plays in the overall flavor and texture. Let’s explore the components that make this recipe not just delicious, but also nutritious.
Exploring the Freshness of Pineapple
At the heart of this popsicle recipe is fresh pineapple, a tropical fruit celebrated for its vibrant flavor and numerous health benefits. Pineapple is packed with essential vitamins and minerals, particularly vitamin C, manganese, and bromelain, an enzyme known for its anti-inflammatory properties. When selecting pineapple for your popsicles, you have two options: fresh or canned.
Choosing Between Fresh and Canned Pineapple
While canned pineapple is convenient, fresh pineapple offers superior flavor and nutritional value. If you opt for fresh pineapple, look for a fruit that’s slightly soft to the touch and has a sweet, fragrant aroma. If you decide to use canned pineapple, choose varieties packed in their own juice rather than syrup to minimize added sugars.
Tips for Cutting Fresh Pineapple
Cutting fresh pineapple can be daunting, but with a few simple tips, you can navigate this task with ease. Start by removing the crown and base of the pineapple to create a stable base. Then, using a sharp knife, slice off the skin in downward strokes, ensuring you remove the eyes of the fruit. Once the skin is off, slice the pineapple into quarters and remove the core before chopping it into bite-sized pieces for blending.
The Creamy Goodness of Coconut Milk
Coconut milk brings a rich, creamy texture to these popsicles, enhancing the tropical experience. This dairy-free alternative is not only delicious but also packed with health benefits. Coconut milk is high in medium-chain triglycerides (MCTs), which can support weight management and provide a quick source of energy.
Differences Between Full-Fat and Light Coconut Milk
When choosing coconut milk, you’ll find options such as full-fat and light coconut milk. Full-fat coconut milk offers a creamier texture and richer flavor, while light coconut milk has fewer calories and fat content. Depending on your dietary preferences, you can choose either option without compromising the popsicle’s delightful taste.
Substitutions for Coconut Milk
If you’re looking for alternatives to coconut milk due to allergies or dietary restrictions, consider using almond milk or oat milk. Both options will yield a different flavor profile but still create a refreshing popsicle.
Sweetening it Right: Honey vs. Agave Syrup
To achieve the perfect level of sweetness in your Tropical Bliss No-Bake Pineapple Popsicles, natural sweeteners like honey or agave syrup are excellent choices. Honey is not only a natural sweetener but also boasts antibacterial properties and antioxidants. Agave syrup, on the other hand, is a lower-glycemic option that is sweeter than honey, allowing you to use less.
How to Adjust Sweetness to Personal Taste
When preparing your popsicles, start with a small amount of sweetener and taste the mixture before adding more. This allows you to customize the sweetness to your liking, ensuring your popsicles are perfectly balanced.
Alternatives for Those with Dietary Restrictions
For those avoiding honey or agave syrup, alternatives like maple syrup or stevia can also work well in this recipe. These natural sweeteners provide a delightful flavor without compromising dietary choices.
The Role of Vanilla Extract
A splash of vanilla extract elevates the flavor profile of your popsicles, providing a warm, aromatic note that complements the tropical ingredients beautifully. When selecting vanilla extract, opt for pure vanilla for the best taste, as artificial vanilla may not deliver the same depth of flavor.
The Optional Creaminess of Greek Yogurt
For an extra layer of creaminess and protein, consider adding Greek yogurt to your popsicle mixture. This ingredient contributes a tangy flavor and enhances the texture, making your popsicles even more satisfying. If you prefer a dairy-free option, coconut yogurt or almond yogurt can be great substitutes.
Step-by-Step Guide to Making Tropical Bliss No-Bake Pineapple Popsicles
Now that you have a comprehensive understanding of the ingredients, it’s time to dive into the step-by-step process of making these delightful Tropical Bliss No-Bake Pineapple Popsicles. The first crucial step is to blend the perfect base for your popsicles.
Blending the Perfect Base
The blending process is essential in achieving a smooth and creamy consistency for your popsicles. Start by combining your fresh pineapple chunks, coconut milk, sweetener, vanilla extract, and Greek yogurt (if using) in a high-speed blender.
Techniques for Blending Fruit for Popsicles
To achieve the best results, blend the ingredients on high speed until the mixture is completely smooth. If needed, you can pause periodically to scrape down the sides of the blender. This ensures that all ingredients are well incorporated, creating a uniform consistency that will freeze beautifully.
Achieving the Right Texture and Consistency
The ideal popsicle mixture should be thick yet pourable. If the mixture is too thick, you can add a splash of coconut milk to loosen it. Conversely, if it’s too thin, add more pineapple or yogurt to thicken it up. The goal is to create a creamy base that will solidify into a delightful frozen treat.
Conducting a Taste Test
Before pouring your mixture into molds, it’s essential to conduct a taste test. This step allows you to adjust the flavors according to your preference. If you find the mixture needs more sweetness, add additional honey or agave syrup. If you crave a bolder pineapple flavor, consider adding a bit more fresh pineapple.
This initial preparation paves the way for the delightful tropical popsicles that will soon become a favorite in your household. With each bite, you’ll experience the vibrant flavors of the tropics, making your summer days a little bit sweeter and infinitely more refreshing.
Molding Your Popsicles
When it comes to freezing your delightful Tropical Bliss No-Bake Pineapple Popsicles, the choice of mold can significantly impact the ease of removal and the final presentation of your popsicles.
Types of Molds: Silicone vs. Plastic
There are two primary types of molds to consider: silicone and plastic. Silicone molds are often favored for their flexibility, which allows for easy removal of frozen treats. They come in various shapes and sizes, making them an attractive option for presentation. On the other hand, plastic molds are typically sturdier and can be more affordable, but they may require some additional effort to release the popsicles.
How to Properly Prepare Molds for Easy Removal
Regardless of the mold type you choose, proper preparation is key to ensuring a smooth removal process. If you’re using plastic molds, consider lightly spraying them with a cooking spray or rubbing them with a thin layer of coconut oil before pouring in the mixture. This will create a non-stick surface and make it easier to release the popsicles once frozen. For silicone molds, this step is often unnecessary due to their inherent flexibility; however, if you’re concerned about sticking, a light coating can still help.
Inserting Sticks: A Quick Guide
Once your molds are prepared, the next step is to insert the sticks properly.
Best Practices for Inserting Sticks
For the best results, insert sticks into the popsicles after they have partially frozen. Allow the mixture to freeze for about 1-2 hours, or until it starts to firm up. At this point, you can carefully push the sticks into the center of each mold. This method helps ensure that the sticks remain centered and upright as the popsicles freeze completely.
Alternative Methods for Molds Without Built-In Sticks
If your molds do not come with built-in sticks, you can use wooden popsicle sticks or even sturdy plastic straws as alternatives. Just be sure to insert them after the initial freezing period, as mentioned earlier. If you’re using a straw, make sure to cut it to the desired length so it fits well within the mold.
Freezing for Perfection
The freezing process is where the magic happens, transforming your tropical mixture into creamy popsicles.
The Science Behind Freezing Popsicles
When you freeze popsicles, the water content in the mixture turns into ice crystals, while the sugars and fats create a smooth texture. The balance of these components is crucial for achieving that creamy, delightful consistency. Too much water can lead to ice crystals, making the popsicles gritty, while too little can result in a popsicle that is too solid.
How Long to Freeze for Optimal Texture
For the best texture, allow your popsicles to freeze for at least 4-6 hours, or until they are completely solid. If you’re short on time, a minimum of 3 hours may suffice, but the longer freezing time will yield a creamier result. To check if they are ready, gently wiggle one of the molds; if it feels solid and firm, your popsicles are good to go!
Releasing the Popsicles
Once your popsicles have frozen to perfection, it’s time to remove them from their molds.
Techniques for Easy Removal from Molds
To release the popsicles, you can simply run warm water over the outside of the molds for a few seconds. This will slightly melt the surface of the popsicle, allowing it to slide out more easily. Be careful not to soak the molds, as too much heat can affect the texture of the popsicle.
Troubleshooting Common Issues in Popsicle Removal
If you encounter difficulty in removing the popsicles, try these troubleshooting tips:
– Frozen Sticks: If the sticks are stuck, simply wiggle them gently while pulling. The slight movement can help free them.
– Stuck Popsicles: If the entire popsicle is stuck, return it to the freezer for a few more minutes and try again. Sometimes, a little more freezing can solidify any partially melted areas.
Serving Suggestions and Presentation
Presentation is key when serving your Tropical Bliss No-Bake Pineapple Popsicles. Here are some creative ideas to elevate your serving experience.
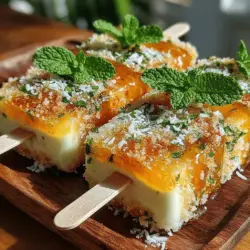
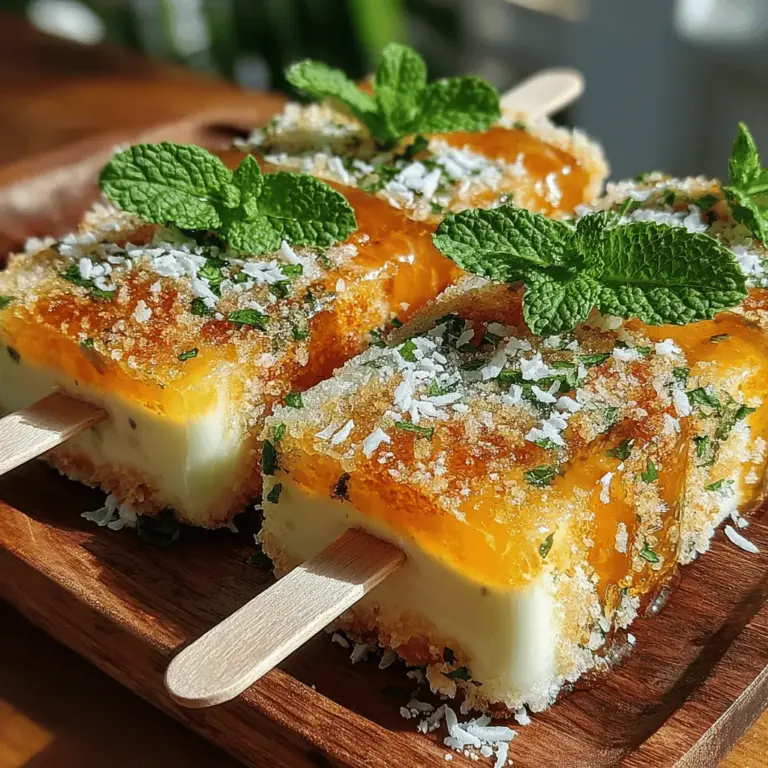
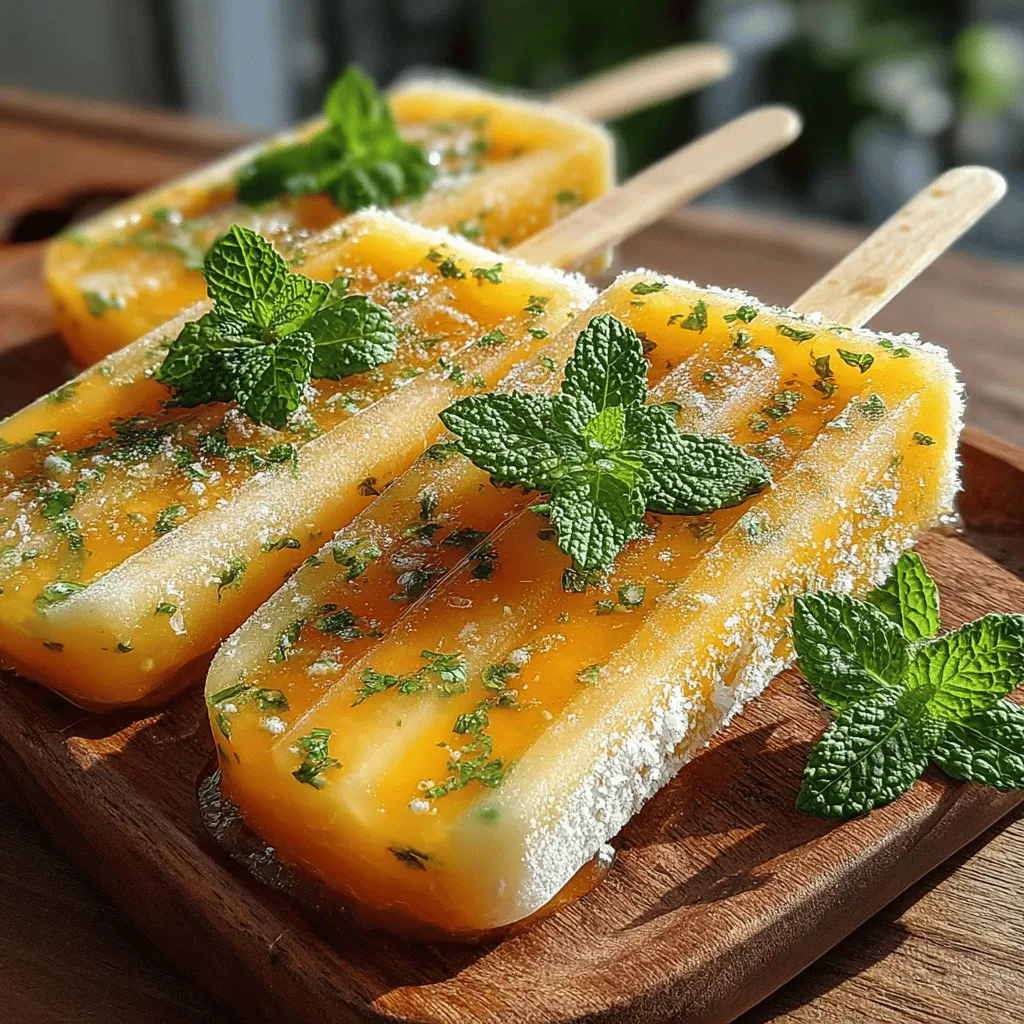
Garnishing for Visual Appeal
A beautifully garnished popsicle can entice anyone to take a bite.
The Role of Fresh Mint in Garnishing
Fresh mint leaves are a perfect complement to the tropical flavors of pineapple. Not only do they add a pop of color, but they also provide a refreshing aroma. Simply place a sprig of mint on top of your popsicle before serving for an elegant touch.
Other Garnishing Ideas to Elevate Your Popsicles
Consider these garnishing ideas to further enhance the visual appeal of your popsicles:
– Coconut Flakes: A sprinkle of toasted coconut flakes adds texture and a tropical flair.
– Sliced Fruit: Place a slice of fresh pineapple or kiwi on top for a burst of color and flavor.
– Chocolate Drizzle: For an indulgent twist, drizzle melted dark chocolate over the popsicles before serving.
Creative Serving Ideas
Popsicles are not just for individual enjoyment; they can be a centerpiece at gatherings.
Serving Popsicles at Parties or Gatherings
Set up a popsicle station at your next summer party. Arrange the popsicles on a platter surrounded by fresh fruit, coconut flakes, and mint leaves, allowing guests to customize their own creations. This interactive experience is sure to be a hit with friends and family.
Pairing with Other Summer Treats
These popsicles pair wonderfully with other summer treats. Serve them alongside a light fruit salad, or offer a selection of ice creams for a refreshing dessert spread. They also make a great accompaniment to tropical-themed cocktails for adult gatherings.
Nutritional Information and Health Benefits
Understanding the nutritional profile of your Tropical Bliss No-Bake Pineapple Popsicles can help you make informed choices.
Analyzing the Nutritional Profile
Each popsicle is not only delicious but also relatively healthy. Here’s a breakdown of the nutritional content:
– Calories: Approximately 80-100 calories per popsicle, depending on the ingredients used.
– Fats: Mostly from coconut milk, which provides healthy fats beneficial for heart health.
– Sugars: Natural sugars from the pineapple and coconut, offering a sweet treat without added sugars.
Health Advantages of Pineapple and Coconut Milk
Both pineapple and coconut milk are packed with health benefits:
– Pineapple is rich in vitamin C, which boosts the immune system, and bromelain, an enzyme that aids digestion.
– Coconut Milk provides healthy fats that can improve heart health and promote satiety, making it an excellent base for your popsicles.
Incorporating Popsicles into a Healthy Diet
These popsicles can easily fit into a balanced diet.
Balancing Treats with Nutrition
While these popsicles are a delightful treat, they can be enjoyed as part of a healthy lifestyle. Pair them with a nutritious meal or snack to maintain balance in your diet.
Suggestions for Portion Control
For those watching their portions, consider making smaller popsicles using mini molds. This allows you to enjoy the flavor without overindulging. Alternatively, cut the popsicles in half for a smaller serving option.
Conclusion: Enjoying Your Tropical Bliss No-Bake Pineapple Popsicles
In conclusion, the Tropical Bliss No-Bake Pineapple Popsicles are a delightful way to celebrate the flavors of summer while indulging in a healthy treat. With a simple blend of fresh ingredients and minimal preparation, these popsicles offer a refreshing escape from the heat. Whether you’re enjoying them by the pool or serving them at a family gathering, these popsicles are sure to bring smiles and satisfaction to all who indulge. Embrace the tropical bliss and the joy of creating your own frozen masterpieces!