
Introduction
Lemon bars are a classic dessert that has stood the test of time, captivating taste buds with their refreshing tartness and sweet finish. These delightful treats are characterized by a buttery crust topped with a luscious, zesty lemon filling that melts in your mouth. Their bright flavor profile and simple preparation make them a favorite among dessert lovers. Whether you’re planning a family gathering, looking for the perfect dish to bring to a potluck, or simply craving a delightful homemade treat, these zesty lemon bars are the ideal solution. In this article, we’ll explore the rich history of lemon bars, break down the essential ingredients, and guide you through the step-by-step process to create your own batch of these irresistible desserts.
Understanding Lemon Bars
Lemon bars have a fascinating history that dates back to the early 20th century. Originating in the United States, they are believed to have been popularized in the 1960s when home baking gained momentum. Their simple ingredients and straightforward preparation appealed to many home cooks, making them a staple in American dessert culture.
Over the years, lemon bars have gained popularity in various cultures, each adding its unique twist to the classic recipe. In some regions, you may find variations that incorporate different citrus fruits, such as lime or orange, while others may play with the texture and presentation, adding meringue or whipped cream on top. Despite these variations, the fundamental appeal of lemon bars remains the same: a delightful balance of tartness and sweetness that brings joy to any occasion.
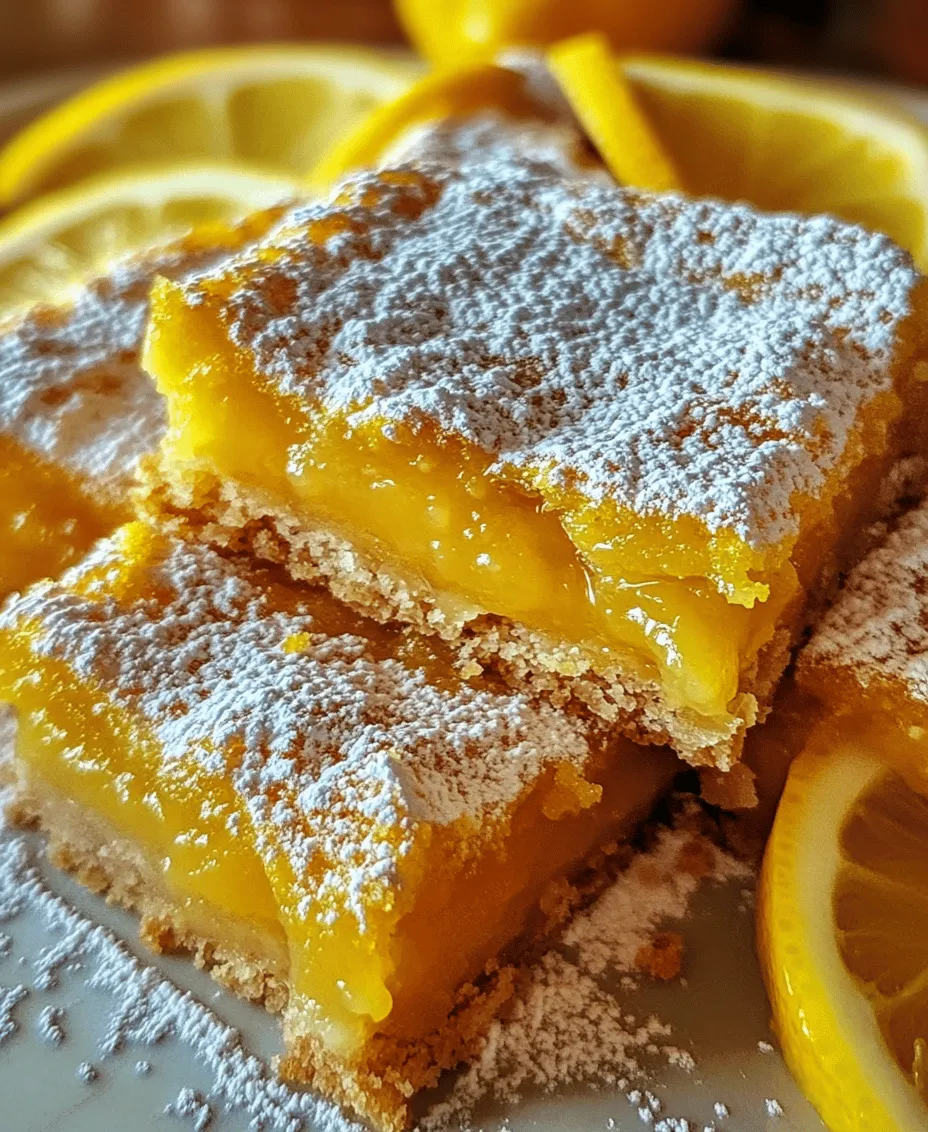
The magic of lemon bars lies in their flavor balance. The tartness of freshly squeezed lemons harmonizes beautifully with the sweetness of sugar, creating a dessert that is bright and refreshing. This balance is what makes them so versatile; they are perfect for summer picnics as well as cozy winter gatherings. The vibrant yellow color of lemon bars also adds a cheerful touch to any dessert table, making them a visual treat as well.
Ingredients Breakdown
To create your own zesty lemon bars, it’s essential to understand the role of each ingredient. Here’s a detailed breakdown of what you’ll need:
– All-purpose flour: This is the backbone of both the crust and the filling. It provides structure and stability, allowing the bars to hold their shape once baked. When mixed with butter and sugar, it creates a crumbly yet firm crust that perfectly complements the smooth lemon filling.
– Powdered sugar: Often used in the crust, powdered sugar lends a fine texture and sweetness. Unlike granulated sugar, powdered sugar dissolves more easily, which helps create a tender crust. It also adds a touch of sweetness without overpowering the lemon flavor.
– Unsalted butter: This ingredient is crucial for flavor and moisture. Unsalted butter allows you to control the saltiness of your dessert, giving you the flexibility to balance flavors to your liking. The butter, when creamed with sugar, creates a rich base for the crust, contributing to its melt-in-your-mouth quality.
– Granulated sugar: Essential for the filling, granulated sugar provides the sweetness needed to balance the tartness of the lemons. It also plays a role in the filling’s texture, helping it to set properly while still remaining soft and creamy.
– Eggs: Eggs serve as the binding agent in the filling. They create a custard-like texture that is both rich and smooth. The proteins in the eggs help set the filling as it bakes, ensuring that the lemon bars hold together beautifully.
– Freshly squeezed lemon juice: This is the star of the show! Fresh lemon juice is vital for achieving that zesty flavor that lemon bars are known for. Using fresh lemons not only enhances the taste but also ensures that you’re incorporating natural acidity, which elevates the overall flavor of the dessert. Bottled lemon juice, while convenient, often lacks the brightness of fresh juice.
– Lemon zest: Zest adds an extra layer of lemon flavor and aroma, making your bars even more fragrant and flavorful. The essential oils found in the zest provide a vibrant lemony punch that complements the juice and enhances the overall citrus experience.
– Baking powder: A small amount of baking powder is typically added to the filling to help it rise slightly during baking, resulting in a lighter texture. It helps give the filling a little lift and a more delicate crumb.
– Pinch of salt: Salt is an essential component in baking, as it enhances all the other flavors in the dessert. A pinch of salt in the crust and filling helps to balance the sweetness and tartness, making the overall taste more complex and enjoyable.
Step-by-Step Instructions
Now that you have a solid understanding of the ingredients and their roles, let’s dive into the step-by-step process of making these zesty lemon bars. Follow these simple instructions, and you’ll have a batch of delicious lemon bars ready to impress your friends and family.
Step 1: Preheat the Oven
Begin by preheating your oven to 350°F (175°C). This ensures that your lemon bars bake evenly and come out perfectly set.
Step 2: Prepare the Baking Dish
Line an 8×8-inch baking dish with parchment paper, allowing some overhang on the sides. This will make it easy to lift the bars out once they are cooled. Lightly grease the parchment paper with cooking spray or butter to ensure the bars don’t stick.
Step 3: Make the Crust
1. In a mixing bowl, combine 1 cup of all-purpose flour and 1/4 cup of powdered sugar.
2. Cut in 1/2 cup of unsalted butter (softened at room temperature) using a pastry cutter or your fingers until the mixture resembles coarse crumbs. The goal is to incorporate the butter into the flour and sugar mixture without melting it.
3. Press the mixture evenly into the bottom of the prepared baking dish.
Step 4: Bake the Crust
Place the crust in the preheated oven and bake for about 15-20 minutes, or until the edges are lightly golden. Keep an eye on it to avoid overbaking.
Step 5: Prepare the Filling
While the crust is baking, you can prepare the lemon filling. In a separate bowl, whisk together:
– 1 cup of granulated sugar
– 2 large eggs
– 1/3 cup of freshly squeezed lemon juice
– 1 tablespoon of lemon zest
– 1/2 teaspoon of baking powder
– A pinch of salt
Whisk until the mixture is smooth and well combined, ensuring there are no lumps.
Step 6: Add the Filling
Once the crust is golden and out of the oven, pour the lemon filling over the hot crust. This helps the filling to set properly and creates a lovely texture.
Step 7: Bake the Lemon Bars
Return the baking dish to the oven and bake for an additional 20-25 minutes, or until the filling is set and the edges are lightly browned. The center may still have a slight wobble; it will firm up as it cools.
Step 8: Cool and Slice
After baking, remove the lemon bars from the oven and let them cool in the baking dish for about 30 minutes. Then, transfer them to the refrigerator to chill for at least 1 hour before slicing. Chilling the bars will make them easier to cut and will enhance the flavors.
Step 9: Serve and Enjoy
Once chilled, use the parchment overhang to lift the bars out of the pan. Cut them into squares or rectangles, dust with additional powdered sugar if desired, and serve. Enjoy your homemade zesty lemon bars, a perfect balance of sweet and tart that will delight your palate!
With these steps, you have a comprehensive guide to creating your own zesty lemon bars. In the next section, we will delve into some tips for achieving the best results and answer common questions about this delightful dessert.
Preheat the Oven
Before diving into the specifics of crafting your lemon bars, it is crucial to preheat your oven to 350°F (175°C). Preheating is an essential step in baking because it ensures that your dessert starts cooking at the right temperature right from the get-go. An adequately preheated oven helps the crust achieve a golden-brown color while also setting the filling properly. Skipping this step may cause uneven baking, leading to a soggy crust or an undercooked filling, both of which can ruin your zesty lemon bars.
Prepare the Crust
The crust of your lemon bars should be buttery, crumbly, and flavorful. To achieve this, gather the following ingredients:
– 1 cup unsalted butter, softened
– 1/2 cup granulated sugar
– 2 cups all-purpose flour
– 1/4 teaspoon salt
1. Cream the Butter and Sugar: In a large mixing bowl, use an electric mixer to beat the softened butter and granulated sugar together until the mixture is light and fluffy. This process should take about 2-3 minutes. Creaming the butter and sugar well incorporates air, making your crust tender and airy.
2. Mix the Dry Ingredients: In another bowl, whisk together the flour and salt. Gradually add this dry mixture to the creamed butter and sugar, mixing on low speed until just combined. Be careful not to overmix; you want the dough to be crumbly but cohesive.
3. Chill the Dough: Once your crust mixture is combined, chill it in the refrigerator for about 30 minutes. Chilling helps the butter firm up, which prevents the crust from spreading too much during baking.
Press the Dough
Now that your dough is chilled, it’s time to press it into the baking pan. Here’s how to do it effectively:
1. Prepare the Pan: Line a 9×13 inch baking dish with parchment paper, allowing some overhang for easy removal later. This step is crucial for easy serving and cleanup.
2. Pressing Technique: Take the chilled dough and begin to break it into smaller pieces. Start pressing the dough into the bottom of the prepared pan. Use the palm of your hand or the bottom of a measuring cup to create an even layer. The key here is to ensure that the dough reaches the edges and corners without being too thick.
3. Prevent Stickiness: If the dough begins to stick to your hands or the utensils, lightly flour your hands or the measuring cup to help with the pressing. It’s important to achieve an even thickness—aim for about 1/4 inch thick across the pan.
Make the Filling
The filling is the star of the show, so let’s make it shine! For the filling, you will need:
– 1 1/2 cups granulated sugar
– 1/4 cup all-purpose flour
– 1/2 cup fresh lemon juice (about 2-3 lemons)
– 4 large eggs
– Zest of 2 lemons
1. Whisk the Dry Ingredients: In a medium bowl, combine the granulated sugar and flour. Mixing these ingredients first helps ensure that there are no lumps in your filling.
2. Add the Eggs: Crack in the eggs and whisk them into the sugar and flour mixture. Beat the mixture until well combined and smooth.
3. Incorporate Lemon Juice and Zest: Gradually whisk in the fresh lemon juice and zest. The acidity from the lemon juice will react with the eggs and sugar, creating a beautifully tangy filling.
Combine and Pour
With both the crust and filling prepared, it’s time to bring them together:
1. Pouring the Filling: Carefully pour the lemon filling over the pre-baked crust in the pan. Use a spatula to spread it evenly across the surface, ensuring you don’t disturb the crust too much.
2. Avoiding Damage: To avoid damaging the crust, you can pour the filling in a gentle stream, allowing it to settle into place without splashing.
Bake Again
Now, return the pan to the oven for the second bake. You’ll want to watch for specific signs indicating the filling is perfectly baked:
1. Baking Time: Bake the lemon bars for an additional 20-25 minutes. The filling should set but still have a slight jiggle in the center.
2. Signs of Doneness: Look for a light golden color on the edges and a slightly firm surface. A toothpick inserted into the center should come out mostly clean but with a bit of moist filling clinging to it.
Cool and Serve
Cooling is a vital step in achieving the perfect texture for your lemon bars:
1. Cooling Time: Once baked, remove the pan from the oven and allow it to cool at room temperature for about 30 minutes. After that, transfer it to the refrigerator to chill for at least 2 hours. Chilling helps the filling set completely, making it easier to cut into squares.
2. Serving: When ready to serve, use the overhanging parchment paper to lift the lemon bars out of the pan. Place them on a cutting board and slice into squares or rectangles. Dust with powdered sugar for an elegant finish.
Serving Suggestions
Lemon bars are versatile and can be served in numerous delightful ways:
– Pairing: Enjoy these zesty treats alongside a cup of tea or coffee. The bright flavor of lemon complements the warmth of your beverage beautifully.
– Garnishing: Consider garnishing with fresh berries like strawberries or blueberries for a pop of color and added flavor. A dollop of whipped cream can also elevate the dish.
– Presentation: Dusting the bars with powdered sugar not only adds sweetness but also enhances their visual appeal. Use a fine-mesh sieve for even dusting.
Variations
Get creative with your lemon bars! Here are a few variations to consider:
– Coconut Lemon Bars: Add shredded coconut to the crust for a tropical twist.
– Berry Lemon Bars: Incorporate fresh or frozen berries into the filling for a fruity enhancement.
– Herb-Infused Lemon Bars: Infuse the filling with fresh herbs like basil or mint for a unique flavor profile.
Nutritional Information
When it comes to enjoying lemon bars, it’s good to be mindful of their nutritional content. Here’s a general overview per serving (assuming 16 servings):
– Calories: Approximately 150
– Fat: 7g
– Carbohydrates: 22g
– Sugar: 10g
– Protein: 2g
For those with dietary restrictions, consider these modifications:
– Gluten-Free: Substitute all-purpose flour with a gluten-free blend, ensuring all other ingredients are also gluten-free.
– Vegan Options: Replace eggs with a vegan egg substitute (like flaxseed meal mixed with water) and use coconut oil instead of butter for a plant-based version.
Storage Tips
To keep your lemon bars fresh:
1. Refrigeration: Store leftover lemon bars in an airtight container in the refrigerator for up to one week. This helps maintain their texture and flavor.
2. Freezing: For longer storage, freeze the bars. Cut them into squares, layer them between sheets of parchment paper in a freezer-safe container, and store for up to three months. To thaw, simply leave them in the refrigerator overnight before serving.
Conclusion
Making zesty lemon bars is not just about baking; it’s about creating a delightful experience to share with family and friends. The bright, tangy flavor of lemon combined with a buttery crust makes these bars a timeless dessert choice that never goes out of style. Whether enjoyed on their own or paired with your favorite beverage, these treats are guaranteed to bring joy to any occasion.
So, gather your ingredients, follow the steps, and indulge in the delightful flavors of homemade lemon bars. This recipe is not just a culinary endeavor; it’s an invitation to savor the freshness of citrus and the warmth of shared moments. Embrace the versatility of lemon bars and let them become a cherished part of your dessert repertoire. Happy baking!